This is the default setting and the only one one available to Akeeba Backup Core. It does no post-processing. It simply leaves the backup archives on your server.
![[Note]](/media/com_docimport/admonition/note.png) | Note |
|---|---|
|
This feature is available only to Akeeba Backup Professional. |
Send by email
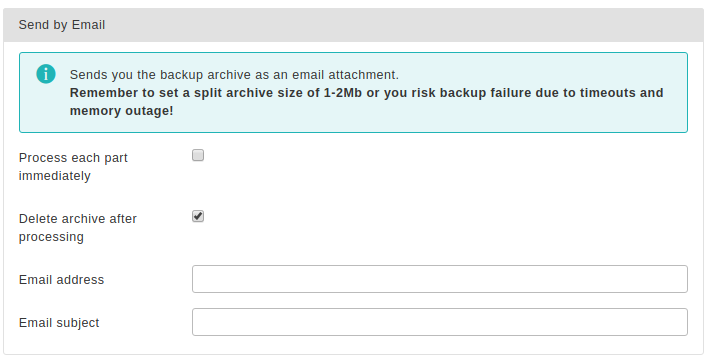
Akeeba Backup will send you the backup archive parts as file attachments to your email address. You need to be aware of the restrictions:
You MUST set the Part size for split archives setting of the Archiver engine to a value between 1-10 Megabytes. If you choose a big value (or leave the default value of 0, which means that no split archives will be generated) you run the risks of the process timing out, a memory outage error to occur or, finally, your email servers not being able to cope with the attachment size, dropping the email.
As a result, this is only suitable for really small sites.
The available configuration settings for this engine, accessed by pressing the button next to it, are:
- Process each part immediately
-
If you enable this, each backup part will be emailed to you as soon as it's ready. This is useful if you are low on disk space (disk quota) when used in conjunction with Delete archive after processing. When using this feature we suggest having 10Mb plus the size of your part for split archives free in your account. The drawback with enabling this option is that if the email fails, the backup fails. If you don't enable this option, the email process will take place after the backup is complete and finalized. This ensures that if the email process fails a valid backup will still be stored on your server. The drawback is that it requires more available disk space.
- Delete archive after processing
-
If enabled, the archive files will be removed from your server after they are emailed to you. Very useful to conserve disk space and practice the good security measure of not leaving your backups on your server.
- Email address
-
The email address where you want your backups sent to. When used with GMail or other webmail services it can provide a cheap alternative to proper cloud storage.
- Email subject
-
A subject for the email you'll receive. You can leave it blank if you want to use the default. However, we suggest using something descriptive, i.e. your site's name and the description of the backup profile.
| Note |
|---|---|
|
This feature is available only to Akeeba Backup Professional. Older versions of Akeeba Backup may not have all of the options discussed here. |
Using this engine, you can upload your backup archives to the Amazon S3 cloud storage service and other storage services providing an S3-compatible API.
This engine supports multi-part uploads to Amazon S3. This means that, unlike the other post-processing engines, even if you do not use split archives, Akeeba Backup will still be able to upload your files to Amazon S3. This new feature allows Akeeba Backup to upload your backup archive in 5Mb chunks so that it doesn't time out when uploading a very big archive file. That said, we STRONGLY suggest using a part size for archive splitting of 2000MB. This is required to work around a limitation on older versions of PHP which can cause the backup or extraction to fail if the backup size is equal to or greater than 2GB.
You can also specify a custom endpoint URL. This allows you to use this feature with third party cloud storage services offering an API compatible with Amazon S3 such as Cloudian, Riak CS, Ceph, Connectria, HostEurope, Dunkel, S3For.me, Nimbus, Walrus, GreenQloud, Scality Ring, CloudStack and so on. If a cloud solution (public or private) claims that it is compatible with S3 then you can use it with Akeeba Backup.
| Note |
|---|---|
|
Akeeba Backup 5.1.2 and later support the Beijing Amazon S3 region, i.e. storage buckets hosted in China. These buckets are only accessible from inside China and have a few caveats:
|
Upload to Amazon S3
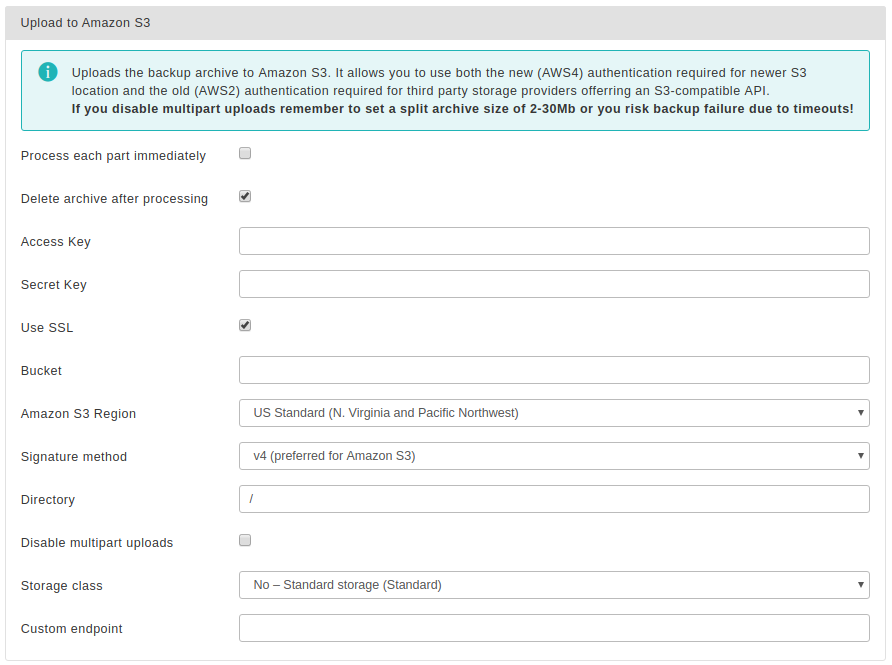
The required settings for this engine are:
- Process each part immediately
-
If you enable this, each backup part will be uploaded as soon as it's ready. This is useful if you are low on disk space (disk quota) when used in conjunction with Delete archive after processing. When using this feature we suggest having 10Mb plus the size of your part for split archives free in your account. The drawback with enabling this option is that if the upload fails, the backup fails. If you don't enable this option, the upload process will take place after the backup is complete and finalized. This ensures that if the upload process fails a valid backup will still be stored on your server. The drawback is that it requires more available disk space.
- Fail backup on upload failure
-
When this option is set to No (default) the backup will not stop if uploading the backup archive to the remote storage fails. A warning will be issued, but the backup will be marked as successful. You can then go to the Manage Backups page and retry uploading the backup archive to remote storage. This is useful if the backup failed to upload because of a transient network or remote server issue, or a misconfiguration you have fixed after the backup was taken. This also acts as a safety net: if your site breaks after the backup is taken you can restore from the latest backup archive which failed to upload —in whole or in part— to remote storage.
When this option is set to Yes the backup will stop as soon as Akeeba Backup detects that it failed to upload a backup archive to the remote storage. If you have set Process each part immediately to No (default) that will be it; the backup attempt will be marked as Failed and all backup archive files of this backup attempt will be removed. If you have set have set Process each part immediately to Yes and some backup archive files have already been uploaded to the remote storage they will be left behind when the backup attempt is marked as Failed; you will have to remove them yourself, manually, outside of Akeeba Backup. In either case you will not have a valid backup. If your site breaks before you can rectify the problem you are left without a backup.
Considering that the vast majority of the rare occurrences of backup upload failures we see are transient issues, we consider this option to be dangerous as it can unexpectedly leave you without a valid backup when you need one. It is far better to leave this setting set to No and monitor your backups for warnings. There are extremely few use cases where this option makes sense (e.g. taking a backup of a site on a server without enough space for both the backup archive and the site to coexist, a situation which is anyway problematic should you need to restore the backup). We very strongly recommend not enabling this option unless you have a compelling use case and understand the implications of potentially being left without a valid backup at random.
- Delete archive after processing
-
If enabled, the archive files will be removed from your server after they are uploaded to Amazon S3.
- Access Key
-
Your Amazon S3 Access Key. Required unless you run Akeeba Backup inside an EC2 instance with an attached IAM Role. Please read about this below.
- Secret Key
-
Your Amazon S3 Secret Key. Required unless you run Akeeba Backup inside an EC2 instance with an attached IAM Role. Please read about this below.
- Use SSL
-
If enabled, an encrypted connection will be used to upload your archives to Amazon S3.
![[Warning]](/media/com_docimport/admonition/warning.png)
Warning Do not use this option if your bucket name contains dots.
- Bucket
-
The name of your Amazon S3 bucket where your files will be stored in. The bucket must be already created; Akeeba Backup can not create buckets.
Warning DO NOT CREATE BUCKETS WITH NAMES CONTAINING UPPERCASE LETTERS. AMAZON CLEARLY WARNS AGAINST DOING THAT. If you use a bucket with uppercase letters in its name it is very possible that Akeeba Backup will not be able to upload anything to it. More specifically, it seems that if your web server is located in Europe, you will be unable to use a bucket with uppercase letters in its name. If your server is in the US, you will most likely be able to use such a bucket. Your mileage may vary. The same applies if your bucket name contains dots and you try using the Use SSL option, for reasons that have to do with Amazon S3's setup.
Please note that this is a limitation imposed by Amazon itself. It is not something we can "fix" in Akeeba Backup. If this is the case with your site, please DO NOT ask for support; simply create a new bucket whose name only consists of lowercase unaccented Latin characters (a-z), numbers (0-9) and dashes.
- Amazon S3 Region
-
Please select which S3 Region you have created your bucket in. This is MANDATORY for using the newer, more secure, v4 signature method. You can see the region of your bucket in your Amazon S3 management console. Right click on a bucket and click on Properties. A new pane opens to the left. The second row is labelled Region. This is where your bucket was created in. Go back to Akeeba Backup and select the corresponding option from the drop-down.
![[Important]](/media/com_docimport/admonition/important.png)
Important If you choose the wrong region the connection WILL fail.
Please note that there are some reserved regions which have not been launched by Amazon at the time we wrote this engine. They are included for forward compatibility should and when Amazon launches those regions.
- Signature method
-
This option determines the authentication API which will be used to "log in" the backup engine to your Amazon S3 bucket. You have two options:
-
v4 (preferred for Amazon S3). If you are using Amazon S3 (not a compatible third party storage service) and you are not sure, you need to choose this option. Moreover, you MUST specify the Amazon S3 Region in the option above. This option implements the newer AWS4 (v4) authentication API. Buckets created in Amazon S3 regions brought online after January 2014 (e.g. Frankfurt) will only accept this option. Older buckets will work with either option.
Important v4 signatures are only compatible with Amazon S3 proper. If you are using a custom Endpoint this option will NOT work.
-
v2 (legacy mode, third party storage providers). If you are using an S3-compatible third party storage service (NOT Amazon S3) you MUST use this option. We do not recommend using this option with Amazon S3 as this authentication method is going to be phased out by Amazon itself in the future.
-
- Bucket Access
-
This option determines how the API will access the Bucket. If unsure, use the
Virtual Hostingsetting.The two available settings are:
-
Virtual Hosting (recommended). This is the recommended and supported method for Amazon S3. Buckets created after May 2019 will only support this method. Amazon has communicated that this method is the only available in Amazon S3's API starting September 2020.
-
Path Access (legacy). This is the older, no longer supported method. You should only need to use it with a custom endpoint and ONLY if your storage provider has told you that you need to enable it.
-
- Directory
-
The directory inside your Amazon S3 bucket where your files will be stored in. If you want to use subdirectories, you have to use a forward slash, e.g.
directory/subdirectory/subsubdirectory.![[Tip]](/media/com_docimport/admonition/tip.png)
Tip You can use Akeeba Backup's backup naming variables in the directory name in order to create it dynamically. These are the same variables as what you can use in the archive name, i.e. [DATE], [TIME], [HOST], [RANDOM].
- Disable multipart uploads
-
Since Akeeba Backup 3.2, uploads to Amazon S3 of parts over 5Mb use Amazon's new multi-part upload feature. This allows Akeeba Backup to upload the backup archive in 5Mb chunks and then ask Amazon S3 to glue them together in one big file. However, some hosts time out while uploading archives using this method. In that case it's preferable to use a relatively small Part Size for Split Archive setting (around 10-20Mb, your mileage may vary) and upload the entire archive part in one go. Enabling this option ensures that, no matter how big or small your Part Size for Split Archives setting is, the upload of the backup archive happens in one go. You MUST use it if you get RequestTimeout warnings while Akeeba Backup is trying to upload the backup archives to Amazon S3.
- Storage class
-
Select the storage class for your data. Standard is the regular storage for business critical data. Please consult the Amazon S3 documentation for the description of each storage class.
Note Glacier and Deep Archive storage classes are much cheaper but have long delays (several seconds to several hours) in retrieving or deleting your files. Using these storage classes is not compatible with the Enable Remote Quotas configuration option and the Manage Remotely Stored Files feature in the Manage Backups page. This is a limitation of Amazon S3, not Akeeba Backup.
We strongly recommend not using these storage classes directly in Akeeba Backup. Instead, use one or more Lifecycle Policies in your Amazon S3 bucket. These can be configured in your Amazon S3 control panel and tell Amazon when to migrate your files between different storage classes. For example, you could use Intelligent Tiering in Akeeba Backup together with the Maximum Backup Age quotas and Remote Quotas to only keep the last 45 days of backup archives and the backups taken on the 1st of each month. You could then also add two lifecycle policies to migrate backup archives older than 60 days to Glacier and archives older than 180 days to Deep Archive. This way you would have enough backups to roll back your site in case of an emergency but also historical backups for safekeeping or legal / regulatory reasons. Feel free to adjust the time limits to best suit your business use case!
- Custom endpoint
-
Enter the custom endpoint (connection URL) of a third party service which supports an Amazon S3 compatible API. Please remember to set the Signature method to v2 when using this option.
Regarding the naming of buckets and directories, you have to be aware of the Amazon S3 rules (these rules are a simplified form of the list S3Fox presents you with when you try to create a new bucket):
-
Folder names can not contain backward slashes (\). They are invalid characters.
-
Bucket names can only contain lowercase letters, numbers, periods (.) and dashes (-). Accented characters, international characters, underscores and other punctuation marks are illegal characters.
Important Even if you created a bucket using uppercase letters, you must type its name with lowercase letters. Amazon S3 automatically converts the bucket name to all-lowercase. Also note that, as stated above, you may NOT be able to use at all under some circumstances. Generally, your should avoid using uppercase letters.
-
Bucket names must start with a number or a letter.
-
Bucket names must be 3 to 63 characters long.
-
Bucket names can't be in an IP format, e.g. 192.168.1.2
-
Bucket names can't end with a dash.
-
Bucket names can't have an adjacent dot and dash. For example, both
my.-bucketandmy-.bucketare invalid. It's best to avoid dots at all as they are incompatible with the Use SSL option.
If any - or all - of those rules are broken, you'll end up with error messages that Akeeba Backup couldn't connect to S3, that the calculated signature is wrong or that the bucket does not exist. This is normal and expected behaviour, as Amazon S3 drops the connection when it encounters invalid bucket or directory names.
Automatic provisioning of Access and Secret Key on EC2 instances with an attached IAM Role
Starting with version 6.2.0, Akeeba Backup can automatically provision temporary credentials (Access and Secret Key) if you leave these fields blank. This feature is meant for advanced users who automatically deploy multiple sites to Amazon EC2. This feature has four requirements:
-
Using Amazon S3, not a custom endpoint. Only Amazon S3 proper works with the temporary credentials issued by the EC2 instance.
-
Using the v4 signature method. The old signature method (v2) does not work with temporary credentials issued by the EC2 instance. This is because Amazon requires that the requests authenticated with these credentials to also include the Security Token returned by the EC2 instance, something which is only possible with the v4 signature method.
-
Running Akeeba Backup on a site which is hosted on an Amazon EC2 instance. It should be self understood that you can't use temporary credentials issued by the EC2 instance unless you use one. Therefore, don't expect this feature to work with regular hosting; it requires that your site runs on an Amazon EC2 server.
-
Attaching an IAM Role to the Amazon EC2 instance. The IAM Role must allow access to the S3 bucket you have specified in Akeeba Backup's configuration.
When Akeeba Backup detects that both the Access and Secret Key fields are left blank (empty) it will try to query the EC2 instance's metadata server for an attached IAM Role. If a Role is attached it will make a second query to the EC2 instance's metadata server to retrieve its temporary credentials. It will then proceed to use them for accessing S3.
The temporary credentials are cached by Akeeba Backup for the duration of the backup process. If they are about to expire or expire during the backup process new credentials will be fetched from the EC2 instance's metadata server using the same process.
Creating and attaching IAM Roles to EC2 instances is beyond the scope of our documentation and our support services. Please refer to Amazon's documentation.
This provides integration with the low cost, high resiliency BackBlaze B2 storage service.
Before you configure Akeeba Backup you need to obtain an
application key from the BackBlaze B2 service. Start by logging
into your account. From the side bar select App Keys.
Click the
button. Remember to select the bucket where your backups will be
saved to in Allow access to Bucket(s) and
set the Type of Access to Read and
Write. Click on .
You will be presented with a message showing your
keyID, keyName,
S3 Endpoint and
applicationKey. Write this information
down. You will not see it again!
| Note |
|---|---|
|
The BackBlaze B2 feature does NOT use the Amazon S3 endpoint. It uses the official BackBlaze B2 API. If you find that the API is slow or unreliable on your host you can use your B2 storage bucket with Akeeba Backup's Upload to Amazon S3 feature. The custom endpoint you need to use is the S3 Endpoint given to you by BackBlaze. Use the keyID as your Access Key and the applicationKey as your Secret Key. The Bucket Name you need is the same one you are using on BackBlaze. Do remember to set the signature method to v2 instead of v4. |
Upload to BackBlaze B2
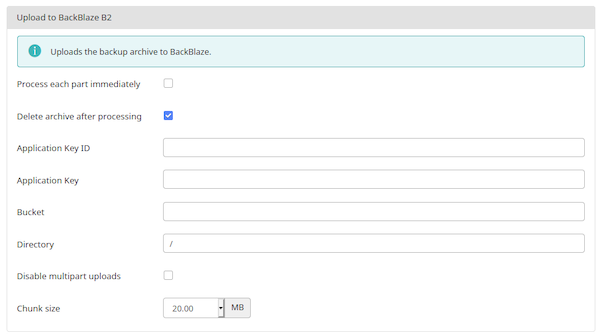
The parameters for this engine are:
- Process each part immediately
-
If you enable this, each backup part will be uploaded as soon as it's ready. This is useful if you are low on disk space (disk quota) when used in conjunction with Delete archive after processing. When using this feature we suggest having 10Mb plus the size of your part for split archives free in your account. The drawback with enabling this option is that if the upload fails, the backup fails. If you don't enable this option, the upload process will take place after the backup is complete and finalized. This ensures that if the upload process fails a valid backup will still be stored on your server. The drawback is that it requires more available disk space.
- Fail backup on upload failure
-
When this option is set to No (default) the backup will not stop if uploading the backup archive to the remote storage fails. A warning will be issued, but the backup will be marked as successful. You can then go to the Manage Backups page and retry uploading the backup archive to remote storage. This is useful if the backup failed to upload because of a transient network or remote server issue, or a misconfiguration you have fixed after the backup was taken. This also acts as a safety net: if your site breaks after the backup is taken you can restore from the latest backup archive which failed to upload —in whole or in part— to remote storage.
When this option is set to Yes the backup will stop as soon as Akeeba Backup detects that it failed to upload a backup archive to the remote storage. If you have set Process each part immediately to No (default) that will be it; the backup attempt will be marked as Failed and all backup archive files of this backup attempt will be removed. If you have set have set Process each part immediately to Yes and some backup archive files have already been uploaded to the remote storage they will be left behind when the backup attempt is marked as Failed; you will have to remove them yourself, manually, outside of Akeeba Backup. In either case you will not have a valid backup. If your site breaks before you can rectify the problem you are left without a backup.
Considering that the vast majority of the rare occurrences of backup upload failures we see are transient issues, we consider this option to be dangerous as it can unexpectedly leave you without a valid backup when you need one. It is far better to leave this setting set to No and monitor your backups for warnings. There are extremely few use cases where this option makes sense (e.g. taking a backup of a site on a server without enough space for both the backup archive and the site to coexist, a situation which is anyway problematic should you need to restore the backup). We very strongly recommend not enabling this option unless you have a compelling use case and understand the implications of potentially being left without a valid backup at random.
- Delete archive after processing
-
If enabled, the archive files will be removed from your server after they are uploaded to Amazon S3.
- Application Key ID
-
The
keyIDyou got when creating the application key per the instructions above - Application Key
-
The
applicationKeyyou got when creating the application key per the instructions above - Bucket
-
The name of your B2 bucket. Case matters! The bucket names foo, FOO and Foo refer to three different buckets.
- Directory
-
A directory (technically: name prefix) of the backup archives in your bucket,
- Disable multipart uploads
-
By default, Akeeba Backup uploads each backup archive to B2 in small "chunks". B2 will then stitch together these chunks to create one, big backup archive. Each chunk transfer takes a small amount of time, preventing timeouts. The downside is that some hosts have weird outbound proxy setups in front of their servers, getting in the way of multipart uploads. In these cases you will see near instant chunk transfers but nothing being uploaded to BackBlaze B2. If this happens you will need to disable multipart uploads by selecting this box and use a fairly small part size for split archives to prevent timeouts while the upload is in progress.
- Chunk size
-
The size of each chunk during a multipart upload as explained above.
| Note |
|---|---|
|
This feature is available only to Akeeba Backup Professional. Using it requires entering your Download ID in the software and having an active subscription on our site which gives you access to one of our backup software. |
This uses the official Box.com API to upload archives to this storage service.
Due to the absence of a multipart upload feature in Box' API we strongly recommend using a small Part Size for Archive Splitting, typically in the 10-50MB range, to prevent a timeout of your backups while they are uploading to Box.
Important security and privacy information
The Box.com uses the OAuth 2 authentication method. This requires a fixed endpoint (URL) for each application which uses it, such as Akeeba Backup. Since Akeeba Backup is installed on your site it has a different endpoint URL for each installation, meaning you could not normally use Box's API to upload files. We have solved it by creating a small script which lives on our own server and acts as an intermediary between your site and Box. When you are linking Akeeba Backup to Box you are going through the script on our site. Moreover, whenever the request token (a time-limited key given by Box to your Akeeba Backup installation to access the service) expires your Akeeba Backup installation has to exchange it with a new token. This process also takes place through the script on our site. Please note that even though you are going through our site we DO NOT store this information and we DO NOT have access to your Box account.
WE DO NOT STORE THE ACCESS CREDENTIALS TO YOUR BOX ACCOUNT. WE DO NOT HAVE ACCESS TO YOUR BOX ACCOUNT. SINCE CONNECTIONS TO OUR SITE ARE PROTECTED BY STRONG ENCRYPTION (HTTPS) NOBODY ELSE CAN SEE THE INFORMATION EXCHANGED BETWEEN YOUR SITE AND OUR SITE AND BETWEEN OUR SITE AND BOX. HOWEVER, AT THE FINAL STEP OF THE AUTHENTICATION PROCESS, YOUR BROWSER IS SENDING THE ACCESS TOKENS TO YOUR SITE. SOMEONE CAN STEAL THEM IN TRANSIT IF AND ONLY IF YOU ARE NOT USING HTTPS ON YOUR SITE'S ADMINISTRATOR.
For this reason we DO NOT accept any responsibility whatsoever for any use, abuse or misuse of your connection information to Box. If you do not accept this condition you are FORBIDDEN from using the intermediary script on our site which, simply put, means that you cannot use the Box integration.
Moreover, the above means that there are additional requirements for using Box integration on your Akeeba Backup installation:
-
You need the PHP cURL extension to be loaded and enabled on your server. Most servers do that by default. If your server doesn't have it enabled the upload will fail and warn you that cURL is not enabled.
-
Your server's firewall must allow outbound HTTPS connections to www.akeebabackup.com and www.akeeba.com over port 443 (standard HTTPS port) to get new tokens every time the current access token expires.
-
Your server's firewall must allow outbound HTTPS connections to Box' domains over port 443 to allow the integration to work. These domain names are, unfortunately, not predefined.
Upload to Box
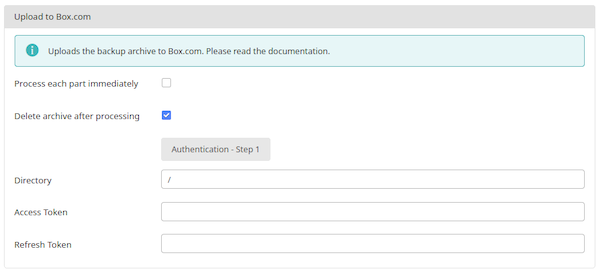
It has the following options:
- Process each part immediately
-
If you enable this, each backup part will be uploaded as soon as it's ready. This is useful if you are low on disk space (disk quota) when used in conjunction with Delete archive after processing. When using this feature we suggest having 10Mb plus the size of your part for split archives free in your account. The drawback with enabling this option is that if the upload fails, the backup fails. If you don't enable this option, the upload process will take place after the backup is complete and finalized. This ensures that if the upload process fails a valid backup will still be stored on your server. The drawback is that it requires more available disk space.
- Fail backup on upload failure
-
When this option is set to No (default) the backup will not stop if uploading the backup archive to the remote storage fails. A warning will be issued, but the backup will be marked as successful. You can then go to the Manage Backups page and retry uploading the backup archive to remote storage. This is useful if the backup failed to upload because of a transient network or remote server issue, or a misconfiguration you have fixed after the backup was taken. This also acts as a safety net: if your site breaks after the backup is taken you can restore from the latest backup archive which failed to upload —in whole or in part— to remote storage.
When this option is set to Yes the backup will stop as soon as Akeeba Backup detects that it failed to upload a backup archive to the remote storage. If you have set Process each part immediately to No (default) that will be it; the backup attempt will be marked as Failed and all backup archive files of this backup attempt will be removed. If you have set have set Process each part immediately to Yes and some backup archive files have already been uploaded to the remote storage they will be left behind when the backup attempt is marked as Failed; you will have to remove them yourself, manually, outside of Akeeba Backup. In either case you will not have a valid backup. If your site breaks before you can rectify the problem you are left without a backup.
Considering that the vast majority of the rare occurrences of backup upload failures we see are transient issues, we consider this option to be dangerous as it can unexpectedly leave you without a valid backup when you need one. It is far better to leave this setting set to No and monitor your backups for warnings. There are extremely few use cases where this option makes sense (e.g. taking a backup of a site on a server without enough space for both the backup archive and the site to coexist, a situation which is anyway problematic should you need to restore the backup). We very strongly recommend not enabling this option unless you have a compelling use case and understand the implications of potentially being left without a valid backup at random.
- Delete archive after processing
-
If enabled, the archive files will be removed from your server after they are uploaded to Amazon S3.
- Authentication - Step 1
-
Click this button to login to Box.com and authorize file transfers to and from it. Follow the instructions on screen. At the end of the process the Access and Refresh Token fields will be filled in for you.
- Directory
-
The directory where you want your archive to be stored.
- Access Token and Refresh Token
-
These are populated through the Authentication - Step 1 button above. Please do NOT copy these to other sites or other backup profiles. If the access and refresh tokens get out of sync your backup archive uploads will fail.
| Note |
|---|---|
|
This feature is available only to Akeeba Backup Professional. |
Using this engine, you can upload your backup archives to the European cloud storage service CloudMe.
Upload to CloudMe
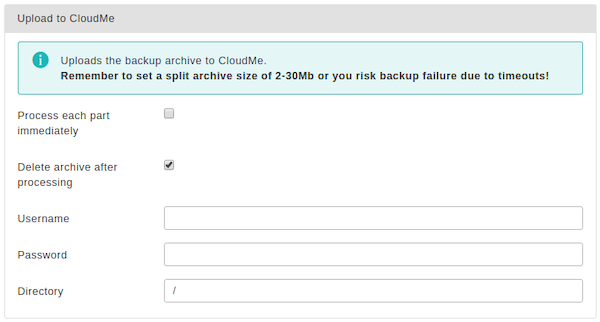
The required settings for this engine are:
- Process each part immediately
-
If you enable this, each backup part will be uploaded as soon as it's ready. This is useful if you are low on disk space (disk quota) when used in conjunction with Delete archive after processing. When using this feature we suggest having 10Mb plus the size of your part for split archives free in your account. The drawback with enabling this option is that if the upload fails, the backup fails. If you don't enable this option, the upload process will take place after the backup is complete and finalized. This ensures that if the upload process fails a valid backup will still be stored on your server. The drawback is that it requires more available disk space.
- Fail backup on upload failure
-
When this option is set to No (default) the backup will not stop if uploading the backup archive to the remote storage fails. A warning will be issued, but the backup will be marked as successful. You can then go to the Manage Backups page and retry uploading the backup archive to remote storage. This is useful if the backup failed to upload because of a transient network or remote server issue, or a misconfiguration you have fixed after the backup was taken. This also acts as a safety net: if your site breaks after the backup is taken you can restore from the latest backup archive which failed to upload —in whole or in part— to remote storage.
When this option is set to Yes the backup will stop as soon as Akeeba Backup detects that it failed to upload a backup archive to the remote storage. If you have set Process each part immediately to No (default) that will be it; the backup attempt will be marked as Failed and all backup archive files of this backup attempt will be removed. If you have set have set Process each part immediately to Yes and some backup archive files have already been uploaded to the remote storage they will be left behind when the backup attempt is marked as Failed; you will have to remove them yourself, manually, outside of Akeeba Backup. In either case you will not have a valid backup. If your site breaks before you can rectify the problem you are left without a backup.
Considering that the vast majority of the rare occurrences of backup upload failures we see are transient issues, we consider this option to be dangerous as it can unexpectedly leave you without a valid backup when you need one. It is far better to leave this setting set to No and monitor your backups for warnings. There are extremely few use cases where this option makes sense (e.g. taking a backup of a site on a server without enough space for both the backup archive and the site to coexist, a situation which is anyway problematic should you need to restore the backup). We very strongly recommend not enabling this option unless you have a compelling use case and understand the implications of potentially being left without a valid backup at random.
- Delete archive after processing
-
If enabled, the archive files will be removed from your server after they are uploaded to CloudMe.
- Username
-
Your CloudMe username
- Password
-
Your CloudMe password
- Directory
-
The directory inside your CloudMe Blue Folder™ where your files will be stored in. If you want to use subdirectories, you have to use a forward slash, e.g.
directory/subdirectory/subsubdirectory.You can use Akeeba Backup's backup naming variables in the directory name in order to create it dynamically. These are the same variables as what you can use in the archive name, i.e. [DATE], [TIME], [HOST], [RANDOM].
| Note |
|---|---|
|
This feature is available only to Akeeba Backup Professional. |
Using this engine, you can upload your backup archives to the DreamObjects cloud storage service by DreamHost.
Upload to DreamObjects
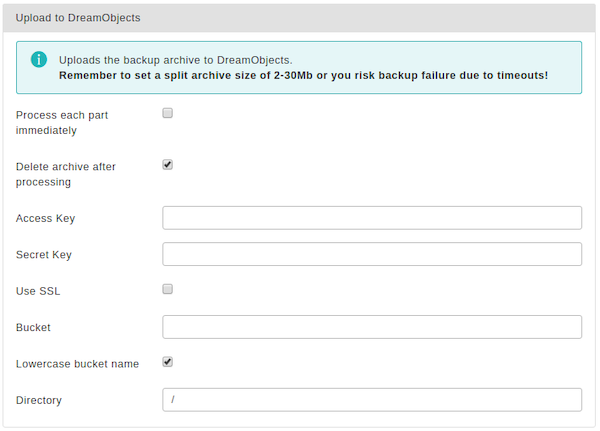
The required settings for this engine are:
- Process each part immediately
-
If you enable this, each backup part will be uploaded as soon as it's ready. This is useful if you are low on disk space (disk quota) when used in conjunction with Delete archive after processing. When using this feature we suggest having 10Mb plus the size of your part for split archives free in your account. The drawback with enabling this option is that if the upload fails, the backup fails. If you don't enable this option, the upload process will take place after the backup is complete and finalized. This ensures that if the upload process fails a valid backup will still be stored on your server. The drawback is that it requires more available disk space.
- Fail backup on upload failure
-
When this option is set to No (default) the backup will not stop if uploading the backup archive to the remote storage fails. A warning will be issued, but the backup will be marked as successful. You can then go to the Manage Backups page and retry uploading the backup archive to remote storage. This is useful if the backup failed to upload because of a transient network or remote server issue, or a misconfiguration you have fixed after the backup was taken. This also acts as a safety net: if your site breaks after the backup is taken you can restore from the latest backup archive which failed to upload —in whole or in part— to remote storage.
When this option is set to Yes the backup will stop as soon as Akeeba Backup detects that it failed to upload a backup archive to the remote storage. If you have set Process each part immediately to No (default) that will be it; the backup attempt will be marked as Failed and all backup archive files of this backup attempt will be removed. If you have set have set Process each part immediately to Yes and some backup archive files have already been uploaded to the remote storage they will be left behind when the backup attempt is marked as Failed; you will have to remove them yourself, manually, outside of Akeeba Backup. In either case you will not have a valid backup. If your site breaks before you can rectify the problem you are left without a backup.
Considering that the vast majority of the rare occurrences of backup upload failures we see are transient issues, we consider this option to be dangerous as it can unexpectedly leave you without a valid backup when you need one. It is far better to leave this setting set to No and monitor your backups for warnings. There are extremely few use cases where this option makes sense (e.g. taking a backup of a site on a server without enough space for both the backup archive and the site to coexist, a situation which is anyway problematic should you need to restore the backup). We very strongly recommend not enabling this option unless you have a compelling use case and understand the implications of potentially being left without a valid backup at random.
- Delete archive after processing
-
If enabled, the archive files will be removed from your server after they are uploaded to DreamObjects.
- Access Key
-
Your DreamObjects Access Key
- Secret Key
-
Your DreamObjects Secret Key
- Use SSL
-
If enabled, an encrypted connection will be used to upload your archives to DreamObjects. In this case the upload will take slightly longer, as encryption - what SSL does - is more resource intensive than uploading unencrypted files. You may have to lower your part size.
Warning Do not enable this option if your bucket name contains dots.
- Bucket
-
The name of your DreamObjects bucket where your files will be stored in. The bucket must be already created; Akeeba Backup can not create buckets.
DO NOT CREATE BUCKETS WITH NAMES CONTAINING UPPERCASE LETTERS OR DOTS. If you use a bucket with uppercase letters in its name it is very possible that Akeeba Backup will not be able to upload anything to it for reasons that have to do with the S3 API implemented by DreamObjects. It is not something we can "fix" in Akeeba Backup. Moreover, if you use a dot in your bucket name you will not be able to enable the "Use SSL" option since DreamObject's SSL certificate will be invalid for this bucket, making it impossible to upload backup archives. If this is the case with your site, please don't ask for support; simply create a new bucket whose name only consists of lowercase unaccented latin characters (a-z), numbers (0-9) and dashes.
- Directory
-
The directory inside your DreamObjects bucket where your files will be stored in. If you want to use subdirectories, you have to use a forward slash, e.g.
directory/subdirectory/subsubdirectory.You can use Akeeba Backup's backup naming variables in the directory name in order to create it dynamically. These are the same variables as what you can use in the archive name, i.e. [DATE], [TIME], [HOST], [RANDOM].
Regarding the naming of buckets and directories, you have to be aware of the S3 API rules used by DreamObjects:
-
Folder names can not contain backward slashes (\). They are invalid characters.
-
Bucket names can only contain lowercase letters, numbers, periods (.) and dashes (-). Accented characters, international characters, underscores and other punctuation marks are illegal characters.
Important Even if you created a bucket using uppercase letters, you must type its name with lowercase letters. The S3 API implemented by DreamObjects automatically converts the bucket name to all-lowercase. Also note that, as stated above, you may NOT be able to use at all under some circumstances. Generally, your should avoid using uppercase letters.
-
Bucket names must start with a number or a letter.
-
Bucket names must be 3 to 63 characters long.
-
Bucket names can't be in an IP format, e.g. 192.168.1.2
-
Bucket names can't end with a dash.
-
Bucket names can't have an adjacent dot and dash. For example, both
my.-bucketandmy-.bucketare invalid. It is preferable to NOT use a dot as it will cause issues.
If any - or all - of those rules are broken, you'll end up with error messages that Akeeba Backup couldn't connect to DreamObjects, that the calculated signature is wrong or that the bucket does not exist. This is normal and expected behaviour, as the S3 API of DreamObjects drops the connection when it encounters invalid bucket or directory names.
Using this engine, you can upload your backup archives to the low-cost Dropbox cloud storage service (http://www.dropbox.com). This is an ideal option for small websites with a low budget, as this service offers 2GB of storage space for free, all the while retaining all the pros of storing your files on the cloud. Even if your host's data center is annihilated by a natural disaster and your local PC and storage media are wiped out by an unlikely event, you will still have a copy of your site readily accessible and easy to restore.
Upload to Dropbox (v2 API)
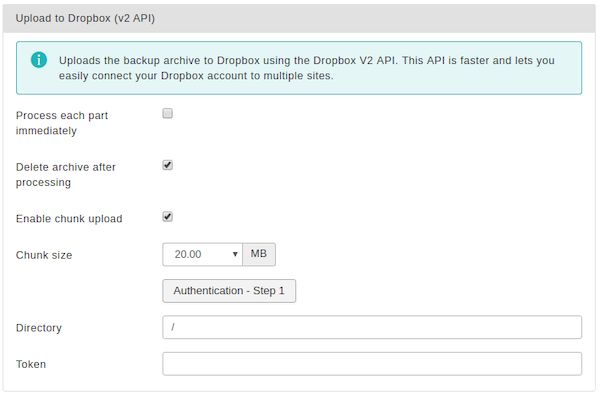
The required settings for this engine are:
- Process each part immediately
-
If you enable this, each backup part will be uploaded as soon as it's ready. This is useful if you are low on disk space (disk quota) when used in conjunction with Delete archive after processing. When using this feature we suggest having 10Mb plus the size of your part for split archives free in your account. The drawback with enabling this option is that if the upload fails, the backup fails. If you don't enable this option, the upload process will take place after the backup is complete and finalized. This ensures that if the upload process fails a valid backup will still be stored on your server. The drawback is that it requires more available disk space.
- Fail backup on upload failure
-
When this option is set to No (default) the backup will not stop if uploading the backup archive to the remote storage fails. A warning will be issued, but the backup will be marked as successful. You can then go to the Manage Backups page and retry uploading the backup archive to remote storage. This is useful if the backup failed to upload because of a transient network or remote server issue, or a misconfiguration you have fixed after the backup was taken. This also acts as a safety net: if your site breaks after the backup is taken you can restore from the latest backup archive which failed to upload —in whole or in part— to remote storage.
When this option is set to Yes the backup will stop as soon as Akeeba Backup detects that it failed to upload a backup archive to the remote storage. If you have set Process each part immediately to No (default) that will be it; the backup attempt will be marked as Failed and all backup archive files of this backup attempt will be removed. If you have set have set Process each part immediately to Yes and some backup archive files have already been uploaded to the remote storage they will be left behind when the backup attempt is marked as Failed; you will have to remove them yourself, manually, outside of Akeeba Backup. In either case you will not have a valid backup. If your site breaks before you can rectify the problem you are left without a backup.
Considering that the vast majority of the rare occurrences of backup upload failures we see are transient issues, we consider this option to be dangerous as it can unexpectedly leave you without a valid backup when you need one. It is far better to leave this setting set to No and monitor your backups for warnings. There are extremely few use cases where this option makes sense (e.g. taking a backup of a site on a server without enough space for both the backup archive and the site to coexist, a situation which is anyway problematic should you need to restore the backup). We very strongly recommend not enabling this option unless you have a compelling use case and understand the implications of potentially being left without a valid backup at random.
- Delete archive after processing
-
If enabled, the archive files will be removed from your server after they are uploaded to Dropbox.
- Authorisation
-
Before you can use the application with Dropbox you have to "link" your Dropbox account with your Akeeba Backup installation. This allows the application to access your Dropbox account without you storing the username (email) and password to the application. The authentication is a simple process. First click on the button. A popup window opens, allowing you to log in to your Dropbox account. Once you log in successfully, click the blue button to transfer the access token back to your Akeeba Backup installation.
Unlike the v1 API, you can perform the same procedure on every single site you want to link to Dropbox.
- Directory
-
The directory inside your Dropbox account where your files will be stored in. If you want to use subdirectories, you have to use a forward slash, e.g.
/directory/subdirectory/subsubdirectory. - Enabled chunked upload
-
The application will always try to upload your backup archives / backup archive parts in small chunks and then ask Dropbox to assemble them back into one file. This allows you to transfer larger archives more reliably and works around the 150Mb limitation of Dropbox' API.
When you enable this option every step of the chunked upload process will take place in a separate page load, reducing the risk of timeouts if you are transferring large archive part files (over 10Mb). When you disable this option the entire upload process has to take place in a single page load.
Warning When you select Process each part immediately this option has no effect! In this case the entire upload operation for each part will be attempted in a single page load. For this reason we recommend that you use a Part Size for Split Archives of 5Mb or less to avoid timeouts.
- Chunk size
-
This option determines the size of the chunk which will be used by the chunked upload option above. You are recommended to use a relatively small value around 5 to 20 Mb to prevent backup timeouts. The exact maximum value you can use depends on the speed of your server and its connection speed to the Dropbox server. Try starting high and lower it if the backup fails during transfer to Dropbox.
- Access Token
-
This is the short-lived access token to Dropbox. Normally, it is automatically fetched from Dropbox when you click on the button above. If for any reason this method does not work for you you can copy the Token from the popup window.
It is very important that you DO NOT copy the Access Token to other backup profiles on the same or a different site. It will not work. Instead, please use the button on each profile and site you want to connect to Dropbox.
- Refresh Token
-
This is the long-lived refresh token to Dropbox. It is used to refresh the access token every time it expires. Normally, it is automatically fetched from Dropbox when you click on the button above. If for any reason this method does not work for you you can copy the Token from the popup window.
It is very important that you DO NOT copy the Refresh Token to other backup profiles on the same or a different site. It will not work and will only cause the Dropbox connection to be lost on your site. Instead, please use the button on each profile and site you want to connect to Dropbox.
| Note |
|---|---|
|
This feature is available only to Akeeba Backup Professional. Using it requires entering your Download ID in the software and having an active subscription on our site which gives you access to one of our backup software. |
Using this engine you can upload your backup archives to Google Drive.
Important security and privacy information
Google Drive uses the OAuth 2 authentication method. This requires a fixed endpoint (URL) for each application which uses it, such as Akeeba Backup. Since Akeeba Backup is installed on your site it has a different endpoint URL for each installation, meaning you could not normally use Google Drive's API to upload files. We have solved it by creating a small script which lives on our own server and acts as an intermediary between your site and Google Drive. When you are linking Akeeba Backup to Google Drive you are going through the script on our site. Moreover, whenever the request token (a time-limited key given by Google Drive to your Akeeba Backup installation to access the service) expires your Akeeba Backup installation has to exchange it with a new token. This process also takes place through the script on our site. Please note that even though you are going through our site we DO NOT store this information and we DO NOT have access to your Google Drive account.
WE DO NOT STORE THE ACCESS CREDENTIALS TO YOUR GOOGLE DRIVE ACCOUNT. WE DO NOT HAVE ACCESS TO YOUR GOOGLE DRIVE ACCOUNT. SINCE CONNECTIONS TO OUR SITE ARE PROTECTED BY STRONG ENCRYPTION (HTTPS) NOBODY ELSE CAN SEE THE INFORMATION EXCHANGED BETWEEN YOUR SITE AND OUR SITE AND BETWEEN OUR SITE AND GOOGLE DRIVE. HOWEVER, AT THE FINAL STEP OF THE AUTHENTICATION PROCESS, YOUR BROWSER IS SENDING THE ACCESS TOKENS TO YOUR SITE. SOMEONE CAN STEAL THEM IN TRANSIT IF AND ONLY IF YOU ARE NOT USING HTTPS ON YOUR SITE'S ADMINISTRATOR.
For this reason we DO NOT accept any responsibility whatsoever for any use, abuse or misuse of your connection information to Google Drive. If you do not accept this condition you are FORBIDDEN from using the intermediary script on our site which, simply put, means that you cannot use the Google Drive integration.
Moreover, the above means that there are additional requirements for using Google Drive integration on your Akeeba Backup installation:
-
You need the PHP cURL extension to be loaded and enabled on your server. Most servers do that by default. If your server doesn't have it enabled the upload will fail and warn you that cURL is not enabled.
-
Your server's firewall must allow outbound HTTPS connections to www.akeebabackup.com and www.akeeba.com over port 443 (standard HTTPS port) to get new tokens every time the current access token expires.
-
Your server's firewall must allow outbound HTTPS connections to Google Drive's domains over port 443 to allow the integration to work. These domain names are, unfortunately, not predefined. Most likely your server administrator will have to allow outbound HTTPS connections to any domain name matching *.googleapis.com to allow this integration to work. This is a restriction of how the Google Drive service is designed, not something we can modify (obviously, we're not Google).
Settings
Upload to Google Drive
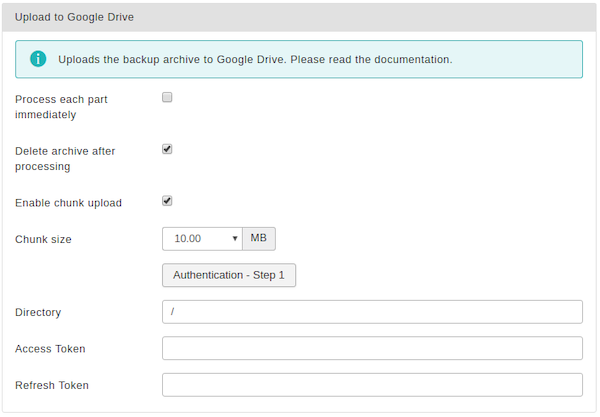
The settings for this engine are:
- Process each part immediately
-
If you enable this, each backup part will be uploaded as soon as it's ready. This is useful if you are low on disk space (disk quota) when used in conjunction with Delete archive after processing. When using this feature we suggest having 10Mb plus the size of your part for split archives free in your account. The drawback with enabling this option is that if the upload fails, the backup fails. If you don't enable this option, the upload process will take place after the backup is complete and finalized. This ensures that if the upload process fails a valid backup will still be stored on your server. The drawback is that it requires more available disk space.
- Fail backup on upload failure
-
When this option is set to No (default) the backup will not stop if uploading the backup archive to the remote storage fails. A warning will be issued, but the backup will be marked as successful. You can then go to the Manage Backups page and retry uploading the backup archive to remote storage. This is useful if the backup failed to upload because of a transient network or remote server issue, or a misconfiguration you have fixed after the backup was taken. This also acts as a safety net: if your site breaks after the backup is taken you can restore from the latest backup archive which failed to upload —in whole or in part— to remote storage.
When this option is set to Yes the backup will stop as soon as Akeeba Backup detects that it failed to upload a backup archive to the remote storage. If you have set Process each part immediately to No (default) that will be it; the backup attempt will be marked as Failed and all backup archive files of this backup attempt will be removed. If you have set have set Process each part immediately to Yes and some backup archive files have already been uploaded to the remote storage they will be left behind when the backup attempt is marked as Failed; you will have to remove them yourself, manually, outside of Akeeba Backup. In either case you will not have a valid backup. If your site breaks before you can rectify the problem you are left without a backup.
Considering that the vast majority of the rare occurrences of backup upload failures we see are transient issues, we consider this option to be dangerous as it can unexpectedly leave you without a valid backup when you need one. It is far better to leave this setting set to No and monitor your backups for warnings. There are extremely few use cases where this option makes sense (e.g. taking a backup of a site on a server without enough space for both the backup archive and the site to coexist, a situation which is anyway problematic should you need to restore the backup). We very strongly recommend not enabling this option unless you have a compelling use case and understand the implications of potentially being left without a valid backup at random.
- Delete archive after processing
-
If enabled, the archive files will be removed from your server after they are uploaded to Google Drive
- Enabled chunked upload
-
The application will always try to upload your backup archives / backup archive parts in small chunks and then ask Google Drive to assemble them back into one file. This allows you to transfer larger archives more reliably.
When you enable this option every step of the chunked upload process will take place in a separate page load, reducing the risk of timeouts if you are transferring large archive part files (over 5Mb). When you disable this option the entire upload process has to take place in a single page load.
Warning When you select Process each part immediately this option has no effect! In this case the entire upload operation for each part will be attempted in a single page load. For this reason we recommend that you use a Part Size for Split Archives of 5Mb or less to avoid timeouts.
- Chunk size
-
This option determines the size of the chunk which will be used by the chunked upload option above. You are recommended to use a relatively small value around 5 to 20 Mb to prevent backup timeouts. The exact maximum value you can use depends on the speed of your server and its connection speed to the Google Drive server. Try starting high and lower it if the backup fails during transfer to Google Drive.
- Authentication – Step 1
-
If this is the FIRST site you connect to Akeeba Backup click on this button and follow the instructions.
On EVERY SUBSEQUENT SITE do NOT click on this button! Instead copy the Refresh Token from the first site into this new site's Refresh Token edit box further below the page.
Warning Google imposes a limitation of 20 authorizations for a single application –like Akeeba Backup– with Google Drive. Simply put, every time you click on the Authentication – Step 1 button a new Refresh Token is generated. The 21st time you generate a new Refresh Token the one you had created the very first time becomes automatically invalid without warning. This is how Google Drive is designed to operate. For this reason we strongly recommend AGAINST using this button on subsequent sites. Instead, copy the Refresh Token.
- Drive
-
If your account has access to Google team drives you can select which of these drives you want to connect to. However, this process is a bit more complicated than it sounds.
First, you need to use the Authentication - Step 1 button to connect to Google Drive. Second, you need to click the Save button in the toolbar to apply the Google Drive connection information. Third, you can select your drive using the dropdown. This is the only method for selecting a drive which is guaranteed to work.
Please remember that the list of drives is returned by Google's servers. If you do not see a drive there your problem has to do with permissions and setup at the Google Drive side of things. In this case please be advised that we are not allowed to help you; Google forbids us from providing help about its products through our site. You will have to peruse their community support forums to seek assistance about setting up your team drives to be visible by your Google Drive account.
- Directory
-
The directory inside your Google Drive where your files will be stored in. If you want to use subdirectories, you have to use a forward slash, e.g.
directory/subdirectory/subsubdirectory.Tip You can use Akeeba Backup's backup naming variables in the directory name in order to create it dynamically. These are the same variables as what you can use in the archive name, i.e. [DATE], [TIME], [HOST], [RANDOM].
Warning Object (file and folder) naming in Google Drive is ambiguous by design. This means that two or more files / folders with the same name can exist inside the same folder at the same time. In other words, a folder called My Files may contain ten different files all called "File 1"! Obviously this is problematic when you want to store backups which need to be uniquely named (otherwise you'd have no idea which backup is the one you want to use!). We work around this issue using the following conventions:
-
If there are multiple folders by the same name we choose the first one returned by the Google Drive API. There are no guarantees which one it will be! Please do NOT store backup archives in folders with ambiguous names or the remote file operations (quota management, download to server, download to browser, delete) will most likely fail.
-
If a folder in the path you specified does not exist we create it
-
If a file by the same name exists in the folder you specified we delete it before uploading the new one.
-
- Access Token
-
This is the temporary Access Token generated by Google Drive. It has a lifetime of one hour (3600 seconds). After that Akeeba Backup will use the Refresh Token automatically to generate a new Access Token. Please do not touch that field and do NOT copy it to other sites.
- Refresh Token
-
This is essentially what connects your Akeeba Backup installation with your Google Drive. When you want to connect more sites to Google Drive please copy the Refresh Token from another site linked to the same Google Drive account to your site's Refresh Token field.
Warning Since all of your sites are using the same Refresh Token to connect to Google Drive you must NOT run backups on multiple sites simultaneously. That would cause all backups to fail since one active instance of Akeeba Backup would be invalidating the Access Token generated by the other active instance of Akeeba Backup also trying to upload to Google Drive. This is an architectural limitation of Google Drive.
Using this engine, you can upload your backup archives to the Google Storage cloud storage service using the official Google Cloud JSON API. This is the preferred method for using Google Storage.
Foreward and requirements
Setting up Google Storage is admittedly complicated. We did ask Google for permission to use the much simpler end-user OAuth2 authentication, a method which is more suitable for people who are not backend developers or IT managers. Unfortunately, their response on July 14th, 2017 was that we were not allowed to. They said in no uncertain terms that we MUST have our clients use Google Cloud Service Accounts. Unfortunately this comes with increased server requirements and more complicated setup instructions.
First the requirements. Google Storage support requires the openssl_sign() function to be available on your server and support the "sha256WithRSAEncryption" method (it must be compiled against the OpenSSL library version 0.9.8l or later). If you are not sure please ask your host. Please note that the versions of the software required for Google Storage integration have been around since early 2012 so they shouldn't be a problem for any decently up-to-date host.
Moreover, we are only allowed to give you the following quick start instructions as an indicative way to set up Google Storage. If you need support for creating a service account or granting Akeeba Backup the appropriate permissions via the IAM Policies, Google requested that we direct you to their Google Cloud Support page. We are afraid this means that we will not be able to provide you with support about any issues concerning the Google Cloud side of the setup at the request of Google.
We apologize for any inconvenience. We have no option but to abide by Google's terms. It's their service, their API and their rules.
Performance and stability
According to our extensive tests in different server environments, the performance and stability of Google Storage is not a given. We've seen upload operations randomly failing with a Google-side server error or timing out when the immediately prior upload of a same sized file chunk worked just fine. We've seen file deletions taking anywhere from 0.5 to 13 seconds per file, for the same file, storage class and bucket with the command issued always from the same server. Please note that you might experience random upload failures. Moreover, you might experience random failures applying remote storage quotas if deleting the obsolete files takes too long to be practical. These issues are on Google Storage's side and cannot be worked around in any way using code in the context of a backup application that's bound by PHP and web server time limits.
We recommend using a remote storage service with good, consistent performance such as Amazon S3 or BackBlaze B2.
Initial Setup
Before you begin you will need to create a JSON authorization file for Akeeba Backup. Please follow the instructions below, step by step, to do this. Kindly note that you can reuse the same JSON authorization file on multiple sites and / or backup profiles.
-
Go to https://console.developers.google.com/permissions/serviceaccounts?pli=1
-
Select the API Project where your Google Storage bucket is already located in.
-
Click on Create Service Account
-
Set the Service Account Name to
Akeeba Backup Service Account -
Click on Role and select ,
-
Check the Furnish a new private key checkbox.
-
The Key Type section appears. Make sure
JSONis selected. -
Click on the CREATE link at the bottom right.
-
Your server prompts you to download a file. Save it as
googlestorage.jsonYou will need to paste the contents of this file in the Contents of googlestorage.json (read the documentation) field in the Configuration page of Akeeba Backup.
| Important |
|---|---|
|
If you lose the |
Post-processing engine options
Upload to Google Storage (JSON API)

The settings for this engine are:
- Process each part immediately
-
If you enable this, each backup part will be uploaded as soon as it's ready. This is useful if you are low on disk space (disk quota) when used in conjunction with Delete archive after processing. When using this feature we suggest having 10Mb plus the size of your part for split archives free in your account. The drawback with enabling this option is that if the upload fails, the backup fails. If you don't enable this option, the upload process will take place after the backup is complete and finalized. This ensures that if the upload process fails a valid backup will still be stored on your server. The drawback is that it requires more available disk space.
- Fail backup on upload failure
-
When this option is set to No (default) the backup will not stop if uploading the backup archive to the remote storage fails. A warning will be issued, but the backup will be marked as successful. You can then go to the Manage Backups page and retry uploading the backup archive to remote storage. This is useful if the backup failed to upload because of a transient network or remote server issue, or a misconfiguration you have fixed after the backup was taken. This also acts as a safety net: if your site breaks after the backup is taken you can restore from the latest backup archive which failed to upload —in whole or in part— to remote storage.
When this option is set to Yes the backup will stop as soon as Akeeba Backup detects that it failed to upload a backup archive to the remote storage. If you have set Process each part immediately to No (default) that will be it; the backup attempt will be marked as Failed and all backup archive files of this backup attempt will be removed. If you have set have set Process each part immediately to Yes and some backup archive files have already been uploaded to the remote storage they will be left behind when the backup attempt is marked as Failed; you will have to remove them yourself, manually, outside of Akeeba Backup. In either case you will not have a valid backup. If your site breaks before you can rectify the problem you are left without a backup.
Considering that the vast majority of the rare occurrences of backup upload failures we see are transient issues, we consider this option to be dangerous as it can unexpectedly leave you without a valid backup when you need one. It is far better to leave this setting set to No and monitor your backups for warnings. There are extremely few use cases where this option makes sense (e.g. taking a backup of a site on a server without enough space for both the backup archive and the site to coexist, a situation which is anyway problematic should you need to restore the backup). We very strongly recommend not enabling this option unless you have a compelling use case and understand the implications of potentially being left without a valid backup at random.
- Delete archive after processing
-
If enabled, the archive files will be removed from your server after they are uploaded to Google Storage.
- Enabled chunk upload
-
When enabled, Akeeba Backup will upload your backup archives in 5Mb chunks. This is the recommended methods for larger (over 10Mb) archives and/or archive parts.
- Bucket
-
The name of your Google Storage bucket where your files will be stored in. The bucket must be already created; the application can not create buckets.
DO NOT CREATE BUCKETS WITH NAMES CONTAINING UPPERCASE LETTERS. If you use a bucket with uppercase letters in its name it is very possible that the application will not be able to upload anything to it.
Please note that this is a limitation of the API. It is not something we can "fix" in the application. If this is the case with your site, please simply create a new bucket whose name only consists of lowercase unaccented latin characters (a-z), numbers (0-9), dashes and dots.
- Directory
-
The directory inside your Google Storage bucket where your files will be stored in. If you want to use subdirectories, you have to use a forward slash, e.g.
directory/subdirectory/subsubdirectory.You can use the application's backup naming variables in the directory name in order to create it dynamically. These are the same variables as what you can use in the archive name, i.e. [DATE], [TIME], [HOST], [RANDOM].
- Contents of googlestorage.json (read the documentation)
-
Open the JSON file you created in the Initial Setup stage outlined above. Copy all of its contents. Paste them in this field. Make sure you have included the curly braces, { and }, at the beginning and end of the file respectively. Don't worry about line breaks being "eaten up", they are NOT important.
Regarding the naming of buckets and directories, you have to be aware of the Google Storage rules:
-
Folder names can not contain backward slashes (\). They are invalid characters.
-
Bucket names can only contain lowercase letters, numbers, periods (.) and dashes (-). Accented characters, international characters, underscores and other punctuation marks are illegal characters.
-
Bucket names must start with a number or a letter.
-
Bucket names must be 3 to 63 characters long.
-
Bucket names can't be in an IP format, e.g. 192.168.1.2
-
Bucket names can't end with a dash.
-
Bucket names can't have an adjacent dot and dash. For example, both
my.-bucketandmy-.bucketare invalid.
If any - or all - of those rules are broken, you'll end up with error messages that the application couldn't connect to Google Storage, that the calculated signature is wrong or that the bucket does not exist. This is normal and expected behaviour, as Google Storage drops the connection when it encounters invalid bucket or directory names.
| Note |
|---|---|
|
This feature is available only to Akeeba Backup Professional. This is an old implementation which might stop working when Google drops support for the S3 API. We recommend using the more modern JSON API integration described later in the documentation. |
Using this engine, you can upload your backup archives to the Google Storage cloud storage service using the interoperable API (Google Storage simulates the API of Amazon S3)
Please note that Google Storage is NOT the same thing as Google Drive. These are two separate products. If you want to upload files to Google Drive please look at the documentation for Upload to Google Drive.
Before you begin you have to go to the Google Developer's Console. After creating a storage bucket, in the left hand menu, go to Storage, Cloud Storage, Settings. Then go to the tab/option Interoperability. There you can go and enable interoperability and create the Access and Secret keys you need for Akeeba Backup.
You should also know the limitations. Google Storage's interoperable API does not allow appending to files, so the archive has to be transferred in a single step. PHP has a time limit restriction we can't overlook. The time required to upload a file to Google Storage equals the size of the file divided by the available bandwidth. We want to time to upload a file to be less than PHP's time limit restriction so as to avoid timing out. Since the available bandwidth is finite and constant, the only thing we can reduce in order to avoid timeouts is the file size. To this end, you have to produce split archives, by setting the part size for archive splitting in ZIP's or JPA's engine configuration pane. The suggested values are between 10 and 20 MB.
| Tip |
|---|---|
|
If you use the native CRON mode (akeeba-backup.php), there is usually no time limit - or there is a very high time limit in the area of 3 minutes or so. Ask your host about it. Setting up a profile for use only with the native CRON mode allows you to increase the part size and reduce the number of parts a complete backup consists of. |
Upload to Google Storage (Legacy S3 API)
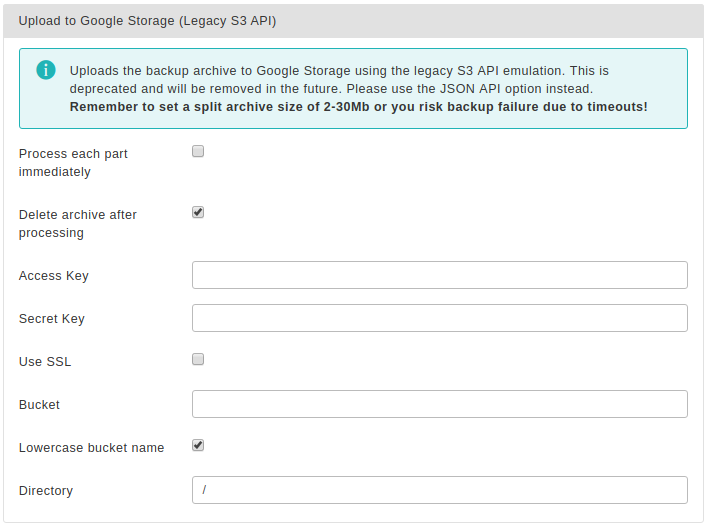
The required settings for this engine are:
- Process each part immediately
-
If you enable this, each backup part will be uploaded as soon as it's ready. This is useful if you are low on disk space (disk quota) when used in conjunction with Delete archive after processing. When using this feature we suggest having 10Mb plus the size of your part for split archives free in your account. The drawback with enabling this option is that if the upload fails, the backup fails. If you don't enable this option, the upload process will take place after the backup is complete and finalized. This ensures that if the upload process fails a valid backup will still be stored on your server. The drawback is that it requires more available disk space.
- Fail backup on upload failure
-
When this option is set to No (default) the backup will not stop if uploading the backup archive to the remote storage fails. A warning will be issued, but the backup will be marked as successful. You can then go to the Manage Backups page and retry uploading the backup archive to remote storage. This is useful if the backup failed to upload because of a transient network or remote server issue, or a misconfiguration you have fixed after the backup was taken. This also acts as a safety net: if your site breaks after the backup is taken you can restore from the latest backup archive which failed to upload —in whole or in part— to remote storage.
When this option is set to Yes the backup will stop as soon as Akeeba Backup detects that it failed to upload a backup archive to the remote storage. If you have set Process each part immediately to No (default) that will be it; the backup attempt will be marked as Failed and all backup archive files of this backup attempt will be removed. If you have set have set Process each part immediately to Yes and some backup archive files have already been uploaded to the remote storage they will be left behind when the backup attempt is marked as Failed; you will have to remove them yourself, manually, outside of Akeeba Backup. In either case you will not have a valid backup. If your site breaks before you can rectify the problem you are left without a backup.
Considering that the vast majority of the rare occurrences of backup upload failures we see are transient issues, we consider this option to be dangerous as it can unexpectedly leave you without a valid backup when you need one. It is far better to leave this setting set to No and monitor your backups for warnings. There are extremely few use cases where this option makes sense (e.g. taking a backup of a site on a server without enough space for both the backup archive and the site to coexist, a situation which is anyway problematic should you need to restore the backup). We very strongly recommend not enabling this option unless you have a compelling use case and understand the implications of potentially being left without a valid backup at random.
- Delete archive after processing
-
If enabled, the archive files will be removed from your server after they are uploaded to Google Storage.
- Access Key
-
Your Google Storage Access Key, available from the Google Cloud Storage key management tool.
- Secret Key
-
Your Google Storage Secret Key, available from the Google Cloud Storage key management tool.
- Use SSL
-
If enabled, an encrypted connection will be used to upload your archives to Google Storage. In this case the upload will take longer, as encryption - what SSL does - is a resource intensive operation. You may have to lower your part size. We strongly recommend enabling this option for enhanced security.
Warning Do not enable this option if your bucket name contains dots.
- Bucket
-
The name of your Google Storage bucket where your files will be stored in. The bucket must be already created; Akeeba Backup can not create buckets.
DO NOT CREATE BUCKETS WITH NAMES CONTAINING UPPERCASE LETTERS. If you use a bucket with uppercase letters in its name it is very possible that Akeeba Backup will not be able to upload anything to it. Moreover you should not use dots in your bucket names as they are incompatible with the Use SSL option due to an Amazon S3 API limitation.
Please note that this is a limitation of the API. It is not something we can "fix" in Akeeba Backup. If this is the case with your site, please DO NOT ask for support; simply create a new bucket whose name only consists of lowercase unaccented latin characters (a-z), numbers (0-9) and dashes.
- Directory
-
The directory inside your Google Storage bucket where your files will be stored in. If you want to use subdirectories, you have to use a forward slash, e.g.
directory/subdirectory/subsubdirectory.Tip You can use Akeeba Backup's backup naming variables in the directory name in order to create it dynamically. These are the same variables as what you can use in the archive name, i.e. [DATE], [TIME], [HOST], [RANDOM].
Regarding the naming of buckets and directories, you have to be aware of the Google Storage rules:
-
Folder names can not contain backward slashes (\). They are invalid characters.
-
Bucket names can only contain lowercase letters, numbers, periods (.) and dashes (-). Accented characters, international characters, underscores and other punctuation marks are illegal characters.
-
Bucket names must start with a number or a letter.
-
Bucket names must be 3 to 63 characters long.
-
Bucket names can't be in an IP format, e.g. 192.168.1.2
-
Bucket names can't end with a dash.
-
Bucket names can't have an adjacent dot and dash. For example, both
my.-bucketandmy-.bucketare invalid. It's best not to use dots at all as they are incompatible with the Use SSL option.
If any - or all - of those rules are broken, you'll end up with error messages that Akeeba Backup couldn't connect to Google Storage, that the calculated signature is wrong or that the bucket does not exist. This is normal and expected behaviour, as Google Storage drops the connection when it encounters invalid bucket or directory names.
| Note |
|---|---|
|
This is a legacy feature which will be removed from future versions of Akeeba Backup. Please use the "Upload to OneDrive and OneDrive for Business" option instead. |
You should no longer use this integration. It only supports OneDrive with personal Microsoft / Xbox accounts. It does not support OneDrive for Business accounts which is what you get with Office 365 or a work or school account. The API it is using will be removed by Microsoft. Therefore we have no option but to remove the legacy integration from Akeeba Backup. Do note that we already have a replacement integration, using Microsoft's newer API for accessing OneDrive.
Therefore, if you were already using this option we recommend that you switch to the "Upload to OneDrive and OneDrive for Business" storage option. You will need to link your site to OneDrive again.
Since this option will be removed from Akeeba Backup soon we will no longer document its options.
| Note |
|---|---|
|
This feature is available only to Akeeba Backup Professional and requires an active subscription to use. |
Using this engine, you can upload your backup archives to the low-cost Microsoft OneDrive cloud storage service (https://onedrive.live.com). Moreover, this engine also supports OneDrive for Business which is the kind of free OneDrive storage you get with your Office 365 for Business, work or school account.
OneDrive is an ideal option for small to medium websites with a low budget. It offers a substantial amount of free storage, especially if you are an Office 365 or Office 365 for Business subscriber. Even if your host's data center is annihilated by a natural disaster and your local PC and storage media are wiped out by an unlikely event, you will still have a copy of your site readily accessible and easy to restore.
Please note that OneDrive is rather slow. If you have a big site, take frequent backups or otherwise upload performance is of the essence you should use a speedier storage provider such as Amazon S3, BackBlaze B2 or, if you'd rather remain in Microsoft's cloud ecosystem, Microsoft Azure BLOB Storage.
Important security and privacy information
The OneDrive integration uses the OAuth 2 authentication method. This requires a fixed endpoint (URL) for each application which uses it, such as Akeeba Backup. Since Akeeba Backup is installed on your site, therefore has a different endpoint URL for each installation, you could not normally use OneDrive's API to upload files. We have solved this problem by creating a small script which lives on our own server and acts as an intermediary between your site and OneDrive. When you are linking Akeeba Backup to OneDrive you are going through the script on our site. Moreover, whenever the access token (a time-limited, really long password given by OneDrive to your Akeeba Backup installation to access the service) expires your Akeeba Backup installation has to exchange it with a new token. This process also takes place through the script on our site. Please note that even though you are going through our site we DO NOT store this information and we DO NOT have access to your OneDrive account.
WE DO NOT STORE THE ACCESS CREDENTIALS TO YOUR ONEDRIVE ACCOUNT. WE DO NOT HAVE ACCESS TO YOUR ONEDRIVE ACCOUNT. CONNECTIONS TO OUR SITE ARE PROTECTED BY STRONG ENRYPTION (HTTPS), THEREFORE NOBODY ELSE CAN SEE THE INFORMATION EXCHANGED BETWEEN YOUR SITE AND OUR SITE AND BETWEEN OUR SITE AND ONEDRIVE. HOWEVER, AT THE FINAL STEP OF THE AUTHENTICATION PROCESS, YOUR BROWSER IS SENDING THE ACCESS TOKENS TO YOUR SITE. SOMEONE CAN STEAL THEM IN TRANSIT IF AND ONLY IF YOU ARE NOT USING HTTPS ON YOUR SITE'S ADMINISTRATOR.
For this reason we DO NOT accept any responsibility whatsoever for any use, abuse or misuse of your connection information to OneDrive. If you do not accept this condition you are FORBIDDEN from using the intermediary script on our site which, simply put, means that you cannot use the OneDrive integration.
| Important |
|---|---|
|
Access to the intermediary script on our servers requires a. an active subscription to any of our products and b. entering a valid Download ID for your AkeebaBackup.com account in the component's options. If the Download ID is invalid or corresponds to an expired subscription you will be unable to use the intermediary script on our servers. As a result you will be unable to upload backup archives to OneDrive. |
Moreover, the above means that there are additional requirements for using OneDrive integration on your Akeeba Backup installation:
-
You need the PHP cURL extension to be loaded and enabled on your server. Most servers do that by default. If your server doesn't have it enabled the upload will fail and warn you that cURL is not enabled.
-
Your server's firewall must allow outbound HTTPS connections to www.akeebabackup.com and www.akeeba.com over port 443 (standard HTTPS port) to get new tokens every time the current access token expires.
-
Your server's firewall must allow outbound HTTPS connections to OneDrive's domains over port 443 to allow the integration to work. These domain names are, unfortunately, not predefined. Most likely your server administrator will have to allow outbound HTTPS connections to any domain name to allow this integration to work. This is a restriction of how the OneDrive service is designed, not something we can modify (obviously, we're not Microsoft).
Settings
Upload to OneDrive
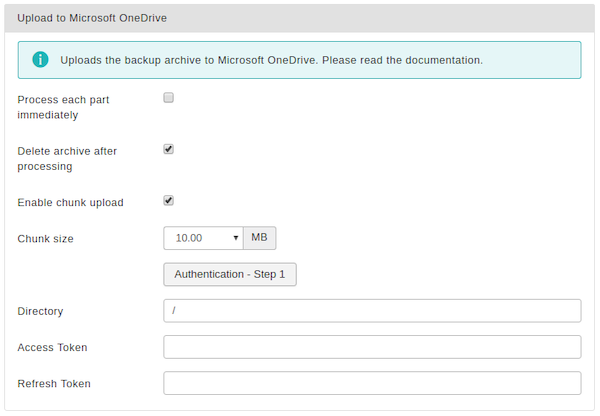
The required settings for this engine are:
- Process each part immediately
-
If you enable this, each backup part will be uploaded as soon as it's ready. This is useful if you are low on disk space (disk quota) when used in conjunction with Delete archive after processing. When using this feature we suggest having 10Mb plus the size of your part for split archives free in your account. The drawback with enabling this option is that if the upload fails, the backup fails. If you don't enable this option, the upload process will take place after the backup is complete and finalized. This ensures that if the upload process fails a valid backup will still be stored on your server. The drawback is that it requires more available disk space.
- Fail backup on upload failure
-
When this option is set to No (default) the backup will not stop if uploading the backup archive to the remote storage fails. A warning will be issued, but the backup will be marked as successful. You can then go to the Manage Backups page and retry uploading the backup archive to remote storage. This is useful if the backup failed to upload because of a transient network or remote server issue, or a misconfiguration you have fixed after the backup was taken. This also acts as a safety net: if your site breaks after the backup is taken you can restore from the latest backup archive which failed to upload —in whole or in part— to remote storage.
When this option is set to Yes the backup will stop as soon as Akeeba Backup detects that it failed to upload a backup archive to the remote storage. If you have set Process each part immediately to No (default) that will be it; the backup attempt will be marked as Failed and all backup archive files of this backup attempt will be removed. If you have set have set Process each part immediately to Yes and some backup archive files have already been uploaded to the remote storage they will be left behind when the backup attempt is marked as Failed; you will have to remove them yourself, manually, outside of Akeeba Backup. In either case you will not have a valid backup. If your site breaks before you can rectify the problem you are left without a backup.
Considering that the vast majority of the rare occurrences of backup upload failures we see are transient issues, we consider this option to be dangerous as it can unexpectedly leave you without a valid backup when you need one. It is far better to leave this setting set to No and monitor your backups for warnings. There are extremely few use cases where this option makes sense (e.g. taking a backup of a site on a server without enough space for both the backup archive and the site to coexist, a situation which is anyway problematic should you need to restore the backup). We very strongly recommend not enabling this option unless you have a compelling use case and understand the implications of potentially being left without a valid backup at random.
- Delete archive after processing
-
If enabled, the archive files will be removed from your server after they are uploaded to OneDrive.
- Authorisation – Step 1
-
Before you can use Akeeba Backup with OneDrive you have to "link" your OneDrive account with your Akeeba Backup installation. This allows Akeeba Backup to access your OneDrive account without you storing the username (email) and password to. The authentication is a simple process. First click on the button. A popup window opens, allowing you to log in to your OneDrive account. Once you log in successfully, you are shown a page with the access and refresh tokens (the "keys" returned by OneDrive to be used for connecting to the service) and the URL to your site. Double check that the URL to your site is correct and click on the big blue "Finalize authentication" button. The popup window closes automatically.
Alternatively, instead of clicking that big blue button you can copy the Access Token and Refresh Token from the popup window to Akeeba Backup's configuration page at the same-named fields. Afterwards you can close the popup.
Important As described above, this process routes you through our own site (akeebabackup.com) due to OneDrive's API restrictions. We do NOT store your login information or tokens and we do NOT have access to your OneDrive account. If, however, you do not agree being routed through our site you are FORBIDDEN from using this intermediary service on our site and you cannot use the OneDrive integration feature. We repeat for a third time that this is a restriction imposed by the OneDrive API, not us. We CANNOT work around this restriction, so we created a very secure solution which works within the restrictions imposed by the OneDrive API.
- Directory
-
The directory inside your OneDrive account where your files will be stored in. If you want to use subdirectories, you have to use a forward slash, e.g.
/directory/subdirectory/subsubdirectory. - Enabled chunked upload
-
When enabled Akeeba Backup will try to upload your backup archives / backup archive parts in small chunks and then ask OneDrive to assemble them back into one file. If your backup archive parts are over 10Mb you are strongly encouraged to check this option.
- Chunk size
-
This option determines the size of the chunk which will be used by the chunked upload option above. We recommend a relatively small value around 4 to 20 Mb to prevent backup timeouts. The exact maximum value you can use depends on the speed of your server and its connection speed to OneDrive's server. Try starting high and lower it if the backup fails during transfer to OneDrive. You cannot set a chunk size lower than 1Mb or higher than 60Mb because of OneDrive's API restrictions. We recommend using 4, 10 or 20Mb (tested and found to be properly working).
- Access Token
-
This is the connection token to OneDrive. Normally, it is automatically sent to your site when clicking the blue button from the Authentication Step 1 popup described above. If you do not wish to click that button copy the (very, VERY long!) Access Token from that popup window into this box.
Unlike other engines, such as Dropbox, you CANNOT share OneDrive tokens between multiple site. Each site MUST go through the authentication process described above and use a different set of Access and Refresh tokens!
- Refresh Token
-
This is the refresh token to OneDrive, used to get a fresh Access Token when the previous one expires. Normally, it is automatically sent to your site when clicking the blue button from the Authentication Step 1 popup described above. If you do not wish to click that button copy the (very, VERY long!) Refresh Token from that popup window into this box.
Unlike other engines, such as Dropbox, you CANNOT share OneDrive tokens between multiple site. Each site MUST go through the authentication process described above and use a different set of Access and Refresh tokens!
| Note |
|---|---|
|
This feature is available only to Akeeba Backup Professional. |
Using this engine, you can upload your backup archives to the Microsoft Windows Azure BLOB Storage cloud storage service. This cloud storage service from Microsoft is reasonably priced and quite fast, with lots of local endpoints around the globe.
File size limits
Azure BLOB Storage, like most modern file storage services, supports two ways of uploading files: either all at once or in chunks (multipart upload). When uploading files all at once the maximum file size is 5000Mb. When uploading in chunks the maximum file size is 50,000 chunks, therefore the maximum file size is determined by the chunk size. The chunk sizes supported are 1Mb to 4000Mb. This means that the maximum size of a single backup archive file you can upload is between 48.82Gb and 190.7Tb.
| Note |
|---|---|
|
Akeeba Backup 3.0 to 8.1.3 (inclusive) only supported an old version of the Azure API which had a maximum upload limit of 64MiB. Moreover, they did not support chunked (multipart) uploads of larger files. The information below only applies to Akeeba Backup 8.1.3 and newer versions in the 8.x range. If you are using Akeeba Backup 9 or later please refer to its documentation instead. If you are still using an older version of Akeeba Backup you will have to set the Part size for archive splitting to 64MiB or less. Typically, you'd need to use 10Mb to avoid your server timing out during the upload. |
Multipart uploads
Do keep in mind that when running a backup over the web (using a browser, the remote JSON API or the legacy frontend backup method) there are several server-related timeouts you cannot ignore. First and foremost there's the PHP timeout itself which, in most cases, we can work around. There are also timeouts in the PHP FastCGI Process Manager (FPM) whenever it's used, your web server (Apache, NginX, IIS, ...) and the operating system itself (maximum CPU usage time per process a.k.a. ulimit -t). These can affect how long an individual upload operation can run. The time required to upload a backup archive file (for all at once uploads) or a chunk of it (for multipart uploads) to Azure equals the size of the file or chunk divided by the available bandwidth.
We want the time to upload a file / chunk to be less than the minimum time limit restriction on your server so as to avoid timing out. Since the available bandwidth is finite and constant, the only thing we can reduce in order to avoid timeouts is the file or chunk size. To this end, there are two thing you can do depending on how you are uploading files:
- For all at one uploads you have to produce split backup archives, by setting the Part size for archive splitting in the archiver engine's configuration pane. The suggested values are between 10 and 20 Mb.
- For multipart uploads you should set the chunk size. Recommended values are 1Mb to 100Mb depending on your server's available bandwidth. We recommend starting with 10Mb. If it times out, decrease it. If it works fine, try increasing it until you hit a timeout; when that happens, walk back to the previous setting.
If you use the native CLI backup script there is no applicable time limit except the server's maximum CPU usage time per process which controls the total time the backup and upload process can take. As a result you can select to NOT do chunked uploads if the backup profile is only ever going to be used under the CLI backup script. Also remember that if your CLI backup script fails you should ask your host to “increase the ulimit -t for CLI scripts” — just tell them that and the second level support of your host will know what to do.
Getting the account name and account key
-
Go to your Subscriptions page on the Azure Portal.
-
Click on your subscription name.
-
In the new blade that opens find the Settings header and click Resources under it.
-
Click on the Storage Account resource your container is located in.
-
Make sure that under the Properties tab, Security header, the “Storage account key access” setting is Enabled. If not, you need to enable it.
-
In the sidebar find the Security + Networking header and click on Access Keys under it.
-
Click at the Show Keys link at the top of the main content area.
-
Copy the “Storage account name” into the Account Name field in Akeeba Backup.
-
Find the key1 heading and copy the contents of the “Key” field into the Primary Access Key field.
Upload to Microsoft Windows Azure BLOB Storage
The required settings for this engine are:
- Process each part immediately
-
If you enable this, each backup part will be uploaded as soon as it's ready. This is useful if you are low on disk space (disk quota) when used in conjunction with Delete archive after processing. When using this feature we suggest having 10Mb plus twice the size of your part size for split archives free in your account. If you don't enable this option, the upload process will take place after the backup is complete and finalized. The drawback to that is that it requires more available disk space.
- Fail backup on upload failure
-
When this option is set to No (default) the backup will not stop if uploading the backup archive to the remote storage fails. A warning will be issued, but the backup will be marked as successful. You can then go to the Manage Backups page and retry uploading the backup archive to remote storage. This is useful if the backup failed to upload because of a transient network or remote server issue, or a misconfiguration you have fixed after the backup was taken. This also acts as a safety net: if your site breaks after the backup is taken you can restore from the latest backup archive which failed to upload —in whole or in part— to remote storage.
When this option is set to Yes the backup will stop as soon as Akeeba Backup detects that it failed to upload a backup archive to the remote storage. If you have set Process each part immediately to No (default) that will be it; the backup attempt will be marked as Failed and all backup archive files of this backup attempt will be removed. If you have set have set Process each part immediately to Yes and some backup archive files have already been uploaded to the remote storage they will be left behind when the backup attempt is marked as Failed; you will have to remove them yourself, manually, outside of Akeeba Backup. In either case you will not have a valid backup. If your site breaks before you can rectify the problem you are left without a backup.
Considering that the vast majority of the rare occurrences of backup upload failures we see are transient issues, we consider this option to be dangerous as it can unexpectedly leave you without a valid backup when you need one. It is far better to leave this setting set to No and monitor your backups for warnings. There are extremely few use cases where this option makes sense (e.g. taking a backup of a site on a server without enough space for both the backup archive and the site to coexist, a situation which is anyway problematic should you need to restore the backup). We very strongly recommend not enabling this option unless you have a compelling use case and understand the implications of potentially being left without a valid backup at random.
- Delete archive after processing
-
If enabled, the archive files will be removed from your server after they are uploaded to Azure.
- Enable chunk upload
-
Should we use multipart uploads for large archive files? Archive files over the Chunk Size threshold will be uploaded in multiple chunks, each one at most as big as the Chunks Size.
Important Microsoft Azure BLOB Storage has a hard limit of up to 50,000 parts per uploaded file. If your backup archive is bigger than 50,000 times the Chunk Size it's not possible to upload it using the multipart. In this case Akeeba Backup will try to upload it all at once which might lead to a timeout. If this happens we strongly recommend setting up the Part Size for Archive Splitting in the Archiver Engine options, setting that to a value under 2000Mb.
- Chunk size
-
How much of the backup archive to transfer at once. Please refer to the Multipart Uploads information above the image.
- Account name
-
The storage account name for your Microsoft Azure subscription. See the instructions above the image.
- Primary Access Key
-
The key1 value for accessing your Microsoft Azure subscription. See the instructions above the image.
- Use SSL
-
Please leave this enabled. It tells Akeeba Backup to use the secure HTTPS protocol to communicate to Microsoft Azure. Disabling it will use the insecure HTTP protocol, without any encryption of your communication between your site's server and Microsoft Azure. Support for using unencrypted HTTP might be removed by Microsoft without prior warning.
- Container
-
The name of the Azure container where you want to store your archives in.
- Directory
-
The directory inside your Azure container where your files will be stored in. If you want to use subdirectories, you have to use a forward slash, e.g.
/directory/subdirectory/subsubdirectory. Leave blank to store the files on the container's root.
| Note |
|---|---|
|
This feature is available only to Akeeba Backup Professional. |
Using this engine, you can upload your backup archives to the OVH Object Storage cloud storage service. This allows you to upload files into OVH's public cloud, powered by the OpenStack technology.
Before you begin, you should know the limitations. As most cloud storage providers, OVH does not allow appending to files, so the archive has to be transferred in a single step. PHP has a time limit restriction we can't overlook. The time required to upload a file to OVH equals the size of the file divided by the available bandwidth. We want to time to upload a file to be less than PHP's time limit restriction so as to avoid timing out. Since the available bandwidth is finite and constant, the only thing we can reduce in order to avoid timeouts is the file size. To this end, you have to produce split archives, by setting the part size for archive splitting in ZIP's or JPA's engine configuration pane. The suggested values are between 10 and 20 MB.
If you use the native CRON mode (akeeba-backup.php), there is usually no time limit - or there is a very high time limit in the area of 3 minutes or so. Ask your host about it. Setting up a profile for use only with the native CRON mode allows you to increase the part size and reduce the number of parts a complete backup consists of.
Before you begin
You will need to set up object storage and collect some necessary but not necessarily obvious information from your OVH account. You can do so through OVH's Cloud Manager portal.
From the left side menu click on Servers and expand your cloud server. If you do not have a server yet you will need to use the Order button to purchase credits. Please note that credits activation can take several days if this is your first order.
Click on the Infrastructure link under your server. In the main area of the manager page you will see the name of your server. Below it, in hard to see grey letters, you will see a 32-digit alphanumeric code such as abcdef0123456789abcdef0123456789. Note it down. This is your Project ID.
Click on the Storage link under your server. You will see a list of your containers. If you do not have any containers yet, create a new one. Make sure to select the Private type; you don't want your backups to be publicly accessible! Click on your server's name. The main area changes. You will see a box with information such as objects, container size and Container URL. Note down the Container URL.
Click on the OpenStack link under your server. If you have not created an OpenStack user yet, create one now. Copy the values under the ID and Password columns. These are, respectively, your OpenStack Username and OpenStack Password.
Upload to OVH Object Storage
The required settings for this engine are:
- Process each part immediately
-
If you enable this, each backup part will be uploaded as soon as it's ready. This is useful if you are low on disk space (disk quota) when used in conjunction with Delete archive after processing. When using this feature we suggest having 10Mb plus the size of your part for split archives free in your account. The drawback with enabling this option is that if the upload fails, the backup fails. If you don't enable this option, the upload process will take place after the backup is complete and finalized. This ensures that if the upload process fails a valid backup will still be stored on your server. The drawback is that it requires more available disk space.
- Fail backup on upload failure
-
When this option is set to No (default) the backup will not stop if uploading the backup archive to the remote storage fails. A warning will be issued, but the backup will be marked as successful. You can then go to the Manage Backups page and retry uploading the backup archive to remote storage. This is useful if the backup failed to upload because of a transient network or remote server issue, or a misconfiguration you have fixed after the backup was taken. This also acts as a safety net: if your site breaks after the backup is taken you can restore from the latest backup archive which failed to upload —in whole or in part— to remote storage.
When this option is set to Yes the backup will stop as soon as Akeeba Backup detects that it failed to upload a backup archive to the remote storage. If you have set Process each part immediately to No (default) that will be it; the backup attempt will be marked as Failed and all backup archive files of this backup attempt will be removed. If you have set have set Process each part immediately to Yes and some backup archive files have already been uploaded to the remote storage they will be left behind when the backup attempt is marked as Failed; you will have to remove them yourself, manually, outside of Akeeba Backup. In either case you will not have a valid backup. If your site breaks before you can rectify the problem you are left without a backup.
Considering that the vast majority of the rare occurrences of backup upload failures we see are transient issues, we consider this option to be dangerous as it can unexpectedly leave you without a valid backup when you need one. It is far better to leave this setting set to No and monitor your backups for warnings. There are extremely few use cases where this option makes sense (e.g. taking a backup of a site on a server without enough space for both the backup archive and the site to coexist, a situation which is anyway problematic should you need to restore the backup). We very strongly recommend not enabling this option unless you have a compelling use case and understand the implications of potentially being left without a valid backup at random.
- Delete archive after processing
-
If enabled, the archive files will be removed from your server after they are uploaded to OVH.
- Project ID
-
See above.
- OpenStack Username
-
See above.
- OpenStack Password
-
See above.
- Container URL
-
See above.
- Directory
-
The directory inside your OVH container where your files will be stored in. If you want to use subdirectories, you have to use a forward slash, e.g.
/directory/subdirectory/subsubdirectory. Leave blank to store the files on the container's root.
This allows you to upload backup archive to any OpenStack Swift implementation. This is the same thing as the OVH Object Storage (see above) with two additional options:
- Authentication URL
-
The endpoint for the Keystone service of your OpenStack installation. DO include the version. DO NOT include the /token suffix. Example: https://authentication.example.com/v2.0
- Tenant ID
-
Your OpenStack tenant ID, e.g. a0b1c2d3e4f56789abcdef0123456789
| Note |
|---|---|
|
This feature is available only to Akeeba Backup Professional. |
Using this engine, you can upload your backup archives to the RackSpace CloudFiles cloud storage service. This service had previously been called Mosso.
Before you begin, you should know the limitations. As most cloud storage providers, CloudFiles does not allow appending to files, so the archive has to be transferred in a single step. PHP has a time limit restriction we can't overlook. The time required to upload a file to CloudFiles equals the size of the file divided by the available bandwidth. We want to time to upload a file to be less than PHP's time limit restriction so as to avoid timing out. Since the available bandwidth is finite and constant, the only thing we can reduce in order to avoid timeouts is the file size. To this end, you have to produce split archives, by setting the part size for archive splitting in ZIP's or JPA's engine configuration pane. The suggested values are between 10 and 20 MB.
If you use the native CRON mode (akeeba-backup.php), there is usually no time limit - or there is a very high time limit in the area of 3 minutes or so. Ask your host about it. Setting up a profile for use only with the native CRON mode allows you to increase the part size and reduce the number of parts a complete backup consists of.
Upload to RackSpace CloudFiles
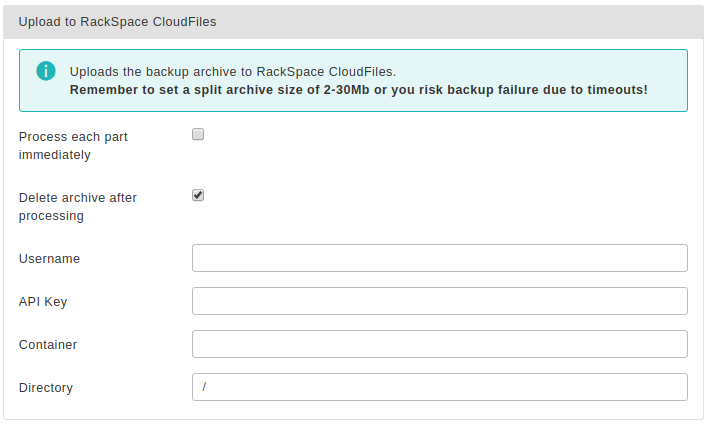
The required settings for this engine are:
- Process each part immediately
-
If you enable this, each backup part will be uploaded as soon as it's ready. This is useful if you are low on disk space (disk quota) when used in conjunction with Delete archive after processing. When using this feature we suggest having 10Mb plus the size of your part for split archives free in your account. The drawback with enabling this option is that if the upload fails, the backup fails. If you don't enable this option, the upload process will take place after the backup is complete and finalized. This ensures that if the upload process fails a valid backup will still be stored on your server. The drawback is that it requires more available disk space.
- Fail backup on upload failure
-
When this option is set to No (default) the backup will not stop if uploading the backup archive to the remote storage fails. A warning will be issued, but the backup will be marked as successful. You can then go to the Manage Backups page and retry uploading the backup archive to remote storage. This is useful if the backup failed to upload because of a transient network or remote server issue, or a misconfiguration you have fixed after the backup was taken. This also acts as a safety net: if your site breaks after the backup is taken you can restore from the latest backup archive which failed to upload —in whole or in part— to remote storage.
When this option is set to Yes the backup will stop as soon as Akeeba Backup detects that it failed to upload a backup archive to the remote storage. If you have set Process each part immediately to No (default) that will be it; the backup attempt will be marked as Failed and all backup archive files of this backup attempt will be removed. If you have set have set Process each part immediately to Yes and some backup archive files have already been uploaded to the remote storage they will be left behind when the backup attempt is marked as Failed; you will have to remove them yourself, manually, outside of Akeeba Backup. In either case you will not have a valid backup. If your site breaks before you can rectify the problem you are left without a backup.
Considering that the vast majority of the rare occurrences of backup upload failures we see are transient issues, we consider this option to be dangerous as it can unexpectedly leave you without a valid backup when you need one. It is far better to leave this setting set to No and monitor your backups for warnings. There are extremely few use cases where this option makes sense (e.g. taking a backup of a site on a server without enough space for both the backup archive and the site to coexist, a situation which is anyway problematic should you need to restore the backup). We very strongly recommend not enabling this option unless you have a compelling use case and understand the implications of potentially being left without a valid backup at random.
- Delete archive after processing
-
If enabled, the archive files will be removed from your server after they are uploaded to CloudFiles.
- Username
-
The username assigned to you by the RackSpace CloudFiles service
- API Key
-
The API Key found in your CloudFiles account
- Container
-
The name of the CloudFiles container where you want to store your archives in.
- Directory
-
The directory inside your CloudFiles container where your files will be stored in. If you want to use subdirectories, you have to use a forward slash, e.g.
/directory/subdirectory/subsubdirectory. Leave blank to store the files on the container's root.
| Note |
|---|---|
|
This feature is available only to Akeeba Backup Professional. |
Using this engine, you can upload your backup archives to any FTP or FTPS (FTP over Explicit SSL) server. There are some "FTP" protocols and other file storage protocols which are not supported, such as SFTP, SCP, Secure FTP, FTP over Implicit SSL and SSH variants. The difference of this engine to the DirectFTP archiver engine is that this engine uploads backup archives to the server, whereas DirectFTP uploads the uncompressed files of your site. DirectFTP is designed for rapid migration, this engine is designed for easy moving of your backup archives to an off-server location.
This engine uses PHP's native FTP functions. This may not work if your host has disabled PHP's native FTP functions or if your remote FTP server is incompatible with them. In this case you may want to use the Upload to Remote FTP server over cURL engine instead.
Your originating server must support PHP's FTP extensions and not have its FTP functions blocked. Your originating server must not block FTP communication to the remote (target) server. Some hosts apply a firewall policy which requires you to specify to which hosts your server can connect. In such a case you might need to allow communication to your remote host.
Before you begin, you should know the limitations. Most servers do not allow resuming of uploads (or even if they do, PHP doesn't quite support this feature), so the archive has to be transferred in a single step. PHP has a time limit restriction we can't overlook. The time required to upload a file to FTP equals the size of the file divided by the available bandwidth. We want to time to upload a file to be less than PHP's time limit restriction so as to avoid timing out. Since the available bandwidth is finite and constant, the only thing we can reduce in order to avoid timeouts is the file size. To this end, you have to produce split archives, by setting the part size for archive splitting in ZIP's or JPA's engine configuration pane. The suggested values are between 10 and 20 MB.
Upload to Remote FTP Server
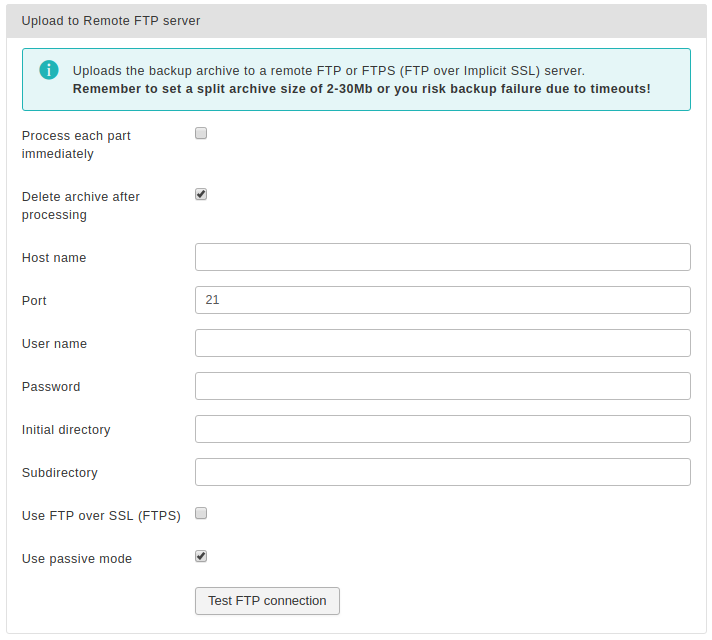
The available configuration options are:
- Process each part immediately
-
If you enable this, each backup part will be uploaded as soon as it's ready. This is useful if you are low on disk space (disk quota) when used in conjunction with Delete archive after processing. When using this feature we suggest having 10Mb plus the size of your part for split archives free in your account. The drawback with enabling this option is that if the upload fails, the backup fails. If you don't enable this option, the upload process will take place after the backup is complete and finalized. This ensures that if the upload process fails a valid backup will still be stored on your server. The drawback is that it requires more available disk space.
- Fail backup on upload failure
-
When this option is set to No (default) the backup will not stop if uploading the backup archive to the remote storage fails. A warning will be issued, but the backup will be marked as successful. You can then go to the Manage Backups page and retry uploading the backup archive to remote storage. This is useful if the backup failed to upload because of a transient network or remote server issue, or a misconfiguration you have fixed after the backup was taken. This also acts as a safety net: if your site breaks after the backup is taken you can restore from the latest backup archive which failed to upload —in whole or in part— to remote storage.
When this option is set to Yes the backup will stop as soon as Akeeba Backup detects that it failed to upload a backup archive to the remote storage. If you have set Process each part immediately to No (default) that will be it; the backup attempt will be marked as Failed and all backup archive files of this backup attempt will be removed. If you have set have set Process each part immediately to Yes and some backup archive files have already been uploaded to the remote storage they will be left behind when the backup attempt is marked as Failed; you will have to remove them yourself, manually, outside of Akeeba Backup. In either case you will not have a valid backup. If your site breaks before you can rectify the problem you are left without a backup.
Considering that the vast majority of the rare occurrences of backup upload failures we see are transient issues, we consider this option to be dangerous as it can unexpectedly leave you without a valid backup when you need one. It is far better to leave this setting set to No and monitor your backups for warnings. There are extremely few use cases where this option makes sense (e.g. taking a backup of a site on a server without enough space for both the backup archive and the site to coexist, a situation which is anyway problematic should you need to restore the backup). We very strongly recommend not enabling this option unless you have a compelling use case and understand the implications of potentially being left without a valid backup at random.
- Delete archive after processing
-
If enabled, the archive files will be removed from your server after they are uploaded to the FTP server.
- Host name
-
The hostname of your remote (target) server, e.g.
ftp.example.com. You must NOT enter the ftp:// protocol prefix. If you do, Akeeba Backup will try to remove it automatically and issue a warning about it. - Port
-
The TCP/IP port of your remote host's FTP server. It's usually 21.
- User name
-
The username you have to use to connect to the remote FTP server.
- Password
-
The password you have to use to connect to the remote FTP server.
- Initial directory
-
The absolute FTP directory to your remote site's location where your archives will be stored. This is provided by your hosting company. Do not ask us to tell you what you should put in here because we can't possibly know. There is an easy way to find it, though. Connect to your target FTP server with FileZilla. Navigate to the intended directory. Above the right-hand folder pane you will see a text box with a path. Copy this path and paste it to Akeeba Backup's setting.
- Use FTP over SSL
-
If your remote server supports secure FTP connections over SSL (they have to be Explicit SSL; implicit SSL is not supported), you can enable this feature. In such a case you will most probably have to change the port. Please ask your hosting company to provide you with more information on whether they support this feature and what port you should use. You must note that this feature must also be supported by your originating server as well.
- Use passive mode
-
Normally you should enable it, as it is the most common and firewall-safe transfer mode supported by FTP servers. Sometimes, you remote server might require active FTP transfers. In such a case please disable this, but bear in mind that your originating server might not support active FTP transfers, which usually requires tweaking the firewall!
| Note |
|---|---|
|
This feature is available only to Akeeba Backup Professional. |
Using this engine, you can upload your backup archives to any FTP or FTPS (FTP over Exclicit SSL) server. There are some "FTP" protocols and other file storage protocols which are not supported, such as SFTP, SCP, Secure FTP, FTP over Implicit SSL and SSH variants. The difference of this engine to the DirectFTP over cURL archiver engine is that this engine uploads backup archives to the server, whereas DirectFTP over cURL uploads the uncompressed files of your site. DirectFTP over cURL is designed for rapid migration, this engine is designed for easy moving of your backup archives to an off-server location.
This engine uses PHP's cURL functions. This may not work if your host has not installed or enabled the cURL functions. In this case you may want to use the Upload to Remote FTP server engine instead.
Your originating server must support PHP's cURL extension and not have its FTP functions blocked. Your originating server must not block FTP communication to the remote (target) server. Some hosts apply a firewall policy which requires you to specify to which hosts your server can connect. In such a case you might need to allow communication to your remote host.
Before you begin, you should know the limitations. Most servers do not allow resuming of uploads (or even if they do, PHP doesn't quite support this feature), so the archive has to be transferred in a single step. PHP has a time limit restriction we can't overlook. The time required to upload a file to FTP equals the size of the file divided by the available bandwidth. We want to time to upload a file to be less than PHP's time limit restriction so as to avoid timing out. Since the available bandwidth is finite and constant, the only thing we can reduce in order to avoid timeouts is the file size. To this end, you have to produce split archives, by setting the part size for archive splitting in ZIP's or JPA's engine configuration pane. The suggested values are between 10 and 20 MB.
Upload to Remote FTP Server over cURL
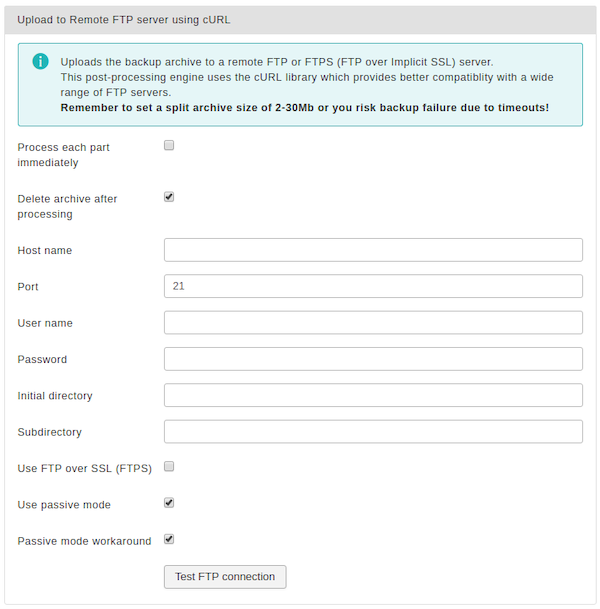
The available configuration options are:
- Process each part immediately
-
If you enable this, each backup part will be uploaded as soon as it's ready. This is useful if you are low on disk space (disk quota) when used in conjunction with Delete archive after processing. When using this feature we suggest having 10Mb plus the size of your part for split archives free in your account. The drawback with enabling this option is that if the upload fails, the backup fails. If you don't enable this option, the upload process will take place after the backup is complete and finalized. This ensures that if the upload process fails a valid backup will still be stored on your server. The drawback is that it requires more available disk space.
- Fail backup on upload failure
-
When this option is set to No (default) the backup will not stop if uploading the backup archive to the remote storage fails. A warning will be issued, but the backup will be marked as successful. You can then go to the Manage Backups page and retry uploading the backup archive to remote storage. This is useful if the backup failed to upload because of a transient network or remote server issue, or a misconfiguration you have fixed after the backup was taken. This also acts as a safety net: if your site breaks after the backup is taken you can restore from the latest backup archive which failed to upload —in whole or in part— to remote storage.
When this option is set to Yes the backup will stop as soon as Akeeba Backup detects that it failed to upload a backup archive to the remote storage. If you have set Process each part immediately to No (default) that will be it; the backup attempt will be marked as Failed and all backup archive files of this backup attempt will be removed. If you have set have set Process each part immediately to Yes and some backup archive files have already been uploaded to the remote storage they will be left behind when the backup attempt is marked as Failed; you will have to remove them yourself, manually, outside of Akeeba Backup. In either case you will not have a valid backup. If your site breaks before you can rectify the problem you are left without a backup.
Considering that the vast majority of the rare occurrences of backup upload failures we see are transient issues, we consider this option to be dangerous as it can unexpectedly leave you without a valid backup when you need one. It is far better to leave this setting set to No and monitor your backups for warnings. There are extremely few use cases where this option makes sense (e.g. taking a backup of a site on a server without enough space for both the backup archive and the site to coexist, a situation which is anyway problematic should you need to restore the backup). We very strongly recommend not enabling this option unless you have a compelling use case and understand the implications of potentially being left without a valid backup at random.
- Delete archive after processing
-
If enabled, the archive files will be removed from your server after they are uploaded to the FTP server.
- Host name
-
The hostname of your remote (target) server, e.g.
ftp.example.com. You must NOT enter the ftp:// protocol prefix. If you do, Akeeba Backup will try to remove it automatically and issue a warning about it. - Port
-
The TCP/IP port of your remote host's FTP server. It's usually 21.
- User name
-
The username you have to use to connect to the remote FTP server.
- Password
-
The password you have to use to connect to the remote FTP server.
- Initial directory
-
The absolute FTP directory to your remote site's location where your archives will be stored. This is provided by your hosting company. Do not ask us to tell you what you should put in here because we can't possibly know. There is an easy way to find it, though. Connect to your target FTP server with FileZilla. Navigate to the intended directory. Above the right-hand folder pane you will see a text box with a path. Copy this path and paste it to Akeeba Backup's setting.
- Use FTP over SSL
-
If your remote server supports secure FTP connections over SSL (they have to be Explicit SSL; implicit SSL is not supported), you can enable this feature. In such a case you will most probably have to change the port. Please ask your hosting company to provide you with more information on whether they support this feature and what port you should use. You must note that this feature must also be supported by your originating server as well.
- Use passive mode
-
Normally you should enable it, as it is the most common and firewall-safe transfer mode supported by FTP servers. Sometimes, you remote server might require active FTP transfers. In such a case please disable this, but bear in mind that your originating server might not support active FTP transfers, which usually requires tweaking the firewall!
- Passive mode workaround
-
Some badly configured / misbehaving servers report the wrong IP address when you enable the passive mode. Usually they report their internal network IP address (something like 127.0.0.1 or 192.168.1.123) instead of their public, Internet-accessible IP address. This erroneous information confuses FTP information, causing uploads to stall and eventually fail. Enabling this workaround option instructs cURL to ignore the IP address reported by the server and instead use the FTP server's public IP address, as seen by your web server. In most cases this works much better, therefore we recommend leaving this option turned on if you're not sure. You should only disable it in case of an exotic setup where the FTP server uses two different public IP addresses for the control and data channels.
| Note |
|---|---|
|
This feature is available only to Akeeba Backup Professional. |
| Note |
|---|---|
|
This engine uses the PHP extension called SSH2. The SSH2 extension is still marked as an alpha and is not enabled by default or even provided by many commercial hosts. In this case you may want to use the Upload to Remote SFTP server over cURL engine instead which uses PHP's cURL extension, available on most hosts. |
Using this engine, you can upload your backup archives to any SFTP (Secure File Transfer Protocol) server. Please note that SFTP is the encrypted file transfer protocol provided by SSH servers. Even though the name is close, it has nothing to do with plain old FTP or FTP over SSL. Not all servers support this but for those which do this is the most secure file transfer option.
The difference of this engine to the DirectSFTP archiver engine is that this engine uploads backup archives to the server, whereas DirectSFTP uploads the uncompressed files of your site. DirectSFTP is designed for rapid migration, this engine is designed for easy moving of your backup archives to an off-server location. Moreover, this engine also supports connecting to your SFTP server using cryptographic key files instead of passwords, a much safer (and much harder and geekier) user authentication method.
Your originating server must have PHP's SSH2 module installed and activated and its functions unblocked. Your originating server must also not block SFTP communication to the remote (target) server. Some hosts apply a firewall policy which requires you to specify to which hosts your server can connect. In such a case you might need to allow communication to your remote host over TCP port 22 (or whatever port you are using).
Upload to Remote SFTP Server
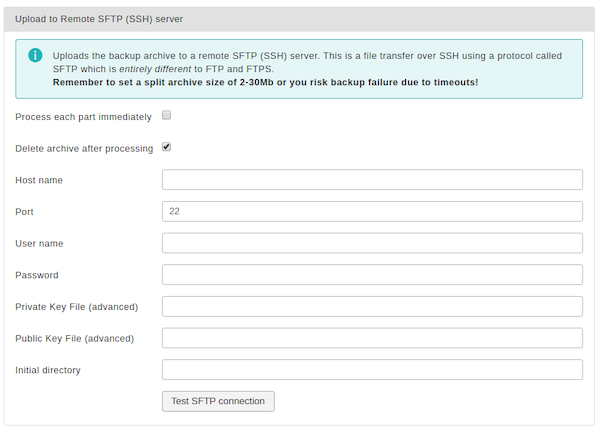
Before you begin, you should know the limitations. SFTP does not allow resuming of uploads so the archive has to be transferred in a single step. PHP has a time limit restriction we can't overlook. The time required to upload a file to SFTP equals the size of the file divided by the available bandwidth. We want to time to upload a file to be less than PHP's time limit restriction to avoid timing out. Since the available bandwidth is finite and constant, the only thing we can reduce in order to avoid timeouts is the file size. To this end, you have to produce split archives, by setting the part size for archive splitting in ZIP's or JPA's engine configuration pane. The suggested values are between 10Mb and 20Mb. Most servers have a bandwidth cap of 20Mbits, which equals to roughly 2Mb/sec (1 byte is 8 bits, plus there's some traffic overhead, lost packets, etc). With a time limit of 10 seconds, we can upload at most 2 Mb/sec * 10 sec = 20Mb without timing out. If you get timeouts during post-processing lower the part size.
The available configuration options are:
- Process each part immediately
-
If you enable this, each backup part will be uploaded as soon as it's ready. This is useful if you are low on disk space (disk quota) when used in conjunction with Delete archive after processing. When using this feature we suggest having 10Mb plus the size of your part for split archives free in your account. The drawback with enabling this option is that if the upload fails, the backup fails. If you don't enable this option, the upload process will take place after the backup is complete and finalized. This ensures that if the upload process fails a valid backup will still be stored on your server. The drawback is that it requires more available disk space.
- Fail backup on upload failure
-
When this option is set to No (default) the backup will not stop if uploading the backup archive to the remote storage fails. A warning will be issued, but the backup will be marked as successful. You can then go to the Manage Backups page and retry uploading the backup archive to remote storage. This is useful if the backup failed to upload because of a transient network or remote server issue, or a misconfiguration you have fixed after the backup was taken. This also acts as a safety net: if your site breaks after the backup is taken you can restore from the latest backup archive which failed to upload —in whole or in part— to remote storage.
When this option is set to Yes the backup will stop as soon as Akeeba Backup detects that it failed to upload a backup archive to the remote storage. If you have set Process each part immediately to No (default) that will be it; the backup attempt will be marked as Failed and all backup archive files of this backup attempt will be removed. If you have set have set Process each part immediately to Yes and some backup archive files have already been uploaded to the remote storage they will be left behind when the backup attempt is marked as Failed; you will have to remove them yourself, manually, outside of Akeeba Backup. In either case you will not have a valid backup. If your site breaks before you can rectify the problem you are left without a backup.
Considering that the vast majority of the rare occurrences of backup upload failures we see are transient issues, we consider this option to be dangerous as it can unexpectedly leave you without a valid backup when you need one. It is far better to leave this setting set to No and monitor your backups for warnings. There are extremely few use cases where this option makes sense (e.g. taking a backup of a site on a server without enough space for both the backup archive and the site to coexist, a situation which is anyway problematic should you need to restore the backup). We very strongly recommend not enabling this option unless you have a compelling use case and understand the implications of potentially being left without a valid backup at random.
- Delete archive after processing
-
If enabled, the archive files will be removed from your server after they are uploaded to the SFTP server.
- Host name
-
The hostname of your remote (target) server, e.g.
secure.example.com. You must NOT enter the sftp:// or ssh:// protocol prefix. If you do, Akeeba Backup will try to remove it automatically and issue a warning about it. - Port
-
The TCP/IP port of your remote host's SFTP (SSH) server. It's usually 22. If unsure, please ask your host.
- User name
-
The username you have to use to connect to the remote SFTP server. This must be always provided
- Password
-
The password you have to use to connect to the remote SFTP server.
- Private key file (advanced)
-
Many (but not all) SSH/SFTP servers allow you to connect to them using cryptographic key files for user authentication. This method is far more secure than using a password. Passwords can be guessed within some degree of feasibility because of their relatively short length and complexity. Cryptographic keys are night impossible to guess with the current technology due to their complexity (on average, more than 100 times as complex as a typical password).
If you want to use this kind of authentication you will need to provide a set of two files, your public and private key files. In this field you have to enter the full filesystem path to your private key file. The private key file must be in RSA or DSA format and has to be configured to be accepted by your remote host. The exact configuration depends on your SSH/SFTP server and is beyond the scope of this documentation. If you are a curious geek we strongly advise you to search for "ssh certificate authentication" in your favourite search engine for more information.
If you are using encrypted private key files enter the passphrase in the Password field above. If it is not encrypted, which is a bad security practice, leave the Password field blank.
Important If the libssh2 library that the SSH2 extension of PHP is using is compiled against GnuTLS (instead of OpenSSL) you will NOT be able to use encrypted private key files. This has to do with bugs / missing features of GnuTLS, not our code. If you can't get certificate authentication to work please try providing an unencrypted private key file and leave the Password field blank.
- Public Key File (advanced)
-
If you are using the key file authentication method described above you will also have to supply the public key file. Enter here the full filesystem path to the public key file. The public key file must be in RSA or DSA format and, of course, unencrypted (as it's a public key).
- Initial directory
-
The absolute filesystem path to your remote site's location where your archives will be stored. This is provided by your hosting company. Do not ask us to tell you what you should put in here because we can't possibly know. There is an easy way to find it, though. Connect to your target SFTP server with FileZilla. Navigate to the intended directory. Above the right-hand folder pane you will see a text box with a path. Copy this path and paste it to Akeeba Backup's setting.
| Note |
|---|---|
|
This feature is available only to Akeeba Backup Professional. |
| Note |
|---|---|
|
This engine uses the PHP cURL extension. If your host has disabled the cURL extension but has enabled the SSH2 PHP extension you may want to use the Upload to Remote SFTP server engine instead which uses PHP's SSH2 extension. |
Using this engine, you can upload your backup archives to any SFTP (Secure File Transfer Protocol) server. Please note that SFTP is the encrypted file transfer protocol provided by SSH servers. Even though the name is close, it has nothing to do with plain old FTP or FTP over SSL. Not all servers support this but for those which do this is the most secure file transfer option.
The difference of this engine to the DirectSFTP over cURL archiver engine is that this engine uploads backup archives to the server, whereas DirectSFTP over cURL uploads the uncompressed files of your site. DirectSFTP over cURL is designed for rapid migration, this engine is designed for easy moving of your backup archives to an off-server location.
Your originating server (where you are backing up from) must a. have PHP's cURL extension installed and activated, b. have the cURL extension compiled with SFTP support and c. allow outbound TCP/IP connections to your target host's SSH port. Please note that some hosts provide the cURL extension without SFTP support. This feature will NOT work on these hosts. Moreover, some hosts apply a firewall policy which requires you to specify to which hosts your server can connect. In such a case you might need to allow communication to your remote host.
Before you begin, you should know the limitations. SFTP does not allow resuming of uploads so the archive has to be transferred in a single step. PHP has a time limit restriction we can't overlook. The time required to upload a file to SFTP equals the size of the file divided by the available bandwidth. We want to time to upload a file to be less than PHP's time limit restriction to avoid timing out. Since the available bandwidth is finite and constant, the only thing we can reduce in order to avoid timeouts is the file size. To this end, you have to produce split archives, by setting the part size for archive splitting in ZIP's or JPA's engine configuration pane. The suggested values are between 10Mb and 20Mb. Most servers have a bandwidth cap of 20Mbits, which equals to roughly 2Mb/sec (1 byte is 8 bits, plus there's some traffic overhead, lost packets, etc). With a time limit of 10 seconds, we can upload at most 2 Mb/sec * 10 sec = 20Mb without timing out. If you get timeouts during post-processing lower the part size.
Upload to Remote SFTP Server over cURL

The available configuration options are:
- Process each part immediately
-
If you enable this, each backup part will be uploaded as soon as it's ready. This is useful if you are low on disk space (disk quota) when used in conjunction with Delete archive after processing. When using this feature we suggest having 10Mb plus the size of your part for split archives free in your account. The drawback with enabling this option is that if the upload fails, the backup fails. If you don't enable this option, the upload process will take place after the backup is complete and finalized. This ensures that if the upload process fails a valid backup will still be stored on your server. The drawback is that it requires more available disk space.
- Fail backup on upload failure
-
When this option is set to No (default) the backup will not stop if uploading the backup archive to the remote storage fails. A warning will be issued, but the backup will be marked as successful. You can then go to the Manage Backups page and retry uploading the backup archive to remote storage. This is useful if the backup failed to upload because of a transient network or remote server issue, or a misconfiguration you have fixed after the backup was taken. This also acts as a safety net: if your site breaks after the backup is taken you can restore from the latest backup archive which failed to upload —in whole or in part— to remote storage.
When this option is set to Yes the backup will stop as soon as Akeeba Backup detects that it failed to upload a backup archive to the remote storage. If you have set Process each part immediately to No (default) that will be it; the backup attempt will be marked as Failed and all backup archive files of this backup attempt will be removed. If you have set have set Process each part immediately to Yes and some backup archive files have already been uploaded to the remote storage they will be left behind when the backup attempt is marked as Failed; you will have to remove them yourself, manually, outside of Akeeba Backup. In either case you will not have a valid backup. If your site breaks before you can rectify the problem you are left without a backup.
Considering that the vast majority of the rare occurrences of backup upload failures we see are transient issues, we consider this option to be dangerous as it can unexpectedly leave you without a valid backup when you need one. It is far better to leave this setting set to No and monitor your backups for warnings. There are extremely few use cases where this option makes sense (e.g. taking a backup of a site on a server without enough space for both the backup archive and the site to coexist, a situation which is anyway problematic should you need to restore the backup). We very strongly recommend not enabling this option unless you have a compelling use case and understand the implications of potentially being left without a valid backup at random.
- Delete archive after processing
-
If enabled, the archive files will be removed from your server after they are uploaded to the SFTP server.
- Host name
-
The hostname of your remote (target) server, e.g.
secure.example.com. You must NOT enter the sftp:// or ssh:// protocol prefix. If you do, Akeeba Backup will try to remove it automatically and issue a warning about it. - Port
-
The TCP/IP port of your remote host's SFTP (SSH) server. It's usually 22. If unsure, please ask your host.
- User name
-
The username you have to use to connect to the remote SFTP server. This must be always provided
- Password
-
The password you have to use to connect to the remote SFTP server.
- Private key file (advanced)
-
Many (but not all) SSH/SFTP servers allow you to connect to them using cryptographic key files for user authentication. This method is far more secure than using a password. Passwords can be guessed within some degree of feasibility because of their relatively short length and complexity. Cryptographic keys are night impossible to guess with the current technology due to their complexity (on average, more than 100 times as complex as a typical password).
If you want to use this kind of authentication you will need to provide a set of two files, your public and private key files. In this field you have to enter the full filesystem path to your private key file. The private key file must be in RSA or DSA format and has to be configured to be accepted by your remote host. The exact configuration depends on your SSH/SFTP server and is beyond the scope of this documentation. If you are a curious geek we strongly advise you to search for "ssh certificate authentication" in your favourite search engine for more information.
If you are using encrypted private key files enter the passphrase in the Password field above. If it is not encrypted, which is a bad security practice, leave the Password field blank.
Important If cURL is compiled against GnuTLS (instead of OpenSSL) you will NOT be able to use encrypted private key files. This has to do with bugs / missing features of GnuTLS, not our code. If you can't get certificate authentication to work please try providing an unencrypted private key file and leave the Password field blank.
- Public Key File (advanced)
-
If you are using the key file authentication method described above you will also have to supply the public key file. Enter here the full filesystem path to the public key file. The public key file must be in RSA or DSA format and, of course, unencrypted (as it's a public key). Some newer versions of cURL allow you to leave this blank, in which case they will derive the public key information from the private key file. We do not recommend this approach.
- Initial directory
-
The absolute filesystem path to your remote site's location where your archives will be stored. This is provided by your hosting company. Do not ask us to tell you what you should put in here because we can't possibly know. There is an easy way to find it, though. Connect to your target SFTP server with FileZilla. Navigate to the intended directory. Above the right-hand folder pane you will see a text box with a path. Copy this path and paste it to Akeeba Backup's setting.
| Note |
|---|---|
|
This feature is available only to Akeeba Backup Professional 3.5.a1 and later. |
Using this engine, you can upload your backup archives to the SugarSync cloud storage service. SugarSync has a free tier (with 5Gb of free space) and a paid tier. Akeeba Backup can work with either one.
Please note that Akeeba Backup can only upload files to Sync Folders, it can not upload files directly to a Workspace (a single device). You have to set up your Sync Folders in SugarSync before using Akeeba Backup. If you have not created or specified any Sync Folder, Akeeba Backup will upload the backup archives to your Magic Briefcase, the default Sync Folder which syncs between all of your devices, including your mobile devices (iPhone, iPad, Android phones, ...).
Before you begin, you should know the limitations. As most cloud storage providers, SugarSync does not allow appending to files, so the archive has to be transferred in a single step. PHP has a time limit restriction we can't overlook. The time required to upload a file to SugarSync equals the size of the file divided by the available bandwidth. We want to time to upload a file to be less than PHP's time limit restriction so as to avoid timing out. Since the available bandwidth is finite and constant, the only thing we can reduce in order to avoid timeouts is the file size. To this end, you have to produce split archives, by setting the part size for archive splitting in ZIP's or JPA's engine configuration pane. The suggested values are between 10Mb and 20Mb. Most servers have a bandwidth cap of 20Mbits, which equals to roughly 2Mb/sec (1 byte is 8 bits, plus there's some traffic overhead, lost packets, etc). With a time limit of 10 seconds, we can upload at most 2 Mb/sec * 10 sec = 20Mb without timing out. If you get timeouts during post-processing lower the part size.
| Tip |
|---|---|
|
If you use the native CRON mode (akeeba-backup.php), there is usually no time limit - or there is a very high time limit in the area of 3 minutes or so. Ask your host about it. Setting up a profile for use only with the native CRON mode allows you to increase the part size and reduce the number of parts a complete backup consists of. |
First-time setup
Since Akeeba Backup 7.0 you need to perform an additional step the very first time you set up SugarSync to obtain a set of Access Key ID and Secret Access Key which will be used together with your email and password to access SugarSync. SugarSync's API needs all four pieces of information (Access Key ID, Secret Access Key, Email and Password) to grant access to your files.
First go to SygarSync's site and select the Developer Portal option at the footer of the site. If this is your first time there select the Join our Program option. It is free of charge.
Then go to the Developer Console (it requires you to log into SugarSync). At the top of the page there is the Your Access Keys area. If you already have entries there skip this paragraph. If you do not have any entries there click on Add Keys. This creates an entry.
| Note |
|---|---|
|
You can ignore the Your Apps section. In fact, creating an app is optional, makes authentication more complicated and does not offer any security or workflow advantage. Therefore, Akeeba Ltd chose not to implement support for SugarSync's Apps. |
You need to copy the Access Key ID and its corresponding Private Access Key in your Akeeba Backup configuration, as explained below.
Upload to SugarSync
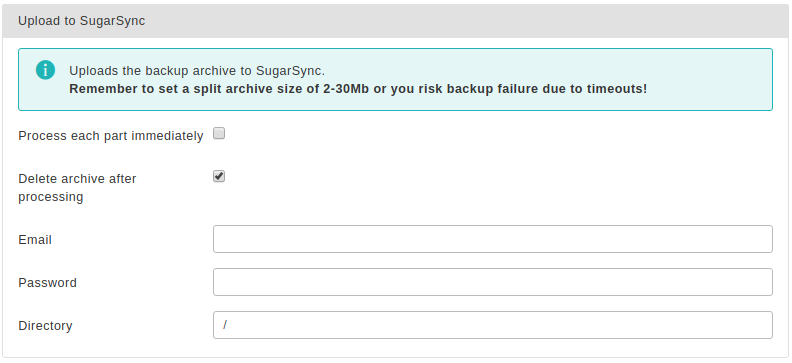
The required settings for this engine are:
- Process each part immediately
-
If you enable this, each backup part will be uploaded as soon as it's ready. This is useful if you are low on disk space (disk quota) when used in conjunction with Delete archive after processing. When using this feature we suggest having 10Mb plus the size of your part for split archives free in your account. The drawback with enabling this option is that if the upload fails, the backup fails. If you don't enable this option, the upload process will take place after the backup is complete and finalized. This ensures that if the upload process fails a valid backup will still be stored on your server. The drawback is that it requires more available disk space.
- Fail backup on upload failure
-
When this option is set to No (default) the backup will not stop if uploading the backup archive to the remote storage fails. A warning will be issued, but the backup will be marked as successful. You can then go to the Manage Backups page and retry uploading the backup archive to remote storage. This is useful if the backup failed to upload because of a transient network or remote server issue, or a misconfiguration you have fixed after the backup was taken. This also acts as a safety net: if your site breaks after the backup is taken you can restore from the latest backup archive which failed to upload —in whole or in part— to remote storage.
When this option is set to Yes the backup will stop as soon as Akeeba Backup detects that it failed to upload a backup archive to the remote storage. If you have set Process each part immediately to No (default) that will be it; the backup attempt will be marked as Failed and all backup archive files of this backup attempt will be removed. If you have set have set Process each part immediately to Yes and some backup archive files have already been uploaded to the remote storage they will be left behind when the backup attempt is marked as Failed; you will have to remove them yourself, manually, outside of Akeeba Backup. In either case you will not have a valid backup. If your site breaks before you can rectify the problem you are left without a backup.
Considering that the vast majority of the rare occurrences of backup upload failures we see are transient issues, we consider this option to be dangerous as it can unexpectedly leave you without a valid backup when you need one. It is far better to leave this setting set to No and monitor your backups for warnings. There are extremely few use cases where this option makes sense (e.g. taking a backup of a site on a server without enough space for both the backup archive and the site to coexist, a situation which is anyway problematic should you need to restore the backup). We very strongly recommend not enabling this option unless you have a compelling use case and understand the implications of potentially being left without a valid backup at random.
- Delete archive after processing
-
If enabled, the archive files will be removed from your server after they are uploaded to SugarSync.
- Access Key ID
-
The Access Key ID you have created in SugarSync's Developer Console page.
- Private Access Key
-
The Private Access Key that corresponds to the Access Key ID you have created in SugarSync's Developer Console page.
-
The email used by your SugarSync account.
- Password
-
The password used by your SugarSync account.
- Directory
-
The directory inside SugarSync where your files will be stored in. If you want to use subdirectories, you have to use a forward slash, e.g.
/directory/subdirectory/subsubdirectory. You may use the backup naming variables, e.g. [HOST] for the site's host name or [DATE] for the current date.Please note that the first part of your directory should be the name of your shared folder. For example, if you have a shared folder named
backupsand you want to create a subdirectory inside it based on the site's name, you need to enterbackups/[HOST]in the directory box. If a Sync Folder by the name "backups" is not found, a directory named "backups" will be created inside your Magic Briefcase folder. Yes, it's more complicated than, say, DropBox – but that's also why SugarSync is more powerful.
Using this engine, you can upload your backup archives to the iDriveSync low-cost, encrypted, cloud storage service.
| Warning |
|---|---|
|
Per the email sent by iDrive Inc., iDriveSync has reached End of Life in January 2021 and will be turned off December 2021. Akeeba Backup's iDriveSync integration will be removed between December 2021 and February 2022. You will need to migrate your data to their iDrive
product. iDrive can be used with Akeeba Backup using the
Upload to Amazon S3 feature. The information iDrive publishes
for
Duplicati are also relevant for Akeeba Backup. You need
to set the Custom Endpoint option to
|
Upload to iDriveSync

The required settings for this engine are:
- Process each part immediately
-
If you enable this, each backup part will be uploaded as soon as it's ready. This is useful if you are low on disk space (disk quota) when used in conjunction with Delete archive after processing. When using this feature we suggest having 10Mb plus the size of your part for split archives free in your account. The drawback with enabling this option is that if the upload fails, the backup fails. If you don't enable this option, the upload process will take place after the backup is complete and finalized. This ensures that if the upload process fails a valid backup will still be stored on your server. The drawback is that it requires more available disk space.
- Fail backup on upload failure
-
When this option is set to No (default) the backup will not stop if uploading the backup archive to the remote storage fails. A warning will be issued, but the backup will be marked as successful. You can then go to the Manage Backups page and retry uploading the backup archive to remote storage. This is useful if the backup failed to upload because of a transient network or remote server issue, or a misconfiguration you have fixed after the backup was taken. This also acts as a safety net: if your site breaks after the backup is taken you can restore from the latest backup archive which failed to upload —in whole or in part— to remote storage.
When this option is set to Yes the backup will stop as soon as Akeeba Backup detects that it failed to upload a backup archive to the remote storage. If you have set Process each part immediately to No (default) that will be it; the backup attempt will be marked as Failed and all backup archive files of this backup attempt will be removed. If you have set have set Process each part immediately to Yes and some backup archive files have already been uploaded to the remote storage they will be left behind when the backup attempt is marked as Failed; you will have to remove them yourself, manually, outside of Akeeba Backup. In either case you will not have a valid backup. If your site breaks before you can rectify the problem you are left without a backup.
Considering that the vast majority of the rare occurrences of backup upload failures we see are transient issues, we consider this option to be dangerous as it can unexpectedly leave you without a valid backup when you need one. It is far better to leave this setting set to No and monitor your backups for warnings. There are extremely few use cases where this option makes sense (e.g. taking a backup of a site on a server without enough space for both the backup archive and the site to coexist, a situation which is anyway problematic should you need to restore the backup). We very strongly recommend not enabling this option unless you have a compelling use case and understand the implications of potentially being left without a valid backup at random.
- Delete archive after processing
-
If enabled, the archive files will be removed from your server after they are uploaded to iDriveSync
- Username or e-email
-
Your iDriveSync username or email address
- Password
-
Your iDriveSync password
- Private key (optional)
-
If you have locked your account with a private key (which means that all your data is stored encrypted in iDriveSync) please enter your Private Key here. If you are not making use of this feature please leave this field blank.
- Directory
-
The directory inside your iDriveSync where your files will be stored in. If you want to use subdirectories, you have to use a forward slash, e.g.
directory/subdirectory/subsubdirectory.Tip You can use Akeeba Backup's backup naming variables in the directory name in order to create it dynamically. These are the same variables as what you can use in the archive name, i.e. [DATE], [TIME], [HOST], [RANDOM].
- Use the new endpoint
-
This is required for iDriveSync accounts created after 2014. If you have entered your username/e-mail and password correctly but Akeeba Backup can't connect to iDriveSync please try checking this box.
Lengthier explanation. Sometime after 2014 iDriveSync started signing up new users through iDrive.com instead of iDriveSync.com. The new accounts need to access a new service endpoint (URL) to upload new files, delete existing files and so on. Meanwhile, accounts created before this change still need to access the old service endpoint (URL). The same service, two different interface implementations, making it impossible for us to automatically detect which method will work with your iDriveSync account. Therefore the only thing we could do was add this confusing checkbox. We're sorry about that.
| Note |
|---|---|
|
This feature is available only to Akeeba Backup Professional 3.10.1 and later. |
Using this engine, you can upload your backup archives to any server which supports the WebDAV (Web Distributed Authoring and Versioning) protocol. Examples of storage services supporting WebDAV:
-
OwnCloud is a software solution that you can install on your own servers to provide a private cloud.
-
CloudDAV is a service which gives you WebDAV access to a plethora of cloud storage providers: Amazon S3, GMail, RackSpace CloudFiles, Microsoft OneDrive (formerly: SkyDrive), Windows Azure BLOB Storage, iCloud, LiveMesh, Box.com, FTP servers, Email (which, unlike the Send by email engine in Akeeba Backup, does support large files), Google Docs, Mezeo, Zimbra, FilesAnywhere, Dropbox, Google Storage, CloudMe, Microsoft SharePoint, Trend Micro, OpenStack Swift (supported by several providers), Google sites, HP cloud, Alfresco cloud, Open S3, Eucalyptus Walrus, Microsoft Office 365, EMC Atmos, iKoula - iKeepinCloud, PogoPlug, Ubuntu One, SugarSync, Hosting Solutions, BaseCamp, Huddle, IBM Files Cloud, Scality, Google Drive, Memset Memstore, DumpTruck, ThinkOn, Evernote, Cloudian, Copy.com, Salesforce. [TESTED with Amazon S3 as the storage provider]
-
Apache web server (when the optional WebDAV support is enabled – recommended for advanced users only).
-
Pretty much every storage provider which claims to support WebDAV
| Tip |
|---|---|
|
You can find more information for WebDAV access of each of these providers in http://www.free-online-backup-services.com/features/webdav.html |
| Note |
|---|---|
|
We have not thoroughly tested and do not guarantee that any of the above providers will work smoothly with Akeeba Backup unless you see the notive [TESTED] next to it. |
Before you begin, you should know the limitations. As most remote storage technologies, WebDAV does not allow appending to files, so the archive has to be transferred in a single step. PHP has a time limit restriction we can't overlook. The time required to upload a file to WebDAV equals the size of the file divided by the available bandwidth. We want to time to upload a file to be less than PHP's time limit restriction so as to avoid timing out. Since the available bandwidth is finite and constant, the only thing we can reduce in order to avoid timeouts is the file size. To this end, you have to produce split archives, by setting the part size for archive splitting in ZIP's or JPA's engine configuration pane. The suggested values are between 10Mb and 20Mb. Most servers have a bandwidth cap of 20Mbits, which equals to roughly 2Mb/sec (1 byte is 8 bits, plus there's some traffic overhead, lost packets, etc). With a time limit of 10 seconds, we can upload at most 2 Mb/sec * 10 sec = 20Mb without timing out. If you get timeouts during post-processing lower the part size.
| Tip |
|---|---|
|
If you use the native CRON mode (akeeba-backup.php), there is usually no time limit - or there is a very high time limit in the area of 3 minutes or so. Ask your host about it. Setting up a profile for use only with the native CRON mode allows you to increase the part size and reduce the number of parts a complete backup consists of. |
Upload to WebDAV
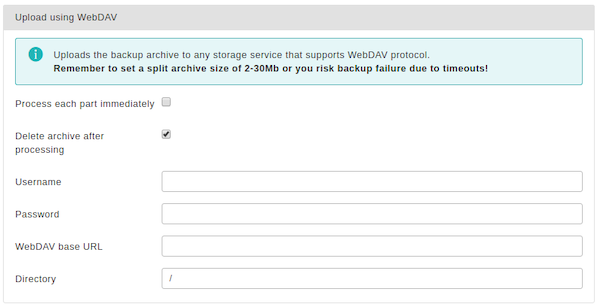
The required settings for this engine are:
- Process each part immediately
-
If you enable this, each backup part will be uploaded as soon as it's ready. This is useful if you are low on disk space (disk quota) when used in conjunction with Delete archive after processing. When using this feature we suggest having 10Mb plus the size of your part for split archives free in your account. The drawback with enabling this option is that if the upload fails, the backup fails. If you don't enable this option, the upload process will take place after the backup is complete and finalized. This ensures that if the upload process fails a valid backup will still be stored on your server. The drawback is that it requires more available disk space.
- Fail backup on upload failure
-
When this option is set to No (default) the backup will not stop if uploading the backup archive to the remote storage fails. A warning will be issued, but the backup will be marked as successful. You can then go to the Manage Backups page and retry uploading the backup archive to remote storage. This is useful if the backup failed to upload because of a transient network or remote server issue, or a misconfiguration you have fixed after the backup was taken. This also acts as a safety net: if your site breaks after the backup is taken you can restore from the latest backup archive which failed to upload —in whole or in part— to remote storage.
When this option is set to Yes the backup will stop as soon as Akeeba Backup detects that it failed to upload a backup archive to the remote storage. If you have set Process each part immediately to No (default) that will be it; the backup attempt will be marked as Failed and all backup archive files of this backup attempt will be removed. If you have set have set Process each part immediately to Yes and some backup archive files have already been uploaded to the remote storage they will be left behind when the backup attempt is marked as Failed; you will have to remove them yourself, manually, outside of Akeeba Backup. In either case you will not have a valid backup. If your site breaks before you can rectify the problem you are left without a backup.
Considering that the vast majority of the rare occurrences of backup upload failures we see are transient issues, we consider this option to be dangerous as it can unexpectedly leave you without a valid backup when you need one. It is far better to leave this setting set to No and monitor your backups for warnings. There are extremely few use cases where this option makes sense (e.g. taking a backup of a site on a server without enough space for both the backup archive and the site to coexist, a situation which is anyway problematic should you need to restore the backup). We very strongly recommend not enabling this option unless you have a compelling use case and understand the implications of potentially being left without a valid backup at random.
- Delete archive after processing
-
If enabled, the archive files will be removed from your server after they are uploaded to SugarSync.
- Username
-
The username you use to connect to your WebDAV server
- Password
-
The password you use to connect to your WebDAV server
- WebDAV base URL
-
The base URL of your WebDAV server's endpoint. It might be a directory such as
http://www.example.com/mydav/or even a script endpoint such ashttp://www.example.com/webdav.php. If unsure please ask your WebDAV provider for more information.Warning If the base URL of your WebDAV server's endpoint is a directory (almost always) you MUST use a trailing slash, e.g.
http://www.example.com/mydav/(correct) but nothttp://www.example.com/mydav(WRONG!) - Directory
-
The directory inside the WebDAV folder where your files will be stored in. If you want to use subdirectories, you have to use a forward slash, e.g.
/directory/subdirectory/subsubdirectory. You may use the backup naming variables, e.g. [HOST] for the site's host name or [DATE] for the current date.Warning You MUST always use a directory. Most WebDAV servers, e.g. Box.com, allow you to use the root directory which is denoted by
/(a single forward slash). Other WebDAV servers, such as CloudDAV, DO NOT allow you to use the root directory. In this case you MUST use a non-empty directory, e.g./backupsfor the upload to WebDAV to work at all.