 |
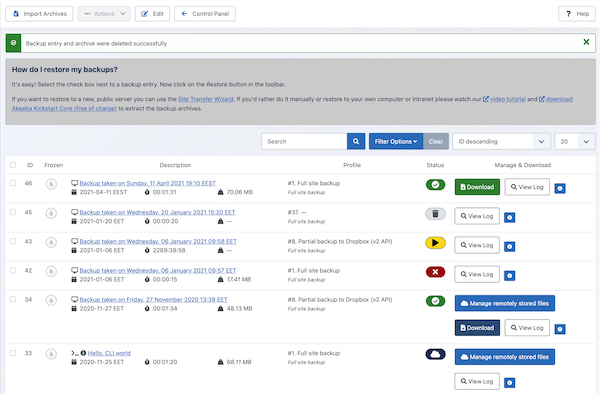
This page is the single place you can review all your Akeeba Backup backup history, as well as administer the backup files. The bulk of the page consists of a standard Joomla!™ list table. Each row represents a backup attempt and displays a whole lot of information:
- The check box column
Clicking the check box on the leftmost cell of a row selects this backup for an operation to be applied to it. Operations are activated by clicking on tool bar buttons. In case of an operation allowing a single row to be selected, the topmost selected row is considered as the sole selection.
- ID
This is a unique numeric identified of the backup attempt. You will only ever need to use it if you are using the Akeeba Backup JSON API or the Joomla! command line client integration to manage your site.
- Frozen indicator
You can mark important backups as "frozen", creating a protected record. Once a record has been marked as frozen, the following will happen:
Its files cannot be deleted with the Delete Files button
It cannot be deleted with the Delete button
For remote backups, you cannot delete the remotely stored archives
It doesn't participate in any quotas, local or remote including the obsolete records quotas
- Description
Displays the description you have set when you started the backup. If your backup has a comment attached to it, an info icon will also appear. Hovering your mouse over the info icon will show you a preview of that comment.
To the left of the description there's an icon indicating the backup origin, e.g. Backend, Frontend, JSON API, CLI and so on. Hover over it to see what each icon means.
Below the description you will see the date and time of the backup. The date / time format, timezone and timezone suffix are configured in the component's Options page.
In the same place below the description you will also see the duration of the backup in Hours:Minutes:Seconds format, as well as the size of the backup.
- Profile
Displays the numeric identifier (and description, if available) of the backup profile used during the backup. It is possible that since the time of the backup the profile may have been modified or even deleted!
Below it you will see the backup type. It indicates the backup type. A backup type may not be provided if the backup profile has been deleted in the meantime.
- Status
Indicates the status of the backup. Hover over the icon to see what it means. It will be one of:
- OK (Checkmark on green background)
A complete backup whose backup archive is available for download.
- Obsolete (Trash can on gray background)
A complete backup whose backup archive is either deleted, or was overwritten by another backup attempt.
Note
If you move your backup output directory's location, all your previous backups will appear as "Obsolete", even though you might have moved these backup files as well. This is not a bug. Akeeba Backup internally stores the absolute path to the backup files. When you move the output directory its absolute path changes, so Akeeba Backup is unable to locate the old backup files.
- Remote (Clould on blue background)
Indicates a complete backup which has been uploaded to remote storage (e.g. Dropbox, Amazon S3, CloudFiles and so on), but it is no longer stored on your server. You can fetch the backup archive backup to your server any time (as long as you haven't manually removed the file from the remote storage) in order to restore it, clicking the Manage Remote Files link on the right-hand column.
Note
Not all remote storage engines support fetching back backup archives.
- Pending (Triangle on yellow background)
A backup attempt which is still running. You should not see any such record, unless a backup attempt started while you were loading this page. In this case, you should not navigate to the Control Panel page! Doing so would invalidate the backup and wreck havoc. You have been warned! Another reason to see such an entry is a backup attempt which failed with a PHP fatal error, or which was abruptly interrupted (by the user or a PHP error). In this case, you can safely delete the entry and get rid of the backup file as well.
- Failed (Big X on red background)
A backup attempt which failed to complete.
- Manage and Download
Depending on the status of the backup it will show two or more buttons:
. Opens a popup which allows you to download the backup archive file(s) directly from your browser. However, this is NOT recommended. The only guaranteed method of downloading your backup archives error-free is using FTP or SFTP in BINARY transfer mode. Anything else has the potential to CORRUPT your backup archives for reasons beyond our control!
Important
Some backup archives may consist of more than one files. These are called multipart backup archives.
You MUST download all part files to have a backup archive set which can be used to extract all files and restore a site.
All files have the same base name, for example site-www.example.com-20220925-105300-abcdef012345, but different extensions. JPA archives have the extensions .jpa, .j01, .j02, …; JPS archives have the extensions .jps, .j01, .j02, …; ZIP archives have the extensions .zip, .z01, .z02, …
The part files of a multipart backup archive are NOT separate archives; you cannot extract its one of them individually. The are all parts of the same archive and they all need to be present for the archive to be able to be extracted. The order of the parts is .j01, .j02, …, .jpa for JPA archives; .j01, .j02, …, .jps for JPS archives; and .z01, .z02, …, .zip for ZIP archives. That is to say, the numbered part files come first in the numeric order defined by their extension, the file with the .jpa, .jps or .zip extension comes last.
You can extract multipart archives using the integrated restoration but also Akeeba Kickstart Core, our free of charge archive extraction tool. It can run on a web server — even a local web server created with MAMP, WAMPserver, XAMPP etc — or, for expert users, on the command line.
. If the file is stored on a remote storage location, e.g. Amazon S3 or a remote FTP server, you will also see this button. Clicking on it will allow you to transfer the files back to your server, download them directly from the remote location or remove them from the remote storage.
. If Akeeba Backup failed to upload your backup archive to remote storage you will be shown this button. Clicking it will have Akeeba Backup retry the upload to remote storage.
. If your backup archive has a backup ID you will also see this button. Clicking it takes you to the View Log page to see the backup log file. If the backup status is anything other than OK this button will be grayed over as Akeeba Backup can't guarantee that the log file is present. Hover your mouse over the button to get the Log file ID which you'll need in the View Log page to look for this log file.
. Clicking this button tells you if the backup archive is currently present on your server, where to find it (relative to your site's root directory) and what is the name of the backup archive file. This allows you to download the backup archive over FTP/SFTP as discussed above.
Clicking on the label of each column allows you to sort the backup entries by the contents of that column. By default, Akeeba Backup sorts the records by the time of backup descending, so that the newest backup attempts will appear on top. Below the header there are four filter boxes. The first one allows you to filter by the backup description. The other two allow you to select a date range so that only backups attempted within this date range will be displayed. You can leave either of these boxes empty to allow an open start or end date respectively. The final box allows you to filter by backup profile.
On the top of the page you can find a tool bar with operations buttons.
The button (Akeeba Backup Professional only) takes you to the Import Archives page which allows you to import any ZIP, JPA or JPS file, located anywhere in your server or Amazon S3, in the Manage Backups page in order to restore it on this or any other site.
The Actions drop-down button contains the actions which apply only on the selected backup records:
. Marks the selected backup records as frozen.
. Marks the selected backup records as no longer frozen.
(Akeeba Backup Professional only). Runs the integrated restoration on the first selected backup record. This feature can be used to restore your backup archive on the same server you backed up from or even a different server.
If you are using Akeeba Backup Core you can always restore your backup archives using Akeeba Kickstart. Please consult the video tutorials on our site.
. Removes any backup archives and log files from your server. If you are using Akeeba Backup Professional, it does not delete any archive files stored remotely; you need to use the button instead.
. Same as Delete files but also removes the backup record itself from the database.
Note
If you are interested in restoring your backup archives and your site is inaccessible or you're using the free Akeeba Backup Core edition, you can use Akeeba Kickstart to extract the archive and restore it on their server. The procedure is detailed in our Video Tutorials.
Important
Integrated restoration is only supported for Full Site and Files Only backup archives. Trying to use it with any other type of backup files will ultimately result in an error. This feature is available only to Akeeba Backup Professional - the paid version. Users of the Akeeba Backup Core version can follow our video tutorials to easily restore their backups using Kickstart.
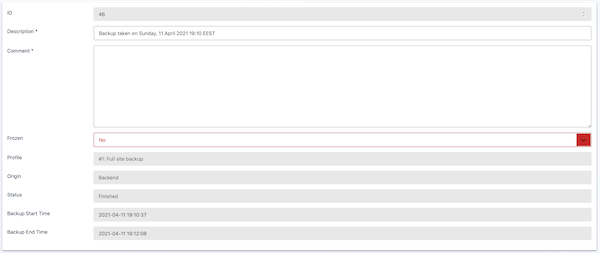 |
Clicking on the description of a backup record or selecting it and clicking on the button in the toolbar will open the View / Edit backup comment page.
You can see some basic information about the backup record you are editing. You can change its description, comment and its Frozen status.
Warning
Using the integrated restoration you are OVERWRITING your site with the one contained in the backup archive. The same precautions apply as with any backup restoration.
Note
This feature is only available in the Akeeba Backup Professional edition.
Restoring a backup from inside Akeeba Backup itself requires that the backup is of the type "Full site" or "All configured databases (archive file)" and that the backup archive is stored on your server (not in remote storage). If your backup archive is stored remotely you will need to fetch it back to your server using the Manage remotely stored files feature documented further below.
The integrated restoration feature allows you to easily restore a previous backup directly on your server, as long as your backup archive still exists on your server of course. The whole idea behind this feature is that it is not necessary to manually download Kickstart, place it in your site's root and move the backup archive from the output directory to the site's root in order to perform the restoration. Instead, the integrated restoration feature takes care of extracting your backup archive directly from the backup output folder into your site's root and then allow you to run the embedded installer (ANGIE) to complete the restoration procedure.
The communication between your browser and the archive extraction script uses a randomly generated secret key which prevents random people from abusing this feature to upload arbitrary code to your site and/or interfere in the backup restoration process. They secret key is only active during the restoration. When the file with the secret key is not present the extraction script is completely inert i.e. it refuses to accept any commands. The key is transmitted verbatim. As a result you need to use HTTPS on your site and a trusted connection (your home / office Internet connection or a VPN as opposed to a public, shared Internet connection) for security resons.
In order to start an integrated restoration begin by going to the Manage Backups page of the component. In that page check the checkbox next to the backup you want to restore and click the button in the toolbar to will run the integrated restoration feature for the selected archive file.
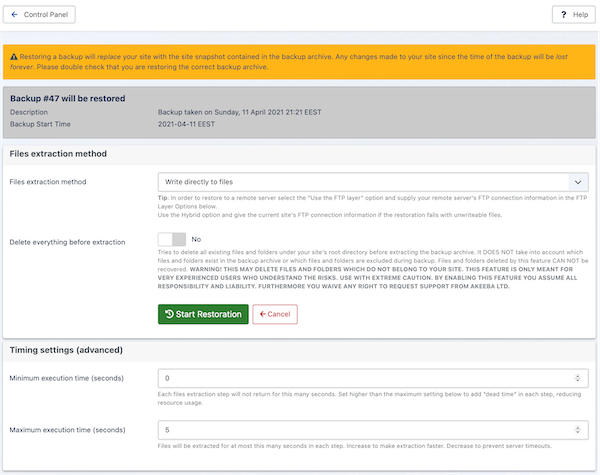 |
When you first start the integrated restoration feature, you are presented with a few settings. The first setting, appearing above the button, determines how the file extraction will be performed. The available options are:
- Write directly to files
All files will be extracted directly to their final location using direct PHP file writes. If your permissions settings do not allow some files or directories to be created/overwritten the process will fail and your site will be left in a half-restored state.
- Use FTP uploads
Using this method, each file is first extracted to the temporary directory specified by the current profile and then moved to its final location using FTP. This is a "best effort" approach and can work with most servers. Do note that only unencrypted FTP (plain FTP) is supported. If you choose this option, you'll also have to specify the FTP connection settings.
Tip
You can use this option to restore a backup on a different site. Just select this option and provide the FTP connection details to the other site before clicking on .
- Hybrid
This mode combines the previous two in an intelligent manner. When selected, Akeeba Backup will first attempt to write to the files directly. If this is not possible, i.e. due to permissions or ownership of the file or folder being extracted, it will automatically make use of the FTP mode to overcome the permissions / ownership problem. It effectively works around a situation commonly called "permissions hell", where different files and folders are owned by different users, making it extremely difficult to overwrite them. This is a situation which happens very commonly on shared hosting. Therefore we strongly advise clients on shared hosting environments to use the Hybrid option.
Note
You MUST supply your FTP information for this mode to have any effect. If you do not do that the Hybrid mode will function exactly as the "Write directly to files" mode.
The default mode is writing directly to files, unless your site's Global Configuration indicates that the FTP layer should be used in which case the Hybrid mode is selected by default.
In the event that a partial restoration happens, your site will be left in a semi-restored state. Trying to access it will pop up the restoration script (ANGIE). If you want to retry the restoration using different settings, please remove the installation directory from your site's root manually, for example using FTP, before trying to access your site's administrator back-end.
The Delete everything before extraction option only appears if you have enabled the respective option in the component's Options page. This is a VERY dangerous options which tells Akeeba Backup to try and delete all existing files and folders under your site's root directory before extracting the backup archive. It DOES NOT take into account which files and folders exist in the backup archive or which files and folders are excluded during backup. Files and folders deleted by this feature CAN NOT be recovered.
Warning
THIS MAY DELETE FILES AND FOLDERS WHICH DO NOT BELONG TO YOUR SITE. THIS FEATURE IS ONLY MEANT FOR VERY EXPERIENCED USERS WHO UNDERSTAND THE RISKS. USE WITH EXTREME CAUTION. BY ENABLING THIS FEATURE YOU ASSUME ALL RESPONSIBILITY AND LIABILITY. FURTHERMORE YOU WAIVE ANY RIGHT TO REQUEST SUPPORT FROM AKEEBA LTD.
If you chose to use the FTP or Hybrid mode, there are some connection settings you have to take care of. Do note that they are filled in with Joomla!'s FTP layer settings by default. Unless you chose not to store your FTP password in Joomla!'s configuration or if you have not configured the FTP layer yet, there is no need to change them. The settings are:
- Host name
The host name of your site's FTP server, without the protocol. For example,
ftp.example.comis valid,ftp://ftp.example.comis invalid.- Port
The TCP/IP port of your site's FTP server. The default and standard value is 21. Please only use a different setting if your host explicitly specifies a non-standard port.
- User name
The username used to connect to the FTP server.
- Password
The password used to connect to the FTP server.
- Initial directory
The FTP directory to your web site's root. This is not the same as the filesystem directory and can't be determined automatically. The easiest way to determine it is to connect to your site using your favourite FTP client, such as FileZilla. Navigate inside your web site's root directory. You'll know you are there when you see the file
configuration.phpand directories such asadministrator,components,languagein that directory. Copy (in FileZilla it appears on the right hand column, above the directory tree) and paste that path in Akeeba Backup's setting.
At the bottom of the page you will find the Timing settings (advanced) settings. These settings control the extraction process and work the same way as the respective settings for taking a backup. If you find that the extraction fails you may want to use a minimum execution time of 7 seconds and a maximum execution time of 2 seconds (yes, max is less than min) to create a roughly 30% duty cycle.
The whole process is fully automated, so there is not much to tell you about it. However, you must not that in order for the restoration procedure to work properly you must take care of the following:
This feature is directly calling the
administrator/components/com_akeebabackup/restore.phpscript. If you have a server-side protection, i.e. .htaccess rules, or permissions settings which prevent this file from being called directly the process will fail.Security note: The restore.php file is of no use to potential hackers. In order for it to work at all, it requires the
restoration.phpfile (more on that on the next point of this list) to load. Even then, it expects a key which is not predefined and is only known to therestore.phpscript and the integrated restoration page of Akeeba Backup. As a result, it can't be used as a potential attack vector.Before the restoration begins, Akeeba Backup needs to create the
administrator/components/com_akeebabackup/restoration.phpfile with all the archive extraction setup parameters. It is intelligent enough to use Joomla!'s FTP mode if it is enabled so as to overcome any permission problems, but you are ultimately responsible for ensuring that the permission settings are adequate for Akeeba Backup to create this file.If you have disabled Joomla!'s FTP layer, the permissions of the
administrator/components/com_akeebadirectory should be 0777 for the integrated restoration to work, or 0755 on hosts which use suPHP. You can change these permissions after the restoration is over, of course.If you are using Joomla!'s FTP layer and it was active when you were installing Akeeba Backup, you'll need to give this directory at least 0755 permissions, but you may have to manually remove
restoration.php(but NOTrestore.php!!!) after the site restoration is over.When the extraction of the backup archive finishes, you will be automatically forwarded to the Akeeba Backup Restoration Script page on a new tab or window. DO NOT CLOSE THE INTEGRATED RESTORATION PAGE'S TAB/WINDOW! After you have competed the Akeeba Backup Restoration Script process you are supposed to return to the Integrated Restoration page and click on the button to:
remove the
installationdirectory from your site's root, andremove the
administrator/components/com_akeebabackup/restoration.phpsetup file to nullify the, already non-existent, potential risk of a malicious user abusing this script.