Starting March 2020 we have removed the I am using Gmail checkbox from our software due to a change in Google's Gmail and G Suite email services.
If you want to use a Gmail or G Suite email account with Akeeba Ticket System you will need to undergo the following process once per site and email address you want to use with Akeeba Ticket System.
Please keep in mind that this is not a limitation of Akeeba Ticket System. It is a consequence of changes effected by Google without prior notice or an easier alternative, as explained in detail in the Frequently Asked Questions below.
Overview
Akeeba Ticket System needs to retrieve your emails from the mail server and process them for the Reply by Email and New Ticket by Email features to work. The standard way to do that is connecting to your mail server with either the IMAP or the POP3 protocol using a username and a password for authenticating (logging into) the server. For most mail server the username is your email address and the password is, well, the password you use to login to your email account.
Starting in the early 2010's, Google introduced Two Factor Authentication (TFA) for its Gmail and G Suite Mail accounts (collectively called “Gmail” in this documentation). Due to the higher security standard inherent to TFA it was no longer possible to use your password for IMAP / POP3 authentication. They introduced application-specific passwords.
Starting in 2019 and enforced throughout 2020, Google completely discontinues standard IMAP and POP3 password authentication, either with a regular password (for non-TFA accounts) or an application-specific password (for TFA accounts). Instead, they have migrated to an authentication method called XOAUTH2.
Instead of entering your email address and your password / application-specific password you need to instead login to your Google account associated with your Gmail mail account in your browser. Google will send back to your site two long pieces of text called tokens.
The [Definition: Access Token] is what is used for authenticating to IMAP. It is also set to expire frequently, approximately once every hour. The second token is called the [Definition: Refresh Token] and can be used to request a new Access Token when the current Access Token has expired.
What this oversimplified overview doesn't address is that tokens are not issued for your Gmail user account in general. In other words, they are not like app-specific passwords which were valid for any and all applications accessing Gmail. They are issued for your Gmail user account to an OAuth2 API application registered with Google – and only this application can ever use these tokens. This is meant to be a double assurance measure. On one hand, the Gmail user can revoke the API application's access to their Gmail account whenever they see fit, without having to change their Gmail password and disturb every other connected application. On the other hand, Google has a tight control over who can ask Gmail users for access to their email account.
Creating an OAuth2 API application
For reasons explained in the Frequently Asked Questions below it is ultimately not possible for Akeeba Ltd to create an API application which allows you to connect your Gmail account to your site without having to undergo this complicated process. You will need to create an API application yourself, free of charge, in Google Cloud Platform. You can then have Akeeba Ticket System use the connection information of that API application to request access to your Gmail account. This process only needs to be carried over once per Gmail account / G Suite organization.
Important
The information under the “Creating an OAuth2 API application” section are provided for information purposes only. They are not meant to be definitive. They are subject to change without prior notification by Google. If you find that the steps have significantly changed since the publication of this document please contact Google for support. Google requests that third parties, like us, do not provide support for its products. As a result we are NOT allowed to help you with your Google Cloud Platform issues.
Creating an OAuth2 API application
First, you need to go to Google Cloud Platform. Make sure that you are logged in with the correct user account, depending on what you want to connect to your Akeeba Ticket System installation:
If you are going to connect your Gmail account (@gmail.com) you must be logged in with the same Gmail account you are going to connect.
If you are going to connect a G Suite email account you must be logged in as an administrator of the same G Suite organization where the email you want to connect is registered with.
Check the currently logged in account the same way as you do in all Google web products, from the icon at the top right corner of your screen.
Enable Google Cloud Platform for your Google account
This is described in Google's Getting Started page. The takeaway is that you may have to enable billing even though what you are going to be using is free of charge. That's a weird requirement of Google and is ABSOLUTELY NOT under Akeeba Ltd's control. Thank you for your understanding.
Create an API project
From the top of the page, next to the “Google Cloud Platform” text, there is a dropdown with your projects.
 |
Click on it to display the projects management popup.
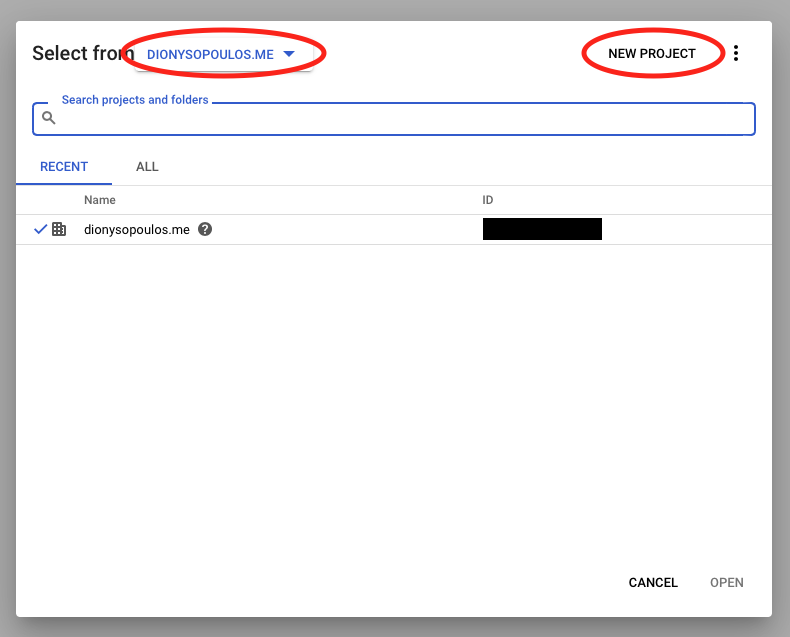 |
From the leftmost popup make sure that you select your G Suite organization. This does not apply if you are using your personal Gmail account.
Then click on the NEW PROJECT button in the top, right hand corner of the page.
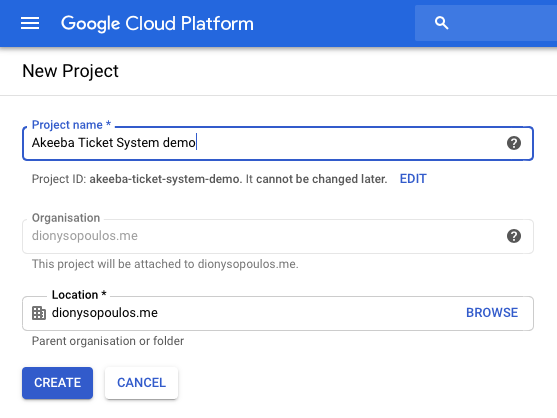 |
In the Project name field enter something descriptive, e.g. “Support System Integration”. This is just for you. Keep it short.
Click on the blue button.
Wait for a few seconds until Google informs you that the project has been created.
Enable the Gmail API on your API project
Note
Yes, this also applies if you are using G Suite. As far as Google is concerned, Gmail and G Suite email are one and the same.
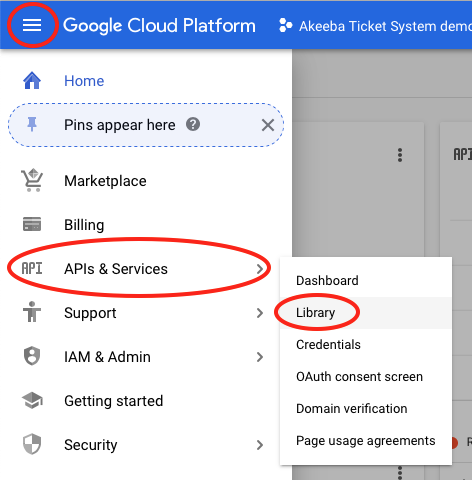 |
From the new page click on the hamburger menu icon, hover over APIs & Services and click on Library.
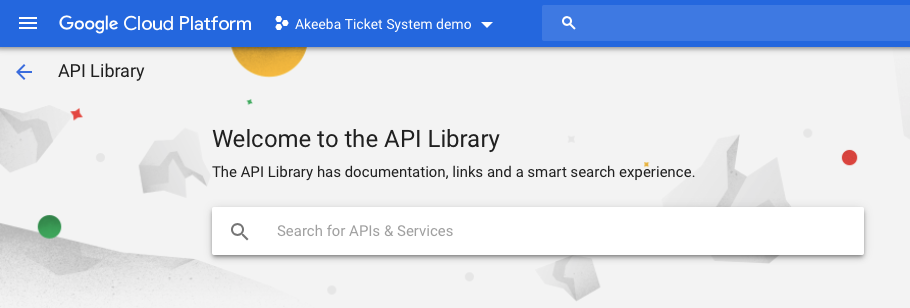 |
In the APIs & Services Library page click on the "Search for APIs & Services" and type gmail
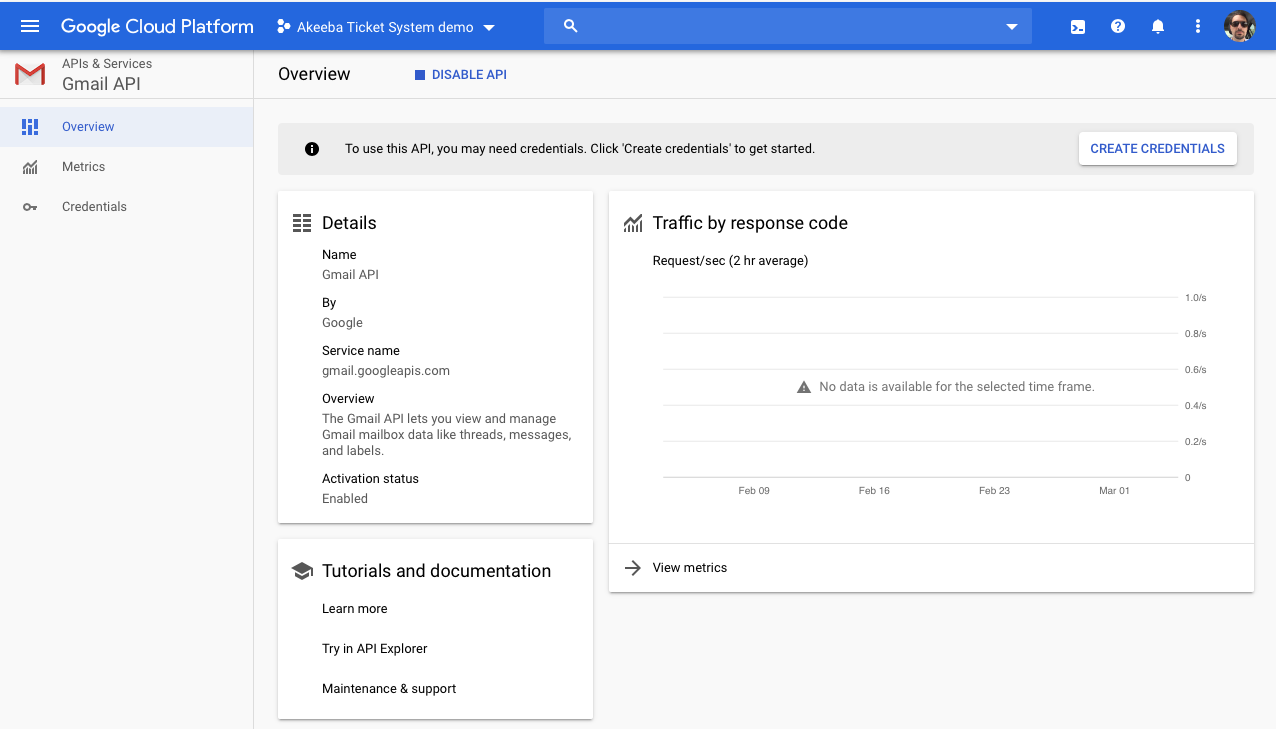
After a few moments you will see only one result called “Gmail API”.
 |
Click on it.
 |
Wait a few moments for the button to appear. Then click on the button and wait until its control panel page appears.
 |
Create an OAuth2 consent screen
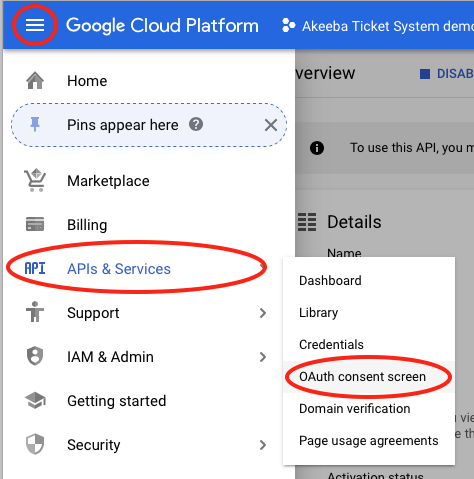 |
From the new page click on the hamburger menu icon, hover over APIs & Services and click on OAuth Consent Screen.
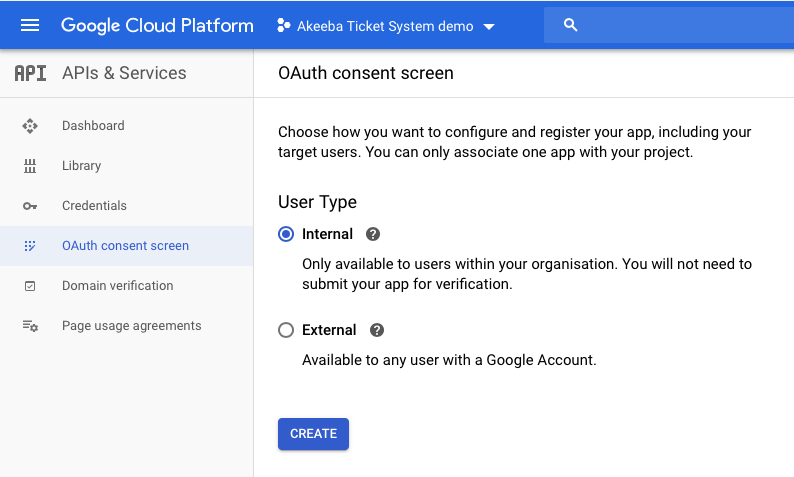 |
In the new page select Internal as your project type.
Important
You MUST select Internal. This project type only allows your personal Gmail address / any email address in your G Suite organization to be authorized. This is what you want and the only way that you will not need to go through Google's verification process. If you accidentally select External you will need to go through the verification process which will take a massive amount of time and effort on your part only to be _declined_ since you don't have a valid use case for an External project that allows anyone, with any Gmail / G Suite email address, to authorize your application to access their account.
Click on the blue button to proceed.
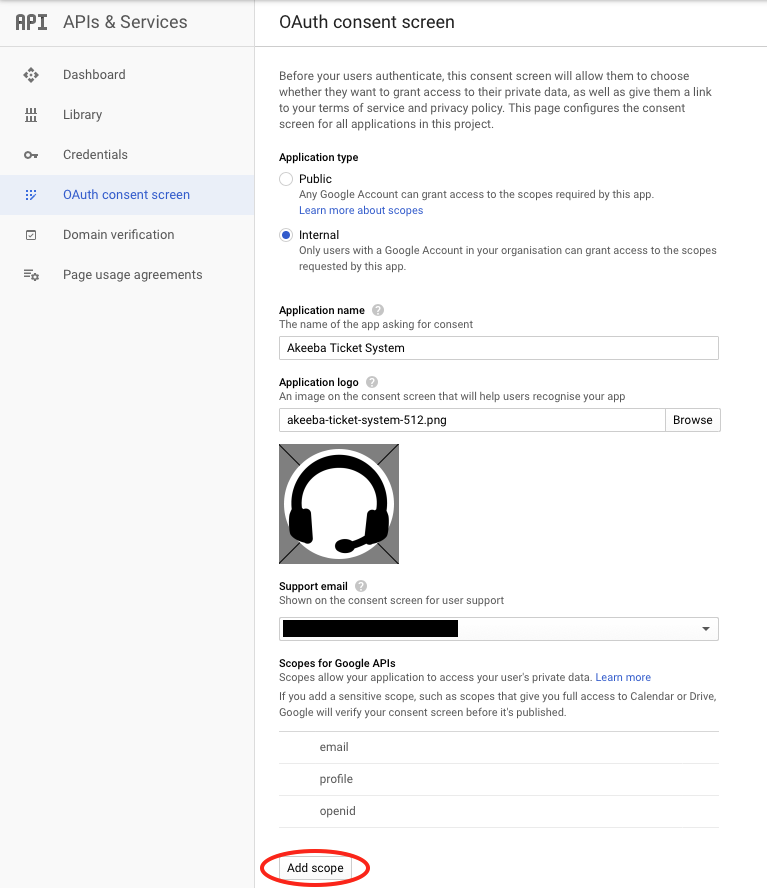 |
In the new page enter an Application Name. This will be displayed when authorizing Akeeba Ticket System to your Gmail account. We recommend entering something along the lines of “ATS on example.com” where example.com is the domain name of your site.
In the Application Logo select any square image over 128x128 pixels. You can use your logo, for example.
Then click on the Add scope button. This opens a popup dialog.
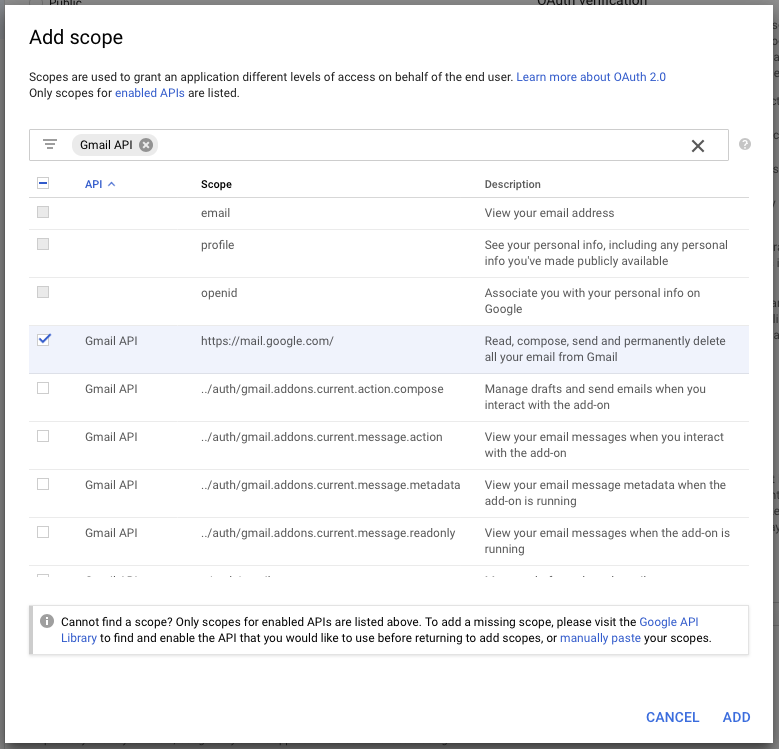 |
In the search box at the top enter Gmail API to filter the results.
From the list below select the Gmail API entry with the Scope https://mail.google.com/
Note
Yes, this also applies if you are using G Suite. As far as Google is concerned, Gmail and G Suite email are one and the same.
Click on the button.
 |
Under Authorized Domains enter your site's domain name. It is VERY important that the domain name you enter here matches EXACTLY the site you are going to be using to link Akeeba Ticket System with your email address. Do remember that www.example.com and example.com are different domains.
Note
If you have not yet linked the domain name to your Google Cloud Platform account you will be asked to do so. The easiest way is to be using Google Analytics on your site.
In the Application Homepage Link enter the URL to your site. It is VERY important that the domain name in this URL matches EXACTLY one of the Authorized Domains you set up above. Do remember that www.example.com and example.com are different domains.
In the Application Privacy Policy Link enter a URL on your site. This can be a dummy page, as long as it doesn't return a 404. It is VERY important that the domain name in this URL matches EXACTLY one of the Authorized Domains you set up above. Do remember that www.example.com and example.com are different domains.
You don't need to enter an Application Terms of Service Link.
Finally click on the button.
Get your API credentials
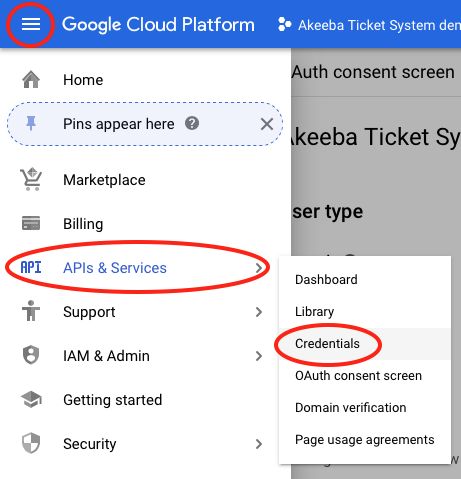 |
From the new page click on the hamburger menu icon, hover over APIs & Services and click on Credentials.
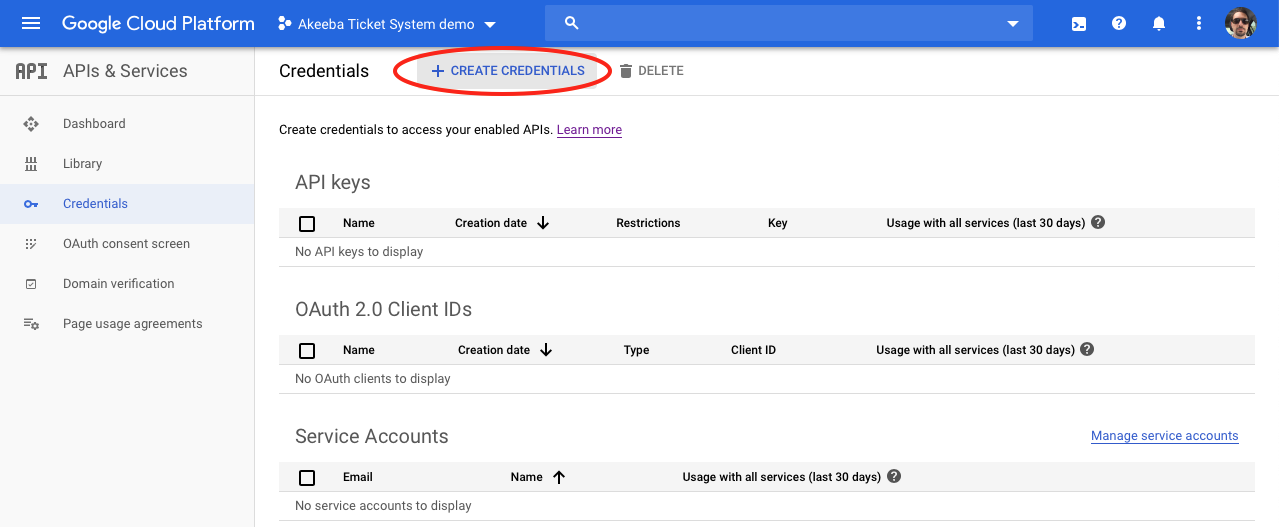 |
On the credentials page click on at the top of the page.
 |
From the drop-down, select OAuth client ID.
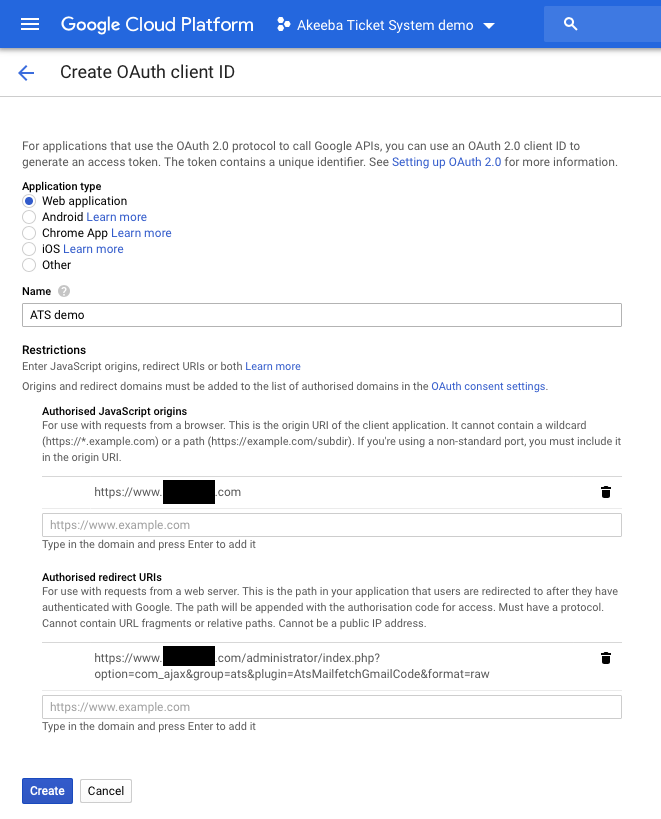 |
Select the Web Application under Application Type.
Enter any Name you want; this is only for your convenience.
Under Authorized JavaScript origins enter your site's URL, e.g. https://www.example.com. It is VERY important that the domain name in this URL matches EXACTLY one of the Authorized Domains you set up in the OAuth consent page setup earlier. Do remember that www.example.com and example.com are different domains.
The Authorized Redirect URIs is the most important part of this process. It needs to be your site URL plus /administrator/index.php?option=com_ajax&group=ats&plugin=AtsMailfetchGmailCode&format=raw
For example, if your site is http://www.example.com/mysite you would need to enter
http://www.example.com/mysite/administrator/index.php?option=com_ajax&group=ats&plugin=AtsMailfetchGmailCode&format=raw
Warning
If you get this URL wrong you will NOT be able to connect Akeeba Ticket System to your email address. You will get an error 400 from Google. If that happens to you, you will need to come back to this page and fix the Redirect URI.
Click on .
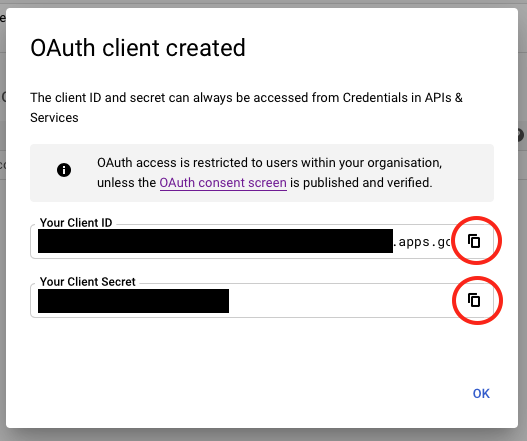 |
You will now see a popup with your API credentials. Before doing anything else copy these credentials to a safe place. You need to copy BOTH the Client ID AND Client Secret. Use the copy buttons next to each one to copy them to your clipboard, do NOT try to highlight them (you cannot highlight the entire Client ID).
Use your API credentials in Akeeba Ticket System
Go to your site's administrator backend.
Click on , from the top menu.
Find and click on the Akeeba Ticket System - Fetch Email plugin.
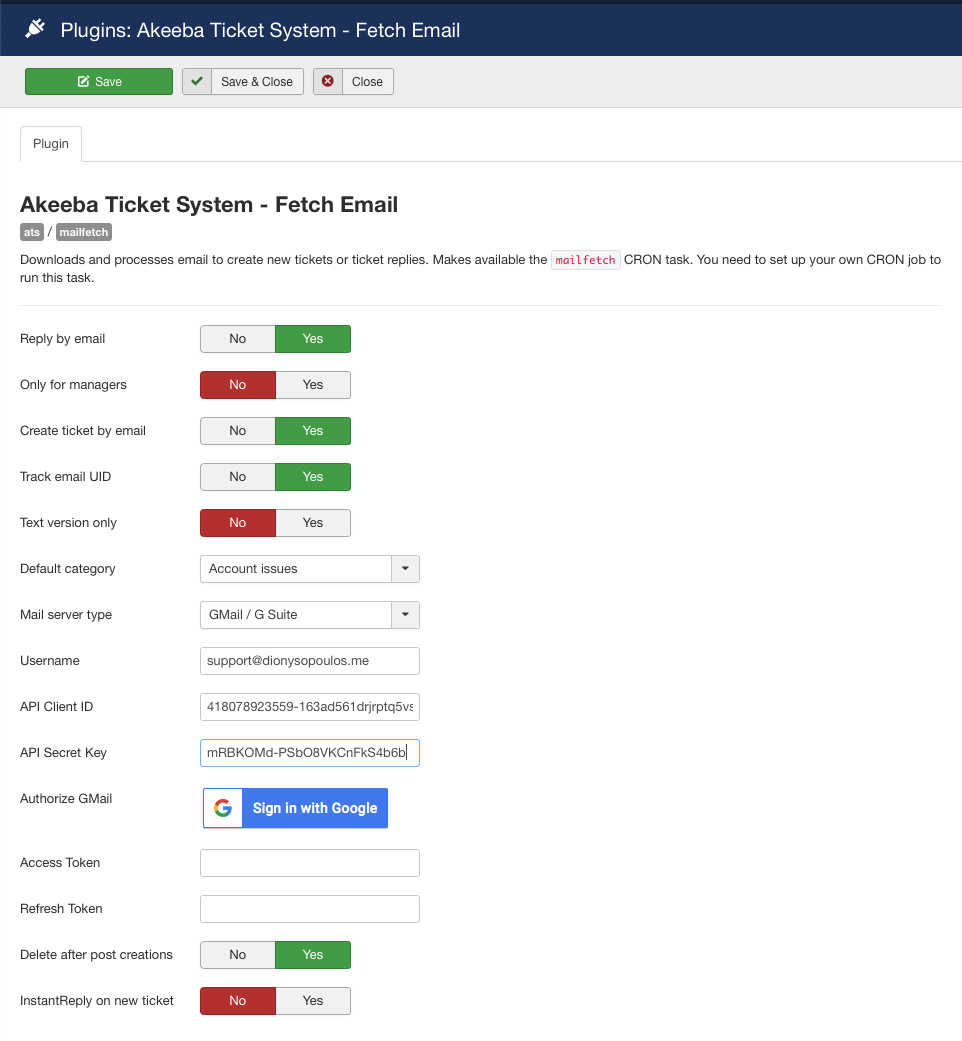 |
On the screen, under Mail server type please choose GMail / G Suite
Under Username enter your email address.
Important
The email address you enter here MUST be the same one you will be authorizing in the next couple of steps. Otherwise ATS will be unable to retrieve any email.
In the API Client ID field paste the Client ID you copied from Google Cloud Console in the steps further above.
In the API Secret Key field paste the Secret Key you copied from Google Cloud Console in the steps further above.
Next to Authorize GMail there is a button. Click on it. A popup opens.
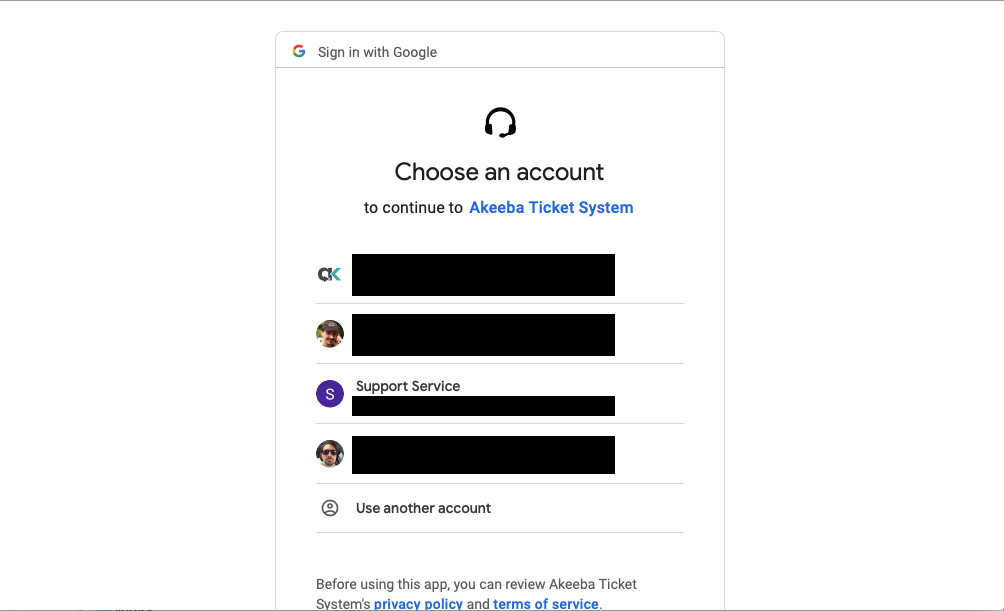 |
Select the email account you want to link to Akeeba Ticket System. It must match exactly the email address you typed in the Username field in the plugin configuration page.
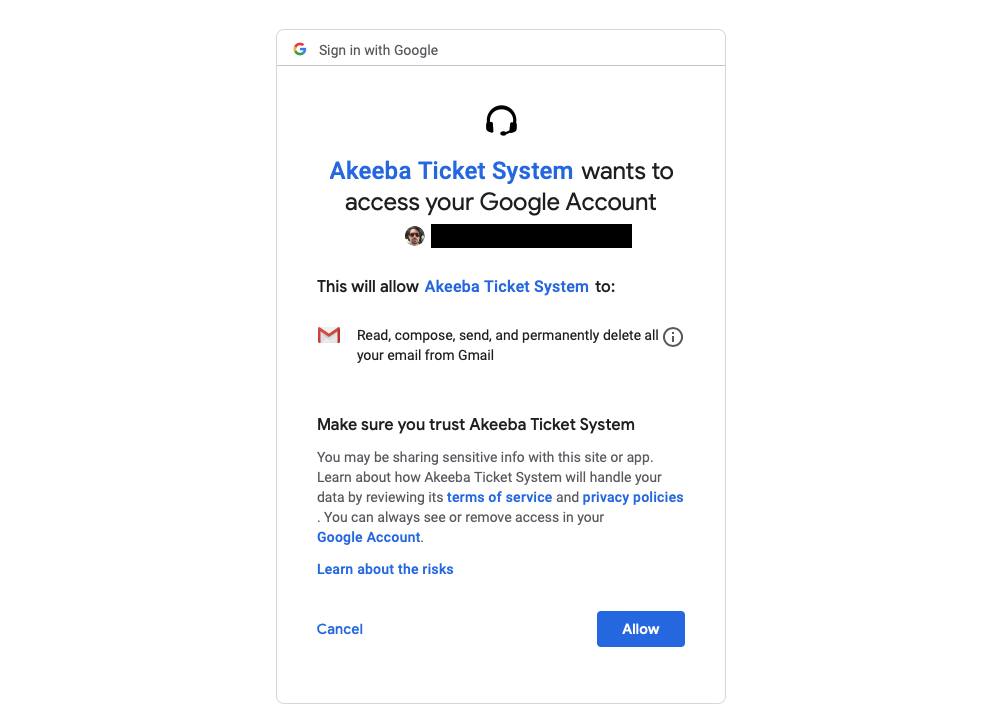 |
Click on to complete the link.
The popup will redirect back to your site and you will see a "One moment please" message momentarily. The popup will automatically close and the Access Token and Refresh Token fields will be filled in.
Now click on in the toolbar. You are done.
Important
If you have multiple sites DO NOT copy the Access Token and Refresh Token between them. It will NOT work.