All full site and database backup archives created by the
application contain a restoration script (also called "installer")
inside the installation directory. This script is
used to restore your database and, depending on the type of installer
script selected and the PHP-based application used by your site,
possibly reconfigure your site.
The restoration scripts used by the application are all based on ANGIE (Akeeba Next Generation Installer Engine), a common platform for backup restoration scripts. The only difference in each installer is the first page (requirements check) and its final page (site configuration). Everything else is common among them.
Since the installer is stored in the backup archive at backup time, it is important to choose the correct installer for your site. For example, if you have a Joomla site you have to choose "ANGIE for Joomla". Selecting the wrong installer is not the end of the world; you will still be able to restore your site's database content but you will have to modify your site's configuration file(s) manually.
All installers can be accessed by visiting the
installation/index.php URL on your site after
extracting the backup archive. For example, if your site is located in
http://www.example.com you can access the ANGIE installer
after extracting the backup archive by visiting
http://www.example.com/installation/index.php.
This section of our documentation will guide you step-by-step
through the restoration process with ANGIE, the restoration script
included in the installation directory of every
backup archive taken with the application. When the instructions
depend on a specialised ANGIE installer (e.g. ANGIE for Joomla!,
etc) we will point you to the right page for more information.
Please read this section in the order presented for best
results.
![[Important]](/media/com_docimport/admonition/important.png) | Important |
|---|---|
|
This is an optional page and you may not ever see it during your site's restoration. Read below for more information on when it is shown. |
In order for ANGIE to work it needs to be able some
temporary data between page loads. This data is stored in files
inside the installation/tmp directory of your site
during the restoration. Depending on your server and the way you
extracted the backup archive this directory may end up being
unwritable for PHP and, of course, ANGIE itself. The easiest way
to work around it is giving this directory 0777 permissions using
your favourite FTP programme. We have, however, found out that
many of our users feel lost when they are told they have to change
permissions. As a result we have made ANGIE very smart and capable
of fixing this problem by itself, as log as you give it your FTP
connection information first. Therefore, in case that this problem
is detected, you will see the following page:
ANGIE - The session page
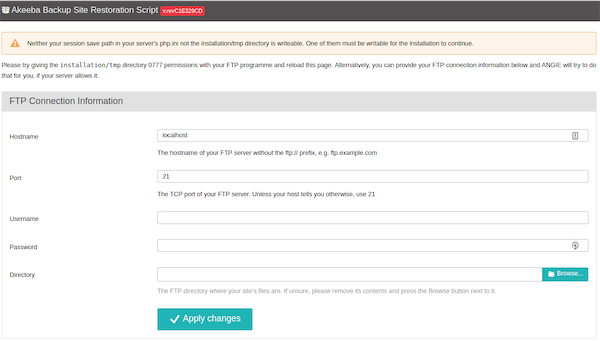
You have to provide the following settings:
- Host name
-
Use the domain name to access your site's FTP server
- Port
-
Leave the default value (21) unless your host tells you otherwise. Do note that Joomla! only supports plain FTP. If your host tells you to use port 22 – which is used only by SFTP – it won't work.
- Username and password
-
What they claim to be, the user name and password to connect to your site's FTP server
- Directory
-
The absolute FTP path to your site's root. The easiest way to find it is using FileZilla to connect to your site and navigate to your site's root, which is usually a directory named
htdocs,httpdocs,http_docs,public_htmlorwww. Look at the right hand pane, above the folder tree (Remote site text box). Copy it and paste it in the Directory box.![[Tip]](/media/com_docimport/admonition/tip.png)
Tip You can instead fill in all of the other information, leave this field blank and click on the button next to it. If your FTP information is correct a popup directory browser appears. You can now browse to the site root directory. It's the one where you can see your site's
installation,includesandlibrariesdirectories. Once you're in there click on the button.
Then click on the
button. If all of the FTP connection information is correct, PHP
can connect to your site by FTP and your FTP server allows
changing permissions you will see the main page of ANGIE.
Otherwise you will see the session fix page again. In this
relatively rare (less than 5% of servers out there, according to
our experience) case you will have to change the permissions of
the installation/tmp directory manually,
using your FTP software or your hosting control panel.
| Important |
|---|---|
|
This is an optional page and you may not ever see it during your site's restoration. Read below for more information on when it is shown. |
Your backup contains all of the database connection information and, sometimes, the FTP connection information as well. This means that anyone who has access to the backup restoration script over the web can learn this information. This is a security risk. While Kickstart allows you to use Stealth Mode (which locks the site for everyone except your own IP address) this only works on servers using the Apache web server. With alternative web server software such as IIS, NginX, Litespeed and Lighttpd becoming more popular this doesn't cut it any more.
This is why we added support for password protection to ANGIE. You can enabled it in the application, in the Configuration page of the component. You also get the chance to override that password when taking a backup from the back-end of your site, by providing it your desired password to the "ANGIE password" field in the Backup Now page. The password is stored in the backup archive encrypted, making it more difficult to be accidentally exposed to a hacker.
If you have specified a password for ANGIE you will see the ANGIE password page when you launch it. Just provide your password and ANGIE will show its main page. If the password is incorrect you will be shown the password page again.
| Important |
|---|---|
|
Just like with passwords on most web sites and devices you may have used, ANGIE passwords are case sensitive. This means that ABC, abc and Abc are three different passwords. |
In some cases you may have forgotten your ANGIE password or
not remember setting one. The latter could happen if your browser
auto-fills a password in the backup page. You can still continue
the restoration by deleting the file
installation/password.php from your site
which is currently being restored. Then reload ANGIE and the
password page will go away without having to enter a
password.
First you see ANGIE's initialisation page:
ANGIE - The initialisation page
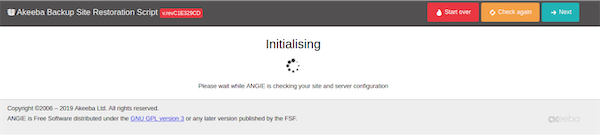
At this point ANGIE is performing system checks. If your browser gets stuck at this page please try disabling any browser plugins, firewalls and antivirus applications which might be interfering with the Javascript on the page. The most likely culprits we've seen are NoScript (a Firefox plugin which disables Javascript) and AVG Antivirus' "Link Checker" feature which ultimately breaks Javascript on most pages. If that doesn't help please try using a different computer, with a different browser and connected via a different ISP to the Internet. Sometimes computer policies, proxies and other network settings can interfere with web applications such as ANGIE or the site script you are restoring.
The next page you will see is the main system checks page. In this page ANGIE checks your server configuration and makes sure it matches the requirements of both ANGIE and the site script you are currently restoring. The exact layout of the page depends on which ANGIE installer you are using. Here you can find links to these specialised installers, in alphabetical order:
| Important |
|---|---|
|
If you are restoring to a new site -even if it is a subdomain or directory of the main site- you MUST create a new database before the restoration. ANGIE can not do that for you. It's not that we didn't think of it (the code is there, if you take a look), it's that on most server environments you don't have adequate database server permissions to create a new database. For detailed instructions on creating new databases, take a look at the relevant page of our Troubleshooting Wizard. |
ANGIE - The database restoration page
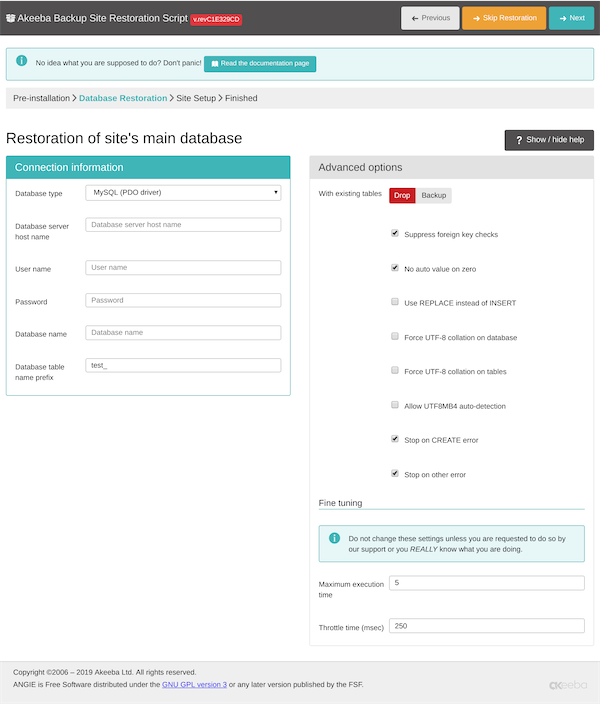
At the top of the page you see which database you are about to restore. The first database you will be restoring is the "site's main database" which means that it's the database your web script uses to store its data (the one you set up in the configuration wizard or the application's Configuration page). If you had defined multiple databases you will be restoring one database after the other, but the "site's main database" is always the first one to restore. If you do not wish to restore a particular database you can click the orange button in the top right hand corner of the page.
The first thing you see is the Connection information column in the left hand side of the page. It is pre-populated with the connection settings of the site you backed up. If you are restoring to a different site than the one you backed up from it will be blank, indicating that you must specify the correct connection information for the new server.
Start with the database type. It's usually
MySQLi (with the "i" at the end), unless you have
a server with an outdated PHP version or suboptimal server
settings. The other option, MySQL (without the
"i" at the end) is the old MySQL driver which is slower and was
ultimately removed in PHP 5.5.0 released on June 2013. The final
option is the PDO MySQL which is another modern
driver for MySQL. It's just as fast as the MySQLi driver. If you
see no option then your new server lacks the PHP modules which are
necessary to connect to MySQL databases. Do note that it's not
necessary to have a MySQL-compatible database server (MySQL,
MariaDB, Percona, Amazon RDS etc). Your version of PHP also needs
to include the mysqli or pdo_mysql module which allows it to talk
to MySQL servers. If the list is empty you need to contact your
host.
The other available options you need to set are:
-
Database server host name. The database server host name. Usually it's localhost, but you must ask your host for this setting, or consult your hosting account control panel, as this setting is usually displayed there.
Important Despite what you think,
localhostand127.0.0.1are two completely different things for PHP's MySQL drivers. It is possible -especially on a Mac OS X local or live server- that your database server does not connect when usinglocalhost. Just use127.0.0.1and it will! This will save you a lot of hair pulling if you're dealing with MAMP or ever try to test restore your site to a Mac. -
Username. The username of the database server user. Please consult your host.
-
Password. The password of the database server user. Please consult your host.
-
Database name. The actual name of the database you want to restore to. If you choose a database which already has tables in them, existing tables with the same name as the ones being restored will be overwritten (replaced) by default. You may want to ask your host for the correct value of this setting.
The Database table name prefix is up to your liking. For security purposes it's best to not use the default prefixes used by most common site scripts (e.g. jos_ or wp_). Ideally, you should use three to four letters followed by an underscore, e.g. tst_ or test_.
![[Warning]](/media/com_docimport/admonition/warning.png) | Warning |
|---|---|
|
Only use two to five lowercase letters a-z (without accents or diacritics) and numbers 0-9 followed by exactly one underscore. Anything else may cause restoration problems due to the way databases work on most operating systems. Especially avoid uppercase letters! On many servers it will cause problems due to the way MySQL stores its data on the server's disk. |
After entering this information, take a look at the the Advanced options column on the right hand side of the page.
The With existing tables option lets you decide what to do with tables which have the same name as those currently being restored. The default Drop option will delete same-named tables during restoration without asking. The Backup option will keep a copy of those tables, changing their name prefix to bak_, i.e. an existing abc_users table will be renamed to bak_users. Existing bak_ tables will be deleted before the rename. Both Drop and Backup options apply to tables that are being restored by ANGIE.
There are two more options which apply to tables in your database even if they are NOT included in the backup archive you are restoring or if you chose not to restore them via the Select which tables to restore option. Drop same prefix will delete all tables with the same prefix as the Database table name prefix you defined in the Connection Information. Drop All is the most dangerous option. It will remove all tables from the database, regardless of their name. If you are sharing a database with another site its database tables will be erased. Both of these options are dangerous and can cause permanent data loss. Be very careful when you use them!
Select which tables to restore allows you to perform a partial restoration. Select which of the tables backed up should be restored. Make a multiple selection with CTRL-click (Windows, Linux) or CMD-click (macOS). Any table you have not selected here will not be restored; it will be skipped over. This an advanced feature. Use it if you are absolutely sure about what you're doing. Skipping the restoration of the wrong table may cause your site to malfunction or not work at all.
Suppress Foreign Key checks allows you to restore cross-linked tables without MySQL errors. Leave it on. Use REPLACE instead of INSERT may be required if you keep getting MySQL errors about rows already existing in your tables. Force UTF-8 collation on database and Force UTF-8 collation on tables should be enabled on all sites which use non-ASCII characters in their contents, e.g. accented Latin characters, German umlauts, Cyrillic, Greek, Chinese or any other characters which are not normally used in the English language. If unsure, make sure it's checked.
No auto value on zero works around a problem with some software which uses an auto incrementing counter column in a database table but also inserts the numerical value 0 in it. This can cause problems during restoration which why this option exists. If unsure, keep it enabled.
Use REPLACE instead of INSERT tells ANGIE to use REPLACE database commands to apply the restored table contents instead of INSERT. This is rarely necessary, if you have edited your SQL files by hand and removed the CREATE TABLE lines. If you don't know what it is you most likely don't need it.
Some PHP software, such as Joomla 3.7 and later, is using
the utf8mb4_general_ci collation instead. This
collation supports multi-byte Unicode characters such as Emoji,
certain Traditional Chinese characters and so on. If you need to
restore such a site please remember to turn on the Allow
UTF8MB4 auto-detection option.
In case you have taken a backup on a server supporting UTF8MB4 but trying to restore on a server that doesn't you will observe that this results in an error. This is by design: UTF8MB4 supports more characters (notably: emoji) than UTF8. If the database server allowed you to restore UTF8MB4 data to a UTF8 table / table field you'd lose data. If, however, you are absolutely sure you want to downgrade your UTF8MB4 data to UTF8 and complete the restoration you can do that in newer versions of our restoration script by selecting (checking) the Force UTF-8 collation on tables option but NOT selecting (leave unchecked) the Allow UTF8MB4 auto-detection option. Please note that if you have extended, 4-byte characters such as Emoji, certain traditional Chinese characters etc they will be replaced with the Unicode Replacement Character (�) as they cannot be mapped to plain UTF-8.
As a final note on the subject of UTF8MB4, if you back up a site on a server supporting only UTF8 and restore it to a server supporting UTF8MB4 you will NOT have a problem. Therefore you do not need to do anything special.
Handling database errors
On rarely cases during the restoration you could get a database error. This is not caused by Akeeba software, but by the data you're trying to restore (in other words: you would get the error even manually importing the SQL file using PhpMyAdmin). However, if that data is not crucial, your site would work perfectly fine without it. Think about logging data, statistical information or some article metadata that is too large for your new database: if one page is missing an image or some formatting that's something you can manually fix later.
This is when the options Stop on CREATE error and Stop on other error come into play. By default ANGIE will stop when something wrong happened, if you uncheck those fields, ANGIE will ignore any database error, showing you a report of the failed queries. In this way you can review them and know which part of the old database wasn't restored in the new one.
You will find the Fine Tuning area towards the bottom. The setting Maximum execution time should be left at its default values unless you get AJAX or timeout errors while ABI is restoring your database. In this case, try setting it to 3, 2 or even 1. This will slow down the restoration a bit, but it will make it more resilient to timeout issues. The Throttle time (msec) should be left at 250 unless you are told by our support staff to change it.
When you're ready with all those settings, click on the button on the top right corner of the installer page to start restoring your database. The restoration dialog appears:
ANGIE - Stepping through the database restoration
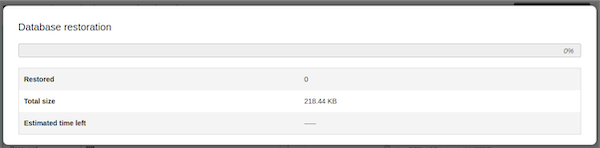
While your database is restoring, you will see the progress bar filling up and the information line below informing you of the processed and total size of the database dump file. The estimated time left is a very rough approximate. Should an error occur, you can close the dialog, modify the settings and retry by clicking the button again. Once the restoration is over, the button appears:
ANGIE - Database restoration is complete

Just click on it. If you have more databases to restore (only backups made with the Professional version, using the Multiple Database Definitions feature of Akeeba Backup Professional) you will see the database setup page again, but the header will read the name of the extra database instead of Site's main database. If you have extra databases to restore you will see the same database restoration page for the next database.
If there are no more databases left to restore but you had defined off-site directories to be backed up, upon clicking you will be taken to the Off-site directories restoration page.
If, however, you do not have any off-site directories upon clicking you will be taken to the Site Setup page. The exact page depends on the installer you are using:
If you don't see that page, maybe you want to take a look at this troubleshooting page.
ANGIE - Off-site directories restoration page
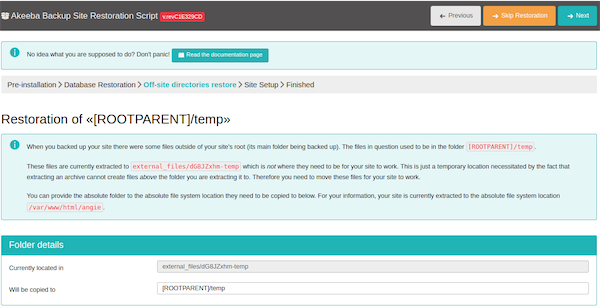
When Akeeba Backup backs up an off-site directory its
contents are placed inside the backup archive in a directory
called "virtual folder". By default this is
external_files. Naturally, this is extracted
inside the site's root which is not where these files need to be.
Therefore, they have to be moved. This is what this page does: it
moves the off-site folder from where they were extracted to where
they should be.
The Virtual folder area shows you the directory inside the extracted site's root where the files and folders to be copied reside. In the Target folder you can enter the absolute filesystem path of where the files and folders contained in the displayed Virtual folder should be moved to. Click on the button to perform the move.
You can always click on to skip moving the files and folders from the displayed virtual folder, e.g. when you would rather do that manually.
While the move is in progress you will see a progress bar filling up:
ANGIE - Off-site files being copied

When the process is finished, ANGIE will let you know:
ANGIE - Off-site files finished copying

Clicking on the button will let you move the next off-site folder.
When you have move all off-site folders, upon clicking you will be taken to the Site Setup page. The exact page depends on the installer you are using:
If you don't see that page, maybe you want to take a look at this troubleshooting page.
Normally, you should see a success message like this:
ANGIE - Off-site files finished copying

If ANGIE could not write to your site's configuration file, it will present you with a dialog box informing you of this fact. You can close the message by clicking on the "X" button on its top right corner. You can then copy the contents of the text area and paste it into your configuration file - replacing any and all existing content - manually, following the instructions printed on this page. This is only required if your configuration file was not writable in the first place. Under most circumstances this won't happen. Do note that if you get this message and you do not follow the steps printed on the page your restored site will not work.
You now have three options to proceed, depending on how you extracted the backup archive.
If you used Kickstart to extract the backup archive, close
the window/tab of the restoration script and return to Kickstart's
window. You will see a big “Clean Up” button. Just click on it and
it will automatically remove the installation directory, the
backup archive, kickstart.php and its
translation files, as well as rename
htaccess.bak to
.htaccess and
php.ini.bak to php.ini
respectively. No further action is necessary. Your restored site
is ready for use.
| Important |
|---|---|
|
If you had created a |
If you were not using Kickstart, you can try clicking on the
button to
have ANGIE try to remove the installation directory automatically.
If it succeeds, it will present you with a success dialog. Just
click on the
button to visit your site's front page. However, if you used
Kickstart to extract your files and clicked on this link
accidentally instead of using Kickstart's button you need to manually rename
htaccess.bak to
.htaccess and
php.ini.bak to php.ini,
as well as remove the archive file, kickstart.php file and all its
INI files and the kicktemp directory (if one
is present) manually.
If you uploaded the extracted files manually, you must remove the installation directory from your site using your FTP client application before visiting your restored site. If you don't, the restoration page may appear again. In this case do not run the restoration again. Just remove the installation directory through FTP and retry visiting your site.