![[Warning]](/media/com_docimport/admonition/warning.png) | Warning |
|---|---|
|
Using the integrated restoration you are OVERWRITING your site with the one contained in the backup archive. The same precautions apply as with any backup restoration. |
![[Note]](/media/com_docimport/admonition/note.png) | Note |
|---|---|
|
This feature is only available in the Akeeba Backup Professional edition |
The integrated restoration feature allows you to easily restore a previous backup directly on your server, as long as your backup archive still exists on your server of course. The whole idea behind this feature is that it is not necessary to manually download Kickstart, place it in your site's root and move the backup archive from the output directory to the site's root in order to perform the restoration. Instead, the integrated restoration feature takes care of extracting your backup archive directly from the backup output folder into your site's root and then allow you to run the embedded installer (Akeeba Backup Installer) to complete the restoration procedure.
The communication between your browser and the archive extraction script is encrypted with the AES128 (Rijndael) encryption method, using a random key produced as soon as you initiate the restoration of a backup archive. This ensures that a malicious user can't exploit the restoration script to mischievously extract your backup archive in your site's root with the intent to steal your database password. The encryption/decryption algorithm is implemented with standard PHP and Javascript code, eliminating the need for third party cryptography libraries and ensuring that under no circumstances unencrypted data will be exchanged between the browser and the server.
In order to start an integrated restoration begin by going to the Manage Backups page of the component. In that page check the checkbox next to the backup you want to restore and click the button in the toolbar to will run the integrated restoration feature for the selected archive file.
The integrated restoration setup page
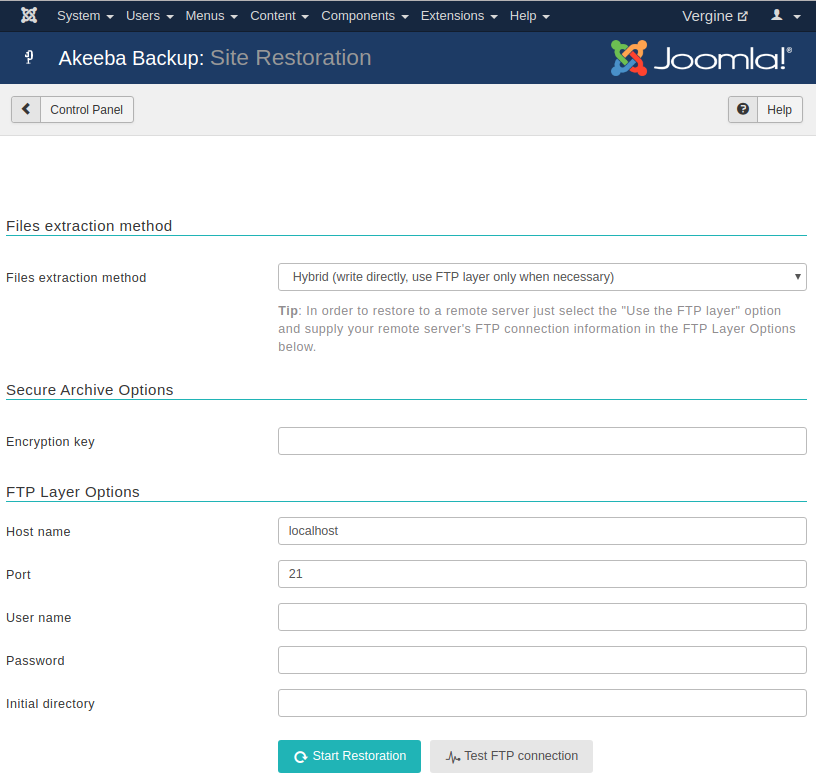
When you first start the integrated restoration feature, you are presented with a few settings. The first setting, appearing above the button, determines how the file extraction will be performed. The two available options are:
- Write directly to files
-
All files will be extracted directly to their final location using direct PHP file writes. If your permissions settings do not allow some files or directories to be created/overwritten the process will fail and your site will be left in a half-restored state.
- Use FTP uploads
-
Using this method, each file is first extracted to the temporary directory specified by the current profile and then moved to its final location using FTP. This is a "best effort" approach and can work with most servers. Do note that only unencrypted FTP (plain FTP) is supported. If you choose this option, you'll also have to specify the FTP connection settings.
![[Tip]](/media/com_docimport/admonition/tip.png)
Tip You can use this option to restore a backup on a different site. Just select this option and provide the FTP connection details to the other site before clicking on .
- Hybrid
-
This mode combines the previous two in an intelligent manner. When selected, Akeeba Backup will first attempt to write to the files directly. If this is not possible, i.e. due to permissions or ownership of the file or folder being exracted, it will automatically make use of the FTP mode to overcome the permissions / ownership problem. It effectively works around a situation commonly called "permissions hell", where different files and folders are owned by different users, making it extremely difficult to overwrite them. This is a situation which happens very commonly on shared hosting. Therefore we strongly advise clients on shared hosting environments to use the Hybrid option.
Note You MUST supply your FTP information for this mode to have any effect. If you do not do that the Hybrid mode will function exactly as the "Write directly to files" mode.
The default mode is writing directly to files, unless your site's Global Configuration indicates that the FTP layer should be used in which case the Hybrid mode is selected by default.
In the event that a partial restoration happens, your site
will be left in a semi-restored state. Trying to access it will
pop up the restoration script (ANGIE). If you want to retry the
restoration using different settings, please remove the
installation directory from your site's root
manually, for example using FTP, before trying to access your
site's administrator back-end.
If you chose to use the FTP mode, there are some connection settings you have to take care of. Do note that they are filled in with Joomla!'s FTP layer settings by default. Unless you chose not to store your FTP password in Joomla!'s configuration or if you have not configured the FTP layer yet, there is no need to change them. The settings are:
- Host name
-
The host name of your site's FTP server, without the protocol. For example,
ftp.example.comis valid,ftp://ftp.example.comis invalid. - Port
-
The TCP/IP port of your site's FTP server. The default and standard value is 21. Please only use a different setting if your host explicitly specifies a non-standard port.
- User name
-
The username used to connect to the FTP server.
- Password
-
The password used to connect to the FTP server.
- Initial directory
-
The FTP directory to your web site's root. This is not the same as the filesystem directory and can't be determined automatically. The easiest way to determine it is to connect to your site using your favourite FTP client, such as FileZilla. Navigate inside your web site's root directory. You'll know you are there when you see the file
configuration.phpand directories such asadministrator,components,languagein that directory. Copy (in FileZilla it appears on the right hand column, above the directory tree) and paste that path in Akeeba Backup's setting. - Test FTP connection
-
Clicking on this button will tell you if the FTP connection could be established or not. If the connection is not successful you should not proceed with a restoration in FTP mode as it will fail immediately.
The whole process is fully automated, so there is not much to tell you about it. However, you must not that in order for the restoration procedure to work properly you must take care of the following:
-
This feature is directly calling the
administrator/components/com_akeeba/restore.phpscript. If you have a server-side protection, i.e. .htaccess rules, or permissions settings which prevent this file from being called directly the process will fail.Security note: The restore.php file is of no use to potential hackers. In order for it to work at all, it requires the
restoration.phpfile (more on that on the next point of this list) to load. Even then, it expects a key which is not predefined and is only known to therestore.phpscript and the integrated restoration page of Akeeba Backup. As a result, it can't be used as a potential attack vector. -
Before the restoration begins, Akeeba Backup needs to create the
administrator/components/com_akeeba/restoration.phpfile with all the archive extraction setup parameters. It is intelligent enough to use Joomla!'s FTP mode if it is enabled so as to overcome any permission problems, but you are ultimately responsible for ensuring that the permission settings are adequate for Akeeba Backup to create this file.If you have disabled Joomla!'s FTP layer, the permissions of the
administrator/components/com_akeebadirectory should be 0777 for the integrated restoration to work, or 0755 on hosts which use suPHP. You can change these permissions after the restoration is over, of course.If you are using Joomla!'s FTP layer and it was active when you were installing Akeeba Backup, you'll need to give this directory at least 0755 permissions, but you may have to manually remove
restoration.php(but NOTrestore.php!!!) after the site restoration is over. -
When the extraction of the backup archive finishes, you will be automatically forwarded to the Akeeba Backup Restoration Script page on a new tab or window. DO NOT CLOSE THE INTEGRATED RESTORATION PAGE'S TAB/WINDOW! After you have competed the Akeeba Backup Restoration Script process you are supposed to return to the Integrated Restoration page and click on the button to:
-
remove the
installationdirectory from your site's root, and -
remove the
administrator/components/com_akeeba/restoration.phpsetup file to nullify the, already non-existent, potential risk of a malicious user abusing this script.
-