Before you begin, make sure that your backend and frontend use the same PHP version. This is very important! Different versions of PHP will be using different versions of the imagick extension and, possibly, the ImageMagick library itself. This discrepancy can very likely mean that what you see in the template preview in the backend of your site IS NOT what you get in the frontend where it matters the most. Having the same PHP version throughout your site is an excellent idea anyway, as it reduces this kind of weird issues which will catch you off-guard – not just in our extension, but other third party extensions and even Joomla itself. If you're not sure how to do that, or even check for it, do ask your host.
Once you have confirmed that you are using the same PHP version throughout your site, you can proceed to configuring PHP to enable the imagick extension.
I don't want to do any of this by myself!
YOU DON'T HAVE TO!
Most people want to manage a site, not a server. That's probably why you use a commercial host. Ask your host to enable the imagick PHP extension on your site. That's it!
As for why this page exists, the reason is simple: there are people who want to learn how to do basic server management themselves because it tends to be faster. This page is here to help them, not force you to do something you don't want to.
On commercial hosting
Most commercial hosts have a place where you can change your PHP configuration, and select the extensions which are enabled on your site.
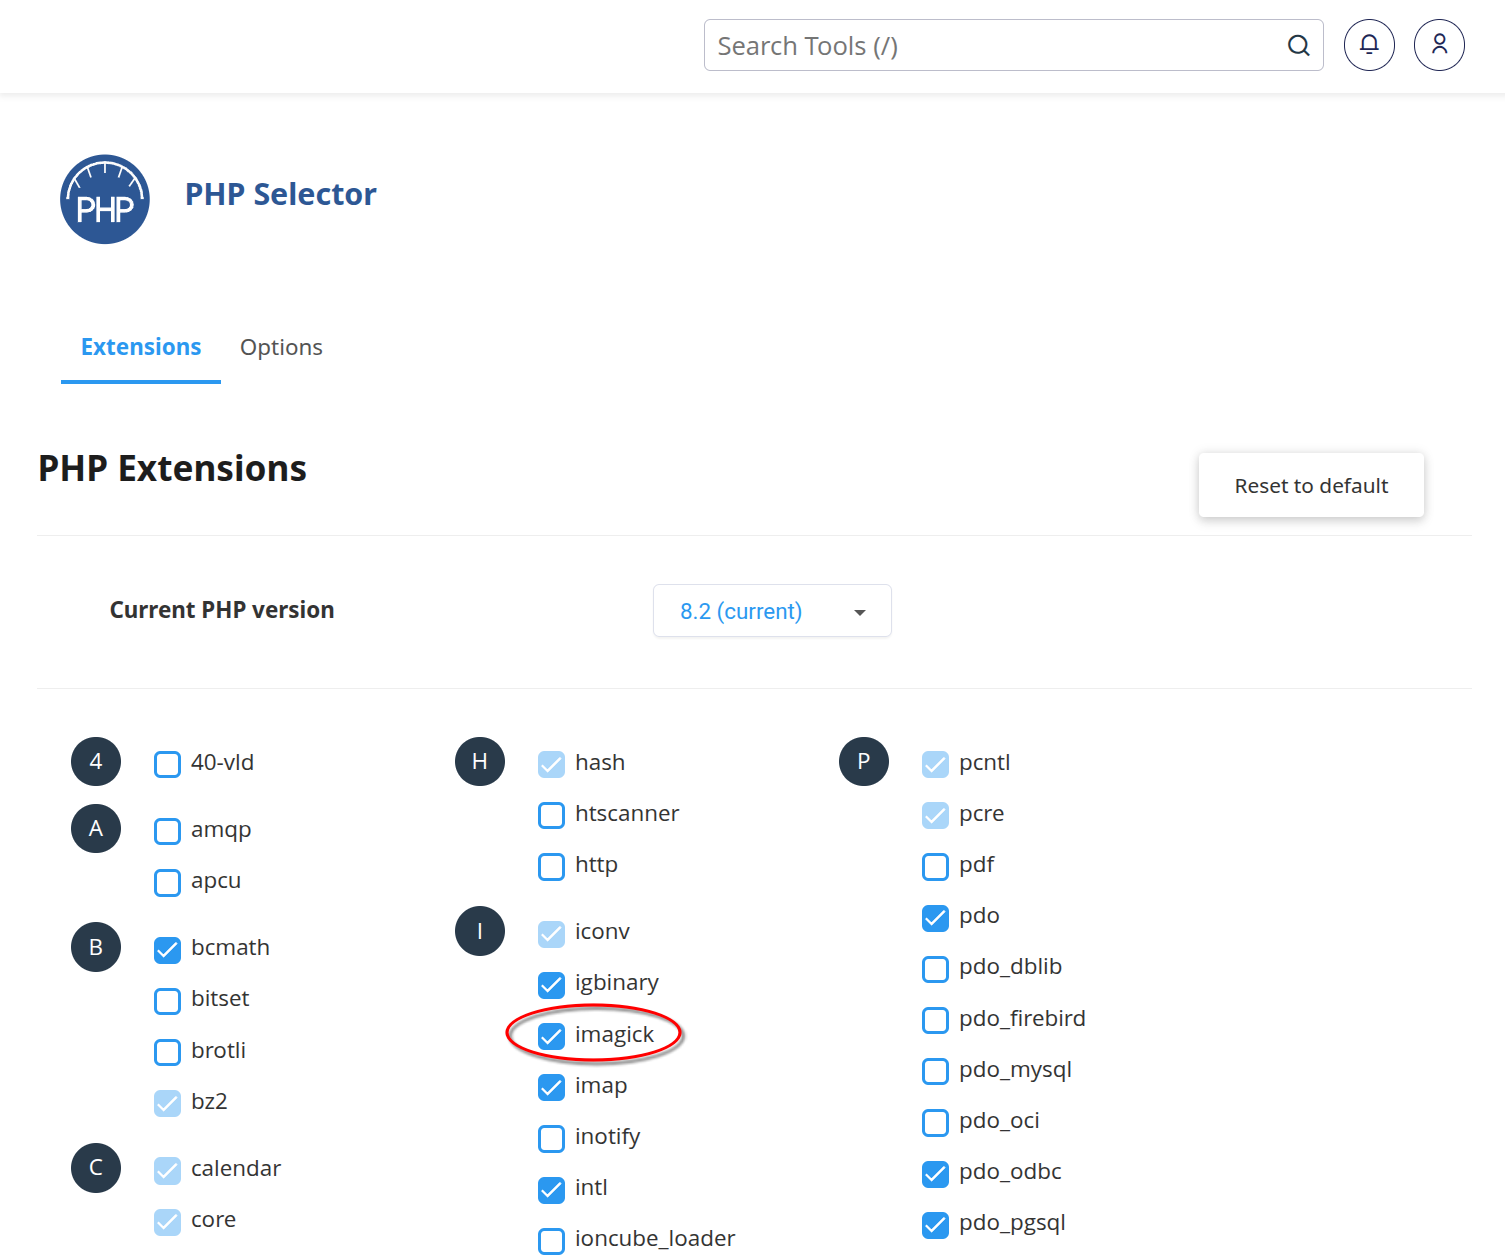
For example, most cPanel hosts have a Select PHP Version option. In it, you just need to check the imagick option. The screenshot below is from the cPanel hosting control panel, as configured by the hosting company Rochen.
Other hosting companies may use a slightly different method. If unsure, please ask your host.
Local hosting (MAMP, XAMPP, WAMPServer, etc)
Local server packages such as MAMP, XAMP, WAMPServer etc typically do not come with the imagick extension preinstalled. You will need to either copy its DLL files (Windows), or compile it (macOS, Linux).
We recommend asking ChatGPT or a similar AI assistant a question such as "how do I install and enable the PHP imagick extension on MAMP 7.2.0 running under macOS Tahoe". Remember to replace the hosting package, its version, your operating system, and your operating system's version in this prompt. Just blindly follow the instructions it provides. This is always fairly accurate, on account of this being a very common question with very straightforward steps which have been invariant for the better part of two decades.
Tip
If you are using macOS you will most likely have to also install HomeBrew. This is a safe piece of software we use ourselves, too.
Self-hosting (Linux, *BSD)
Many people choose to run their own Linux or *BSD server or desktop, for development and / or production. We do too! Several, in fact.
Before you begin, you will need to install the imagick extension package on your system. Assuming you're using the default PHP version that comes with your distribution, this is usually as follows:
Debian, Ubuntu and their derivatives: sudo apt-install -y php-imagick
Arch Linux and its derivatives: sudo pacman -Syu php-imagick
RedHat, CentOS, Alma Linux, and their derivatives: sudo dnf install -y php-pecl-imagick
FreeBSD and its derivatives (replace
php82with your PHP version): sudo pkg install -y imagemagick && sudo pkg install -y php82-pecl-imagickNetBSD, OpenBSD, and their derivatives: you need to compile the extension yourself.
After installing the extension, make sure it's enabled by running php -m | grep imagick. If imagick is enabled, you will see the result imagick coming back.
$ php -m | grep imagickimagick
If this is not the case, you probably have to edit your php.ini file. First, find out where it lives with php --ini.
$ php --iniConfiguration File (php.ini) Path: /etc/phpLoaded Configuration File: /etc/php/php.iniScan for additional .ini files in: /etc/php/conf.dAdditional .ini files parsed: /etc/php/conf.d/99-nicholas.ini,/etc/php/conf.d/igbinary.ini,/etc/php/conf.d/imagick.ini,/etc/php/conf.d/memcached.ini,/etc/php/conf.d/redis.ini,/etc/php/conf.d/xdebug.iniThe "Loaded Configuration File" is your main php.ini file. You can try to edit it with sudo sed -i '/;extension=imagick.so/s/^;//' /etc/php/php.ini This command uncomments the line which loads the imagick extension, assuming it was present in your php.inifile (that's the default).
Alternatively, you can create a new INI file in the "Scan for additional .ini files in" directory. In our example above you can see that this is what we have done; we created the file /etc/php/conf.d/imagick.ini with these contents:
extension = imagick
Sometimes, your distribution's package manager may create such an additional INI file, but have the extension line commented out. For example, this is the default behaviour in Arch Linux. Edit the file, and remove the comment marker (;) from the start of the line.
Note
You may have noticed that in one instance we have extension=imagick.so and in the other we have extension=imagick. They are equivalent and work the same on Linux and *BSD. You can use either; it's a matter of preference. The latter form is easier to read, which is why some distributions –like Arch Linux– default to it.
After you are done editing your php.ini file, please remember to restart your web server AND PHP-FPM (if you are using PHP-FPM). How to do that depends on your distribution and installed PHP version. For example, on Debian and Ubuntu you need to do systemctl restart php8.2-fpm && systemctl restart apache2 whereas on Arch Linux you need to do systemctl restart php83-fpm && systemctl restart httpd.