The Extra Image lets you define an image which can be used with (or without) the Base Image to create visually interesting compositions. The Extra Image can come from the content displayed on the page, or provided as a static image. The source of the Extra Image can be overridden in categories, content items, and menu items.
Add an Extra Image controls whether an Extra Image will be used at all. If this is disabled in your template, any further overrides to the Extra Image source in categories, content items, and menu items will NOT be taken into account.
Extra Image Sources
The Extra Image Source controls where the Extra Image comes from.
None. No Extra Image will be used. This is different than setting Add An Extra Image to No in that this Extra Image Source option CAN be overridden in categories, content items, and menu items.Intro Image. Uses the Intro Image of the content item. The exact semantics of this source depend on the integration plugin. Please read the Important box below.Full Article Image. Uses the Full Article Image of the content item. The exact semantics of this source depend on the integration plugin. Please read the Important box below.Custom Field. Uses a Joomla Custom Field defined on the content item. You can define the name of the custom field in the Extra Image Field Name option. Support for this depends on the integration plugin. Please read the Important box below.Full Article, Or Intro Image. Uses the Full Article Image source. If no image is defined there, it uses the Intro Image source.Intro, Or Full Article Image. Uses the Intro Image source. If no image is defined there, it uses the Full Article Image source.Custom Field, Full Article, Or Intro Image. Uses the Custom Field source. If no image is defined there, it uses the Full Article Image source. If no image is defined there, it uses the Intro Image source.Custom Field, Intro, Or Full Article Image. Uses the Custom Field source. If no image is defined there, it uses the Intro Image source. If no image is defined there, it uses the Full Article Image source.Static Image. The image source is not linked to the content. It comes from an image you define in the Static Image option.
Important
SocialMagic has a plugin system for integrating with Joomla core and and third party extensions content. The appropriate integration plugin is used depending on the content being displayed on your site when the OpenGraph image is being generated. For example, if you are displaying a category blog for core content (articles) the SocialMagick - Content Categories plugin is used.
The Custom Field, Intro Image, and Full Article Image sources have different meanings depending on the integration plugin being used. In the example above, Custom Field refers to a category field, whereas both Intro Image and Full Article Image both refer to the category's Image field. Conversely, if you are click on an article displayed in the category blog the SocialMagick - Articles integration plugin is used, in which case the Custom Field refers to an article field, and the Intro Image and Full Article Image refer to the respective fields in the article.
The reason the template uses the generic terms "Intro Image", "Full Article Image", and "Custom Field" is because the same template can be used for radically different menu items corresponding to different integration plugins. The semantics of these sources for each integration plugins are documented in the integration plugins documentation page.
The Extra Image Field Name option defines the Name of the Joomla custom field which holds the image filename. The field must be of type Media (or third party equivalent) or Text and it must point to an image file stored on your web server. If the field points to an image stored outside of your server (e.g. by using a third party plugin in the filesystem group) or a URL / URI SocialMagick cannot use it. That's for performance and reliability reasons. We have found that having an image on a slow remote storage provider (such as Amazon S3), a slow server, with an invalid URL, or experiencing network issues can make page loads take several seconds or even fail — both of which are detrimental to SEO and site reliability.
Tip
The best approach to performance is to host your images on your web server and put your site behind a CDN, such as CloudFlare, to serve the static media efficiently. This greatly simplifies site management, allows you to use SocialMagick very efficiently, and helps your site load much faster.
The Static Image option allows you to define an image on your site to use as the Extra Image Source. The image you select must be an image file stored on your web server. If the field points to an image stored outside of your server (e.g. by using a third party plugin in the filesystem group) or a URL / URI SocialMagick cannot use it for the reasons explained above.
Display layer
The Display Layer option lets you choose how SocialMagick will composite the Extra Image on the generated OpenGraph image.
As explained earlier, Underlay puts the image in the underlay (bottommost) layer, under the colour background and Base Image. Overlay puts the image in the overlay layer above the Base Image and below the text (if any).
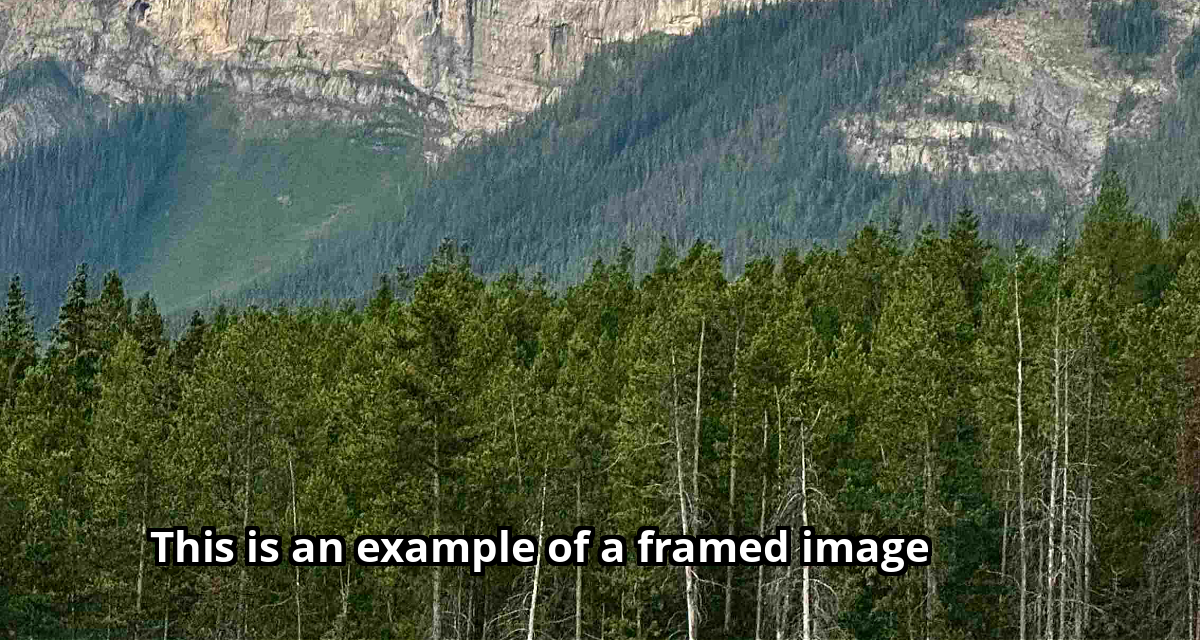
Typically, you will use Underlay in combination with a Base Image that has a cutout (fully transparent) or semitransparent area, possibly with some resizing and cropping tweaking, to display parts of your Extra Image for a framing effect. Here's a typical example:

Conversely, the Overlay is used in two typical use cases. One, you want to completely or partially cover the Base Image. The example below is the same template as above but with the Display Layer switched from Underlay to Overlay.
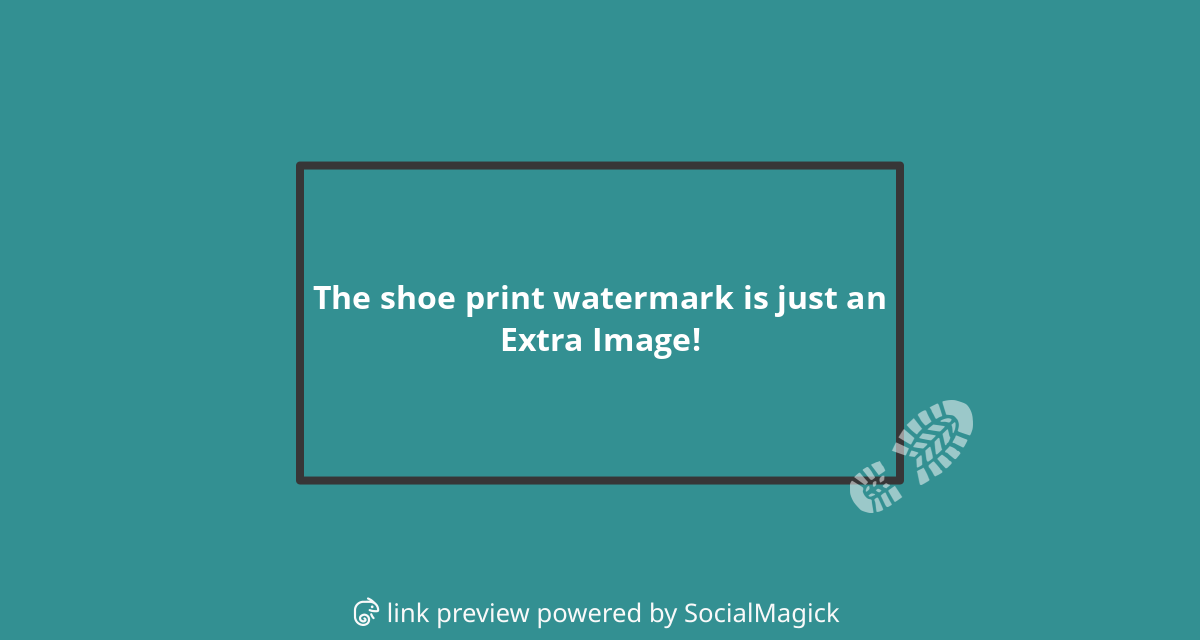
Two, you know your Extra Image has transparency, so you want it overlaid on the image but underneath the text for a watermark effect. In the example below, the shoeprint is a semi-transparent static image. We used the resizing and cropping parameters to move it to the lower right corner of the text box, creating this watermark effect.
Resizing
When Auto-Resize is set to Yes (default), SocialMagick uses an image fit algorithm called Best Fit (or Cover, as you know it from CSS). It roughly translates to these steps:
The Extra Image is placed on the template surface depending on the Crop Anchor Point setting – we'll talk about it later.
If the width or height of the Extra Image are equal or smaller than the width and height of the template, the image is left as-is. No further steps are considered. For example, let's consider a 300x200 template. If the image is 300x400 pixels no resizing takes place since the Extra Image is already the same width as the template.
The image is resized, with its aspect ratio kept intact, so either its width or its height matches the template's corresponding dimension and the resized does not become smaller than the template's area. For example, let's consider a 300x200 template. If the image is 600x600 pixels the choices we have is either make it a 300x300 image (fit the width) or 200x200 image (fit the height). SocialMagick resizes to 300x300 since the 200x200 image would NOT cover the entire 300x200 template area (it would leave a 100x200 area uncovered).
Any part of the resized Extra Image that's outside the template surface is cropped off.
When Auto-Resize is set to No there are two changes.
Instead of using the template's width and height, SocialMagick uses the dimensions you enter in Maximum Resize Width and Maximum Resize Height. These dimensions can be smaller or bigger than the template dimensions. You want to use a smaller size to shrink an image to make it fit into a cutout in the Base Image. You want to use a larger size to have a larger image to crop from, focusing on a detail on the image.
You can also tell SocialMagick to move the resized Extra Image around the template area by using the X Position (From Left) and Y Position (From Top). Think about it as having the resized Extra Image in the top left corner of the OpenGraph image, then dragging it this many pixels to the right and bottom respectively. This allows you to position the extra image in a cutout. This operation is known in graphics software as transform. It is important to remember that this leaves blank (transparent) space on the top and left of the Extra Image. For this reason, it typically only makes sense to use these transform options when there's a Base Image covering that area with its own content. You can use negative values to move the image towards the left or the top.
Cropping
As noted above, how the Extra Image is placed on the template surface depends on your Crop Anchor Point setting. The options are:
Top Left. The Extra Image is placed on the template surface so that the Extra Image's top left corner coincides with the template's top left corner.Top. The Extra Image is placed on the template surface so that the Extra Image's top middle point coincides with the template's top middle point.Top Right. The Extra Image is placed on the template surface so that the Extra Image's top right corner coincides with the template's top right corner.Left. The Extra Image is placed on the template surface so that the Extra Image's left middle point coincides with the template's left middle point.Centre Point. The Extra Image is placed on the template surface so that the Extra Image's dead center (horizontally and vertically) point coincides with the template's dead center point.Right. The Extra Image is placed on the template surface so that the Extra Image's right middle point coincides with the template's right middle point.Bottom Left. The Extra Image is placed on the template surface so that the Extra Image's bottom left corner coincides with the template's bottom left corner.Bottom. The Extra Image is placed on the template surface so that the Extra Image's bottom middle point coincides with the template's bottom middle point.Bottom Right. The Extra Image is placed on the template surface so that the Extra Image's bottom right corner coincides with the template's bottom right corner.Detect. SocialMagick uses the configured face detection method to locate faces in the Extra Image, then automatically selects a crop anchor point that centres the detected faces in the composition. If no faces are detected, SocialMagick falls back to the Centre Point anchor. The accuracy and speed of detection depends on the method selected in the component Options under the Face Detection tab. See the Face Detection section for setup instructions, and the Detected Face Size In The OpenGraph Image and Detected Face Padding options below to fine-tune the result.
Important
When Auto-Resize is set to Yes and the Extra Image is bigger than the template's dimensions, the corner options (top left, top right, bottom left, bottom right) are functionally identical to the four sides options – which one depends on the image's aspect ratio. That's because Auto-Resize uses the Best Fit (Cover) resize algorithm which guarantees that in this case either the width or the height of the resized image will be identical to the corresponding dimension of the template.
If you think SocialMagick is broken because the corner options had no effect compared to the edge options, stop and think: "Do I have a resizing situation which makes one dimension of the resized image identical to the respective dimension of the template?". If the answer is "yes", SocialMagick did exactly what you told it to do, not what you wanted it to do. You probably want to set Auto-Resize to No and work on your resizing options to achieve the effect you were looking for.
For example, let's consider a 300x200 template and a 900x900 Extra Image. The resized Extra Image will be 300x300 templates, i.e. the width will be the same. Using the Top Left, Top, and Top Right options will produce the same effect. Since the width of the resized Extra Image and the template are now the same, placing the images so that their tops align also means that by definition their top left corner, top middle point, and top right corner coincide.
There are another two options called Crop Origin Nudge Towards Right and Crop Origin Nudge Towards Bottom. They may look similar to the X Position (From Left) and Y Position (From Top) but there is a major difference: the Crop Origin Nudge settings apply to the Extra Image before it is resized. While the Position options let you move the resized image around the template so it can fit your composition with the Base Image, the Crop Origin Nudge options allow you to scroll the original image around so that the resize and crop can focus on a different region of the image. Moreover, each Crop Origin Nudge option will have no effect if that would cause the image to go outside the template area, or if the width / height of the image is smaller than the respective template dimension.
You can best understand these options editing the Overlay template, using the Lindsey (very tall) and Spiske (very wide) images in the Template Preview.
Face detection sizing options
When the Crop Anchor Point is set to Detect, two additional options become available to control how the detected face is framed within the composition.
The Detected Face Size In The OpenGraph Image option specifies the target size (in pixels) you want the detected face to appear in the final image. If the detected face is larger than this value in the source image, SocialMagick scales the image down further than the normal resize limits to make the face appear at the target size (effectively zooming out). If the detected face is smaller, SocialMagick adjusts the crop anchor to centre the face within a square of this dimension (effectively zooming in). Setting this to zero disables size-adjustment entirely, letting SocialMagick rely only on the anchor detection result without any rescaling.
Tip
When your template uses a Base Image with a cut-out where the Extra Image shows through — such as the built-in Overlay template — set this option to the pixel width of that cut-out for the best result.
The Detected Face Padding option adds or removes pixels of breathing room around the detected face. Positive values zoom out of the face, showing more of the background and creating a more relaxed composition. Negative values zoom in, giving a tighter, more dramatic crop. Set this to zero to disable padding adjustment entirely.
Tip
When your template uses a cut-out Base Image, a padding value of approximately 25% of the cut-out width gives a balanced composition that includes the hairline and shoulders of your subject.
Image effects
You can optionally apply the following image effects:
Grayscale. Removes the colour from the image without affecting its contrast and brightness. It can be from 0 (no effect) to 100 (all colour removed). You can use intermediate values to mute colours towards a neutral black and white palette without removing all colour.
Sepia. Applies a sepia colour filter.
Opacity. Adjust the opacity of the image, from 0 (fully transparent) to 100 (fully opaque). Do note that semi-transparent areas of the image are kept at their current alpha (transparency) value at 100, and are made more transparent for lower values. This may result in some semi-transparent areas becoming fully transparent as you are decreasing this value.