Note
This feature is available only in Akeeba Backup Professional.
By default, Akeeba Backup automatically includes the whole database of your Joomla!™ installation as well as all the files under your site's root in the backup set. Sometimes you want to include a different database or files you have placed above your site's root for increased security. Akeeba Backup Professional can cope with that need by providing you with handy data inclusion filters.
Important
You DO NOT need to add your site's root or your site's database to the backup. These are always added automatically and they are not listed in the Multiple Databases Definitions or Off-site Directories Inclusion pages.
Note
This feature is available only in Akeeba Backup Professional
Sometimes your site may use more than one databases. Taking a full site backup requires backing up those external databases too. Normally, Akeeba Backup only backs up the tables from your Joomla! database. The solution to this problem is the option of Akeeba Backup. You can define an unlimited number of additional MySQL databases which will get to be backed up (and restored) along with your regular Joomla! database.
Important
Please note that you do not need to and, in fact, must not use this feature to add the main database of your site (the one used by Joomla! itself). The main database of your site is backed up automatically. If you ignore this warning and add your main database as an additional database in this page you will cause errors during the restoration of your site.
Moreover, you should not confuse the term "database" with your Joomla!™ tables. It is possible that a single database contains tables for the current Joomla!™ site, tables from a third party script, tables from another Joomla!™ site on the same server (e.g. a subdomain) and so on and so forth. As far as Akeeba Backup is concerned, all of those tables exist in the same database regardless of their prefix. Unless you tell it otherwise, it will backup ALL tables of the database.
Finally note that adding an empty database (one which has no tables) will result in backup errors.
Note
The settings on this page are defined per backup profile . Make sure you have selected the correct backup profile in the page.
 |
At first, you are presented with a grid view, listing all database definitions. On the left of each entry, there are two icons:
Trashcan (red background). Clicking on this icon will remove the current database definition.
Pencil or Add (blue background). Both will open the database definition editor: the former to edit the database definition, the latter to create a new one.
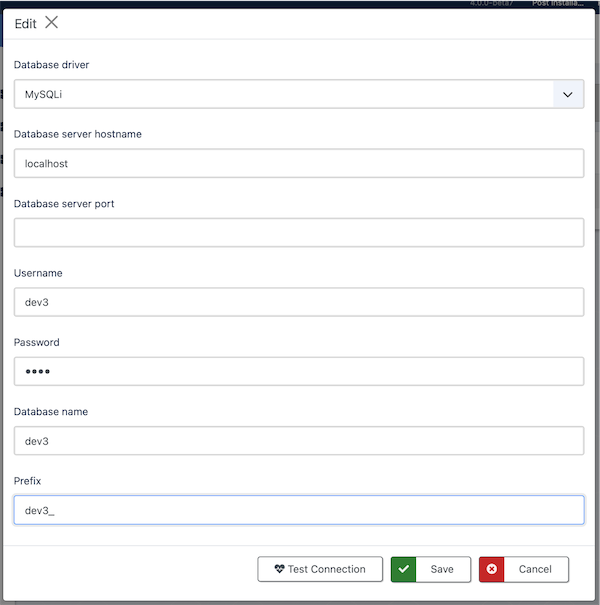 |
The database definition editor opens as a dialog box inside the multiple databases definitions page. The options you can select for each database are:
Database driver. You can select which database driver Akeeba Backup will use to connect to the database. Your options are:
MySQLi. This is PHP's standard MySQL connection driver (the name stands for MySQL Improved). We recommend using it for MySQL, Percona and MariaDB databases on most servers.
MySQL (PDO). This is the alternative modern MySQL connection driver (the name stands for MySQL – PHP Data Object). This is for some servers which do not include MySQLi support but do include PDO support.
PostgreSQL. Use this driver to back up a PostgreSQL database. Requires the PHP PDO extension with the pgsql driver enabled on your server.
Important
You cannot use a MySQL driver to back up a PostgreSQL database, or the PostgreSQL driver to back up a MySQL/MariaDB database. Select the driver that matches your actual database server. Furthermore, a backup taken from a MySQL/MariaDB database cannot be restored on a PostgreSQL server, and vice versa.
Database server hostname. The host of your database server. Usually it's
localhost, but many hosts use something different. If in doubt, ask your host. Please remember that for MySQL servers the settingslocalhostand127.0.0.1are NOT the same. The first means "connect using a socket or named pipe" the second means "connect using TCP/IP networking". If you are on Windows they have a massive performance difference as well.Database server port. Leave it blank, unless your host has told you to use a non standard port for connecting to their database server. The default TCP/IP port for MySQL is 3306. If none is specified this is what Akeeba Backup will try to use.
Username. The username of the database user needed to connect to the database.
Password. The password of the database user needed to connect to the database.
Database name. The name of the database you are connecting to.
Prefix. The prefix used in the table name's prefixes. MAJOR PITFALL: Please do not leave the Prefix field blank if you intend to use the Database Table Exclusion feature to exclude tables or table data of this extra database from the backup. If you don't want to use a real prefix, please use a "fake" prefix, e.g.
thisIsAFakePrefix_, to keep the Database Table Exclusion feature happy and functional.
Some hosts use your account name as a prefix for the database and username. This is not the same as the Prefix setting above. That database and username prefix is actually part of the actual database and username that you need to fill into this page. For example, you're hosted under the account name foobar and you create a database mydata and a user myuser. Your host displays a prefix foobar_ on the left of the edit boxes where you entered the database and user names. This means that your REAL database name is foobar_mydata and your real username is foobar_myuser. This is especially true for accounts hosted in cPanel and Plesk powered hosts. It goes without saying that your password does NOT take a prefix. If in doubt, please contact your host. We can't guess the right values for you because we are not your host. If you ask your host to give you the connection information to your database, they must be able to do so - except for the password which they obviously cannot see for security reasons.
When you think you have all the connection information ready, click on . This will check all settings except the Prefix. The connection test will tell you if it succeeded or failed.
If your connection works properly, it's time to save your changes by clicking the button. The top panel will briefly display a "loading" message and the dialog box will go away. That was it, your extra database definition is now saved.