Table of Contents
- The "ats" plugins
- Akeeba Subscriptions integration
- Automatically close old tickets
- Automatic replies
- Custom fields
- Delete Manager Notes on ticket close / unpublish
- EasySocial avatar integration
- GeoLocation support
- Gravatar integration
- Fetch Email
- New post notification emails
- Remove Obsolete Attachments
- Social "Like" buttons
- Joomla! User Groups integration
- The ATS InstantReply plugins
- The "finder" plugins
- The "search" plugins
- The "user" plugins
- Other plugins
![[Note]](/media/com_docimport/admonition/note.png) | Note |
|---|---|
|
None of the plugins are availabe in Akeeba Ticket System Core. |
Akeeba Ticket System is a modular system, allowing you to easily extend it by means of plugins. It comes with several plugins out of the box for features ranging from sending emails to integrating with Joomla! search and user profiles. In this chapter you will learn what each plugin does and how to configure it.
The plugins can be found in the Joomla! plugins manager (, at the back-end of your site). The plugins are placed in different groups, depending on the kind of functionality they perform. This chapter is organised by plugin group.
| Note |
|---|---|
|
This plugin is NOT availabe in Akeeba Ticket System Core. |
| Note |
|---|---|
|
The Akeeba Subscriptions component is no longer available as an installable download, meaning it's no longer suitable for end users. This plugin is maintained only for internal use in Akeeba Ltd's site and for those developers who can build and use Akeeba Subscriptions from its public repository. |
Displayed in the Joomla! Plugin Manager as Akeeba Ticket System - Akeeba Subscriptions integration
This allows you to integrate the Akeeba Subscriptions component (version 7) with Akeeba Ticket System. Each Akeeba Subscriptions subscription level can be assigned to a number of credits. When the subscription becomes active these credits are added to the user's Akeeba Ticket System credit count. When the subscription becomes inactive you can choose whether to keep the credits or expire them (meaning any unused credits will no longer be available to the user).
| Note |
|---|---|
|
This plugin is NOT availabe in Akeeba Ticket System Core. |
Displayed in the Joomla! Plugin Manager as Akeeba Ticket System - Automatically close old tickets
This plugin allows you to automatically close tickets with a
Pending status which have not received a reply from either the
client or the support staff for a specific amount of time. It makes
the autoclose CRON command available.
This plugin replaces the obsolete
ats-autoclose-tickets CLI script.
The idea behind this plugin is that some clients will see the reply from the support staff which addresses their issue but will neither reply nor close their ticket. Over time your support ticket system will show too many tickets as pending a reply from the client which makes it really hard for you to understand how many support cases are really open, making it potentially difficult to schedule your support staff. This plugin automatically closes stale tickets which are most likely resolved or for which the client has otherwise lost interest.
The plugin has the following options:
- Maximum inactive ticket age
-
Open / Pending tickets older than this many days (but newer than the "Silent close period") will be set to Closed status by the
ats-autoclose-tickets.phpCRON script, posting a notification that the ticket is closed because it's inactive. - Silent close period
-
Open / Pending tickets older than this many days will be set to Closed status by the
ats-autoclose-tickets.phpCRON script, without posting a notification.
| Note |
|---|---|
|
This plugin is NOT availabe in Akeeba Ticket System Core. |
Displayed in the Joomla! Plugin Manager as Akeeba Ticket System - Automatic replies
This plugin allows you to send automatic replies to tickets,
either instantly (when they are filed) or on a schedule. It makes
the autoreply CRON command available when set
up to do so.
This plugin replaces the obsolete
ats-autoclose-tickets CLI script.
The plugin has the following options:
- Run on ticket creation
-
Should I automatically reply to newly created tickets? This applies to tickets created either from the site itself (frontend or backend) or by processing email.
Please note that for new tickets created by email the automatic replies are processed before InstantReplies. Therefore if this plugin sends an automatic reply to a new ticket created by email the InstantReplies will NOT be sent.
- Make available as a CRON task
-
When enabled, it makes the autoreply CRON command available to the CLI CRON script and the CRON URL of ATS. This command processes all the Auto-Replies rules for open tickets and sends the corresponding emails.
- Bot usernames
-
When you are using the auto-reply feature in Akeeba Ticket System you need one or more users to appear as the senders of the reply text. This is where you specify their usernames, one per line.
![[Important]](/media/com_docimport/admonition/important.png)
Important The users must already exist in your Joomla! site. If you have not created them already, go to Users, User Manager in the back-end of your site and create one or more users. Then put their usernames in the Bot usernames setting inside the Options page of Akeeba Ticket System.
Displayed in the Joomla! Plugin Manager as Akeeba Ticket System - Custom fields
You must enable this plugin when using the custom fields feature of Akeeba Ticket System. This plugin is used by ATS to render the custom fields when filing a new ticket and displays the custom fields when viewing the ticket.
| Note |
|---|---|
|
This plugin is NOT availabe in Akeeba Ticket System Core. |
Displayed in the Joomla! Plugin Manager as Akeeba Ticket System - Delete Manager Notes on ticket close / unpublish
This plugin allows you to delete the manager notes from
tickets when they get closed or unpublished. It makes the
deletnotes CRON command available when set up
to do so.
This might be a requirement for EU GDPR compliance. If you collect personally identifiable or confidential information in Manager Notes -- such as social security numbers, login credentials etc -- you have to delete them when you no longer need them to fulfil the request of your client. Obviously, when a ticket is closed or unpublished we can reasonably assume that the request of the client has been fulfilled therefore there is no legal basis for keeping this information in the ticket system. This plugin can automatically delete that information either immediately at ticket close / unpublish or after the fact for all closed / unpublished tickets.
The options for this plugin are:
- Run on ticket creation
-
Should I automatically delete the Manager Notes as soon as a ticket is closed or unpublished?
- Make available as a CRON task
-
When enabled, it makes the deletenotes CRON command available to the CLI CRON script and the CRON URL of ATS. This command will delete the Manager Notes from all tickets which are already closed or unpublished, in batches of 100 tickets.
| Note |
|---|---|
|
This plugin is NOT availabe in Akeeba Ticket System Core. |
Displayed in the Joomla! Plugin Manager as Akeeba Ticket System - EasySocial avatar integration.
This plugin allows ATS to display the user's avatar using the EasySocial component. If you have EasySocial installed on your site and want to use the avatars provided by it for Akeeba Ticket System enable this plugin. DO NOT enable this plugin if you do not have EasySocial already installed on your site.
| Note |
|---|---|
|
This plugin is NOT availabe in Akeeba Ticket System Core. |
Displayed in the Joomla! Plugin Manager as Akeeba Ticket System - GeoLocation support.
This plugin allows you to record the geographic coordinates (location) of your users when they are filing a ticket and display that on a map for the support staff.
![[Warning]](/media/com_docimport/admonition/warning.png) | Warning |
|---|---|
|
It may be illegal for you to collect this information, with or without explicit consent. Please consult with your lawyer. |
The options are:
- Use W3C Geolocation API
-
When enabled, ATS will use the browser's geolocation feature. This is the preferred method on smartphones and other devices which have a built in GPS chip or otherwise can determine the user's exact location. Please note that due to browser restrictions this will only work if your site is using HTTPS and it will ask your users for explicit permission to share their location.
- Use GeoIP
-
When this is enabled, IP geolocation will be used as a fallback when the W3C Geolocation API is disabled above, not available on the user's browser or the user has declined sharing their location. This gets a rough location based on the IP address the user is accessing your site from.
- Maximum accepted accurace (metres)
-
All geolocation methods report their accuracy, i.e. the radius from the returned point on the map where the user may actually be. If the radius is above this value the location will be discarded. Use something really big, such as 500000, to practically accept any result.
- GeoIP source
-
How should I convert IPs to geographic location when the Use GeoIP option is enabled? You can either use a free only service or the Akeeba GeoIP Provider Plugin. The latter requires one of our other GeoIP-capable software (Akeeba Release System, Admin Tools Professional) to update the GeoIP database.
- Display map to
-
Who should see the map with the user's location? It can be just the support staff (default), both the staff and the ticket owner or everyone (NOT recommended!).
- Display map with
-
Which service should we use to render the map? Please note that Google Maps requires paying them to get a Google Maps API key you need to enter below.
- Google Maps API Key
-
If you are using the Google Maps display method you need to enter the API key for Google Maps here. Please note that you need to pay Google for this key.
- Internal field name
-
Under the hood, the geolocation is stored as an ATS "extra field" attached to the ticket. Enter the field name here. The default is
geolocationand should be fine unless you already have a field by the same name.
Displayed in the Joomla! Plugin Manager as Akeeba Ticket System - Gravatar integration.
This plugin allows ATS to display the user's avatar using the Gravatar service. We recommend leaving this plugin enabled at all times as it provides an excellent fallback if any other avatar methods do not return an avatar picture.
| Note |
|---|---|
|
In the original ATS release this was the only available avatar method. |
| Note |
|---|---|
|
This plugin is NOT availabe in Akeeba Ticket System Core. |
Displayed in the Joomla! Plugin Manager as Akeeba Ticket System - Fetch Email
This plugin allows your site to retrieve email from a mail
server and create new tickets or replies to existing tickets based
on your settings. It makes the mailfetch CRON
command available.
| Important |
|---|---|
|
This plugin only provides the infrastructure required to retrieve emails but does not automate the process, i.e. publishing it is required byt NOT sufficient to retrieve emails. You will need to create a CRON job, either using the CRON CLI script or the CRON URL. Please note that the System - Akeeba Ticket System reply by email plugin has been removed because it had inherent consistency issues when fetching email. If you are creating a CRON job use the
|
These are the parameters which allow users to reply or create new tickets by sending emails to your site. Please remember to enable the respective plugin or the CRON job script.
| Note |
|---|---|
|
Starting with Akeeba Ticket System 3.2.0 we are no longer using the legacy PHP IMAP extension to retrieve and parse email because it has not been maintained since the late 2000's and is no longer up to the task. Instead, we are using the Horde IMAP library which is written in pure PHP and does not require any PHP extensions. It's also faster and much more reliable. Nothing changes from your perspective. Unless you are using Gmail / G Suite. Because of changes made by Google to their server we can no longer offer the I am using GMail option and you can not keep on using Gmail / G Suite accounts over IMAP with regular password authentication either. This is NOT because of the library change explained above but because Google decided to discontinue support for a web standard. The reason we are now using the Horde library is that it's the only way we could support the only authentication method Google supports. It is very complicated to set up. |
- Reply by email
-
When enabled allows users to reply to their tickets by email.
- Only for managers
-
When enabled the Reply by email feature is only available for managers
- Create ticket by email
-
When enabled allows users to create new tickets by emails. Obviously, the user needs to send the email from the email address he used to register on your site.
Warning This is dangerous! A user with an auto-reply may cause an endless amount of tickets being created all the time. We strongly recommend NOT using this option.
- Track email UID
-
When enabled Akeeba Ticket System will track the unique identifier of each email message it has processed to prevent double posting of tickets e.g. when an error occurs after a new ticket is created but before it's marked as read / deleted. This is recommended to be enabled on production sites.
- Text version only
-
When enabled Akeeba Ticket System will try to retrieve the plain text version of the email and use it as the post content. If the user's mail client only sends an HTML version of the email this could cause empty tickets to be posted.
- Default category
-
The category where the new tickets created by the "Create ticket by email" feature will be placed.
- Mail server type
-
Your incoming mail server type (IMAP, POP3 or GMail).
If you are using a GMail / G Suite mail account please refer to the "GMail / G Suite Initial Configuration" section of this documentation.
- Mail server host
-
The hostname or IP address of your mail server
- Port
-
The port of your mail server
- Use SSL
-
If your server uses SSL set this to Yes
- Use TLS
-
If your server uses TLS set both this to either When Available or Always and also set Use SSL to Yes
- Validate certificates
-
If you have enabled Use SSL and Use TLS select this option to have ATS verify the SSL certificates presented by your mail server. If the certificates are self-signed this WILL fail. We recommend using this option only when your mail server is using a commercial SSL certificate.
- Username
-
The username you use to connect to your incoming mail server. Usually this is either your email address or the part of your email address before the @ sign. Please consult your email provider.
- Password
-
The password you use to connect to your incoming mail server.
- Mail folder
-
If you have an IMAP / GMail / G Suite mail server select the folder where the messages are stored. This is usually INBOX (all capital letters)
- API Client ID
-
Only applies if you are using a GMail / G Suite mail account. Please refer to the "GMail / G Suite Initial Configuration" section of this documentation.
- API Secret Key
-
Only applies if you are using a GMail / G Suite mail account. Please refer to the "GMail / G Suite Initial Configuration" section of this documentation.
- Authorize GMail
-
Only applies if you are using a GMail / G Suite mail account. Please refer to the "GMail / G Suite Initial Configuration" section of this documentation.
- Access Token
-
Only applies if you are using a GMail / G Suite mail account. Please refer to the "GMail / G Suite Initial Configuration" section of this documentation.
- Refresh Token
-
Only applies if you are using a GMail / G Suite mail account. Please refer to the "GMail / G Suite Initial Configuration" section of this documentation.
- Delete after post creations
-
Should the retrieved email messages be deleted from the server after the post/ticket has been created? If this is set to No then the emails are only marked as read. If you set this option to No we strongly advise that you set Track email UID to Yes.
- InstantReply on new ticket
-
Only applies when Create ticket by email is enabled. This feature will NOT send any replies if a plugin has already sent a reply to the ticket, e.g. the Akeeba Ticket System - Automatic Replies with the Run on ticket creation option enabled.
When this feature is enabled ATS will evaluate the InstantReply suggestions for the new ticket. If there is at least one InstantReply suggestion it will send a reply to the ticket using the virtual "System Task" user with a list of the InstantReply suggestions and a prompt to consider them first.
You can control the text that will be added before and after the list of InstantReply suggestions through the language strings COM_ATS_INSTANTREPLY_EMAIL_BEFORE and COM_ATS_INSTANTREPLY_EMAIL_AFTER. You can customise these language strings using Joomla's language override feature. Make sure you override them for both the front- and the backend of your site.
This feature is enabled by default. Even though the effect of an immediate reply to a ticket may be slightly jarring to some users it also reduces the amount of work for the support staff and increases the likelihood that the user will be able to resolve their own issue faster, without help from a human.
Please note that tickets filed by email which are sent an InstantReply post through this feature DO NOT count as "Spared tickets" in the graph appearing in the Control Panel page of Akeeba Ticket System.
Starting March 2020 we have removed the I am using Gmail checkbox from our software due to a change in Google's Gmail and G Suite email services.
If you want to use a Gmail or G Suite email account with Akeeba Ticket System you will need to undergo the following process once per site and email address you want to use with Akeeba Ticket System.
Please keep in mind that this is not a limitation of Akeeba Ticket System. It is a consequence of changes effected by Google without prior notice or an easier alternative, as explained in detail in the Frequently Asked Questions below.
Overview
Akeeba Ticket System needs to retrieve your emails from the mail server and process them for the Reply by Email and New Ticket by Email features to work. The standard way to do that is connecting to your mail server with either the IMAP or the POP3 protocol using a username and a password for authenticating (logging into) the server. For most mail server the username is your email address and the password is, well, the password you use to login to your email account.
Starting in the early 2010's, Google introduced Two Factor Authentication (TFA) for its Gmail and G Suite Mail accounts (collectively called “Gmail” in this documentation). Due to the higher security standard inherent to TFA it was no longer possible to use your password for IMAP / POP3 authentication. They introduced application-specific passwords.
Starting in 2019 and enforced throughout 2020, Google completely discontinues standard IMAP password authentication, either with a regular password (for non-TFA accounts) or an application-specific password (for TFA accounts). Instead, they have migrated to a proprietary authentication method called XOAUTH2.
Instead of entering your email address and your password / application-specific password you need to instead login to your Google account associated with your Gmail mail account in your browser. Google will send back to your site two long pieces of text called tokens.
The [Definition: Access Token] is what is used for authenticating to IMAP. It is also set to expire frequently, approximately once every hour. The second token is called the [Definition: Refresh Token] and can be used to request a new Access Token when the current Access Token has expired.
What this oversimplified overview doesn't address is that tokens are not issued for your Gmail user account in general. In other words, they are not like app-specific passwords which were valid for any and all applications accessing Gmail. They are issued for your Gmail user account to an OAuth2 API application registered with Google – and only this application can ever use these tokens. This is meant to be a double assurance measure. On one hand, the Gmail user can revoke the API application's access to their Gmail account whenever they see fit, without having to change their Gmail password and disturb every other connected application. On the other hand, Google has a tight control over who can ask Gmail users for access to their email account.
Creating an OAuth2 API application
For reasons explained in the Frequently Asked Questions below it is ultimately not possible for Akeeba Ltd to create an API application which allows you to connect your Gmail account to your site without having to undergo this complicated process. You will need to create an API application yourself, free of charge, in Google Cloud Platform. You can then have Akeeba Ticket System use the connection information of that API application to request access to your Gmail account. This process only needs to be carried over once per Gmail account / G Suite organization.
| Important |
|---|---|
|
The information under the “Creating an OAuth2 API application” section are provided for information purposes only. They are not meant to be definitive. They are subject to change without prior notification by Google. If you find that the steps have significantly changed since the publication of this document please contact Google for support. Google requests that third parties, like us, do not provide support for its products. As a result we are NOT allowed to help you with your Google Cloud Platform issues. |
Creating an OAuth2 API application
First, you need to go to Google Cloud Platform. Make sure that you are logged in with the correct user account, depending on what you want to connect to your Akeeba Ticket System installation:
-
If you are going to connect your Gmail account (@gmail.com) you must be logged in with the same Gmail account you are going to connect.
-
If you are going to connect a G Suite email account you must be logged in as an administrator of the same G Suite organization where the email you want to connect is registered with.
Check the currently logged in account the same way as you do in all Google web products, from the icon at the top right corner of your screen.
Enable Google Cloud Platform for your Google account
This is described in Google's Getting Started page. The takeaway is that you may have to enable billing even though what you are going to be using is free of charge. That's a weird requirement of Google and is ABSOLUTELY NOT under Akeeba Ltd's control. Thank you for your understanding.
Create an API project
From the top of the page, next to the “Google Cloud Platform” text, there is a dropdown with your projects.
Show the projects management popup

Click on it to display the projects management popup.
Projects management popup
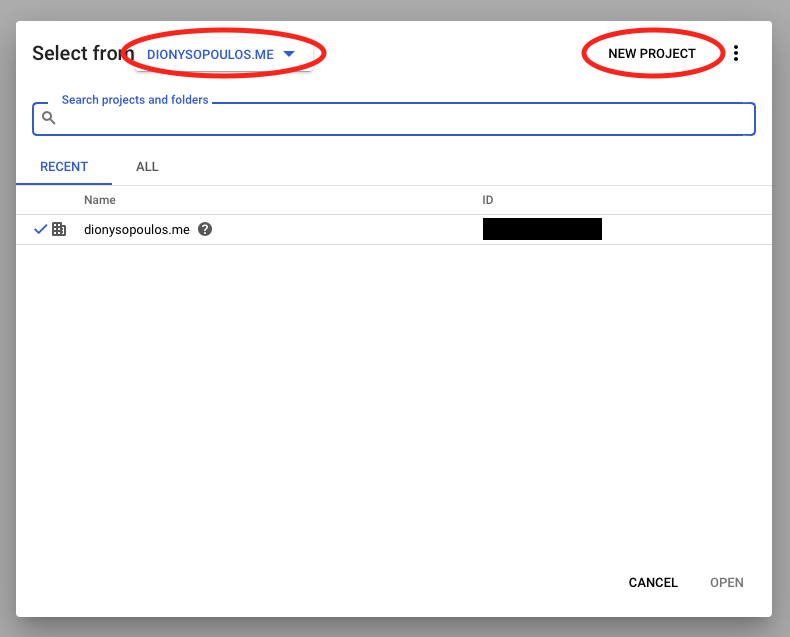
From the leftmost popup make sure that you select your G Suite organization. This does not apply if you are using your personal Gmail account.
Then click on the NEW PROJECT button in the top, right hand corner of the page.
New project, first step
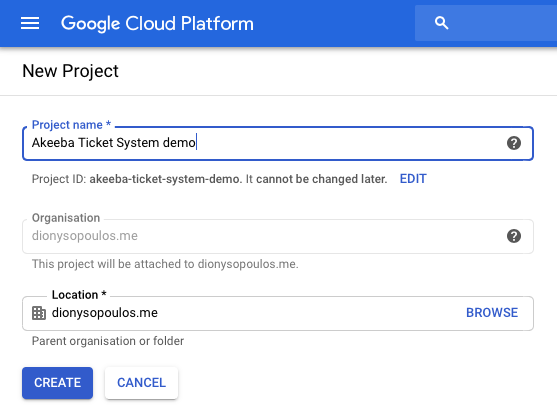
In the Project name field enter something descriptive, e.g. “Support System Integration”. This is just for you. Keep it short.
Click on the blue button.
Wait for a few seconds until Google informs you that the project has been created.
Enable the Gmail API on your API project
| Note |
|---|---|
|
Yes, this also applies if you are using G Suite. As far as Google is concerned, Gmail and G Suite email are one and the same. |
Navigating to the APIs & Services Library
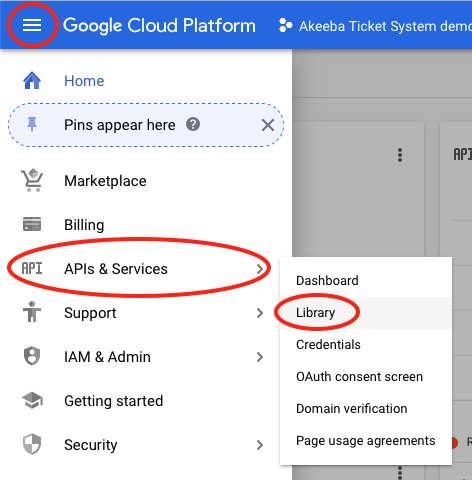
From the new page click on the hamburger menu icon, hover over APIs & Services and click on Library.
The APIs & Services Library page
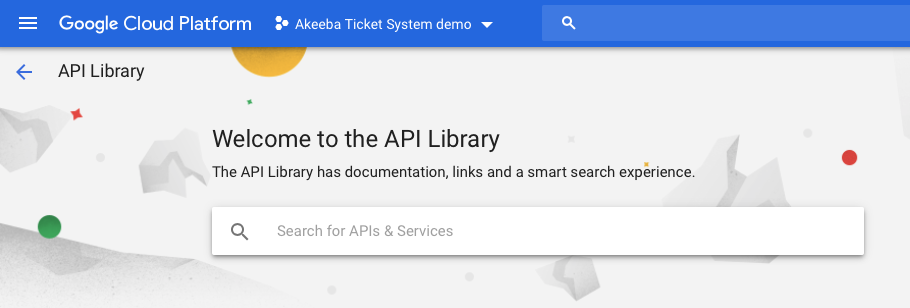
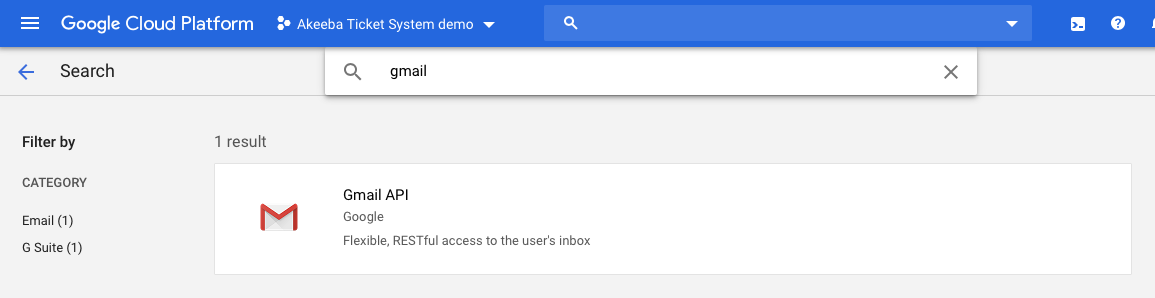
In the APIs & Services Library page click on the "Search
for APIs & Services" and type
gmail
After a few moments you will see only one result called “Gmail API”.
The Gmail API result
Click on it.
The Gmail API page
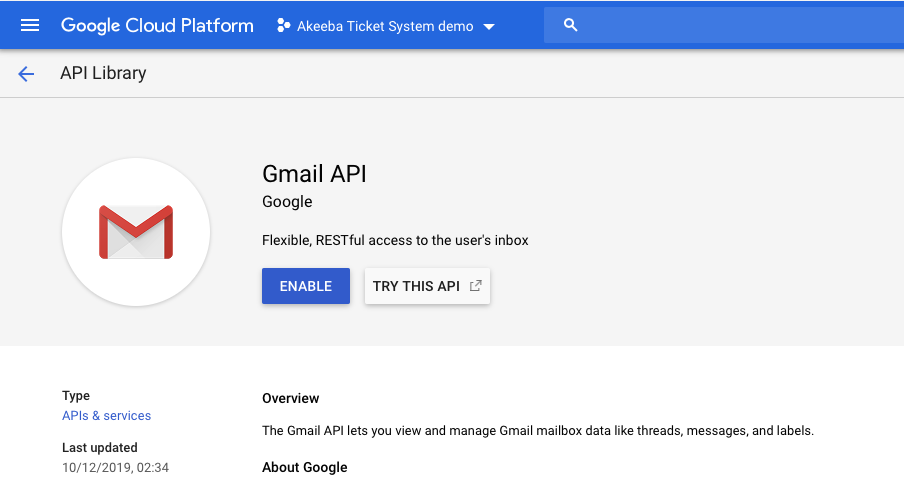
Wait a few moments for the button to appear. Then click on the button and wait until its control panel page appears.
The Gmail API control panel page
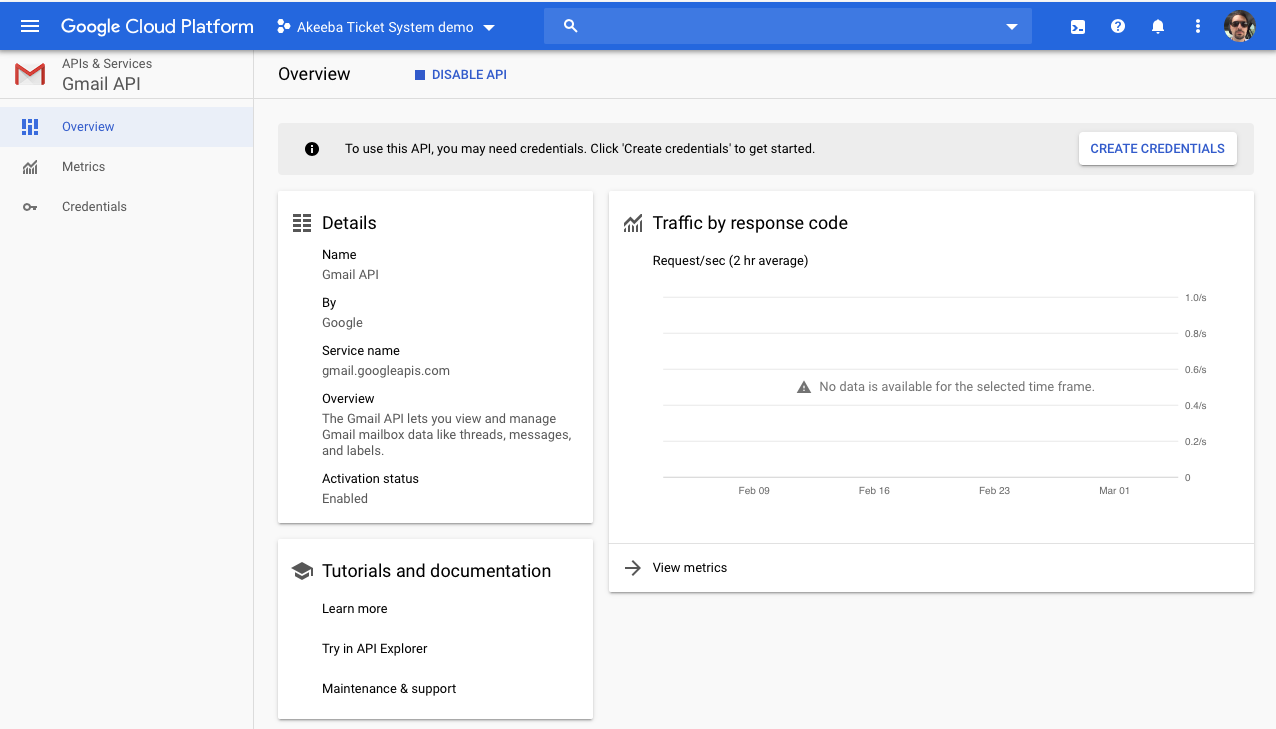
Create an OAuth2 consent screen
Navigating to the APIs & Services Consent Screen
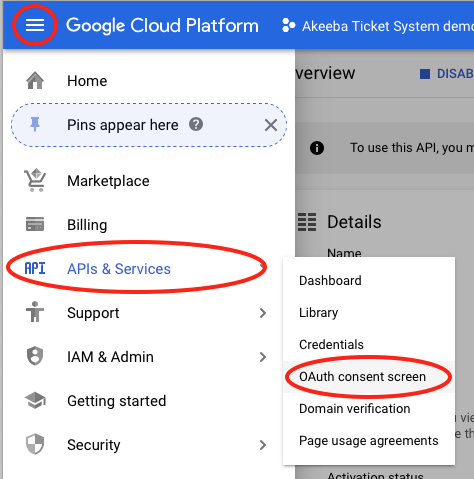
From the new page click on the hamburger menu icon, hover over APIs & Services and click on OAuth Consent Screen.
Setting up an Internal project
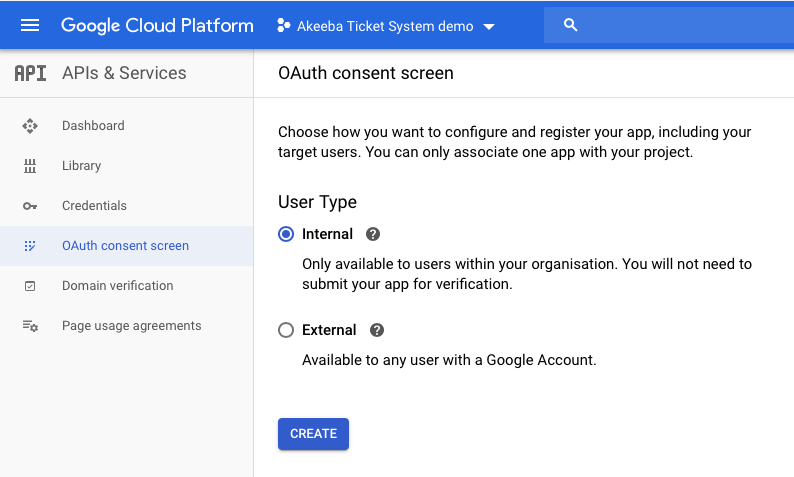
In the new page select Internal as your project type.
| Important |
|---|---|
|
You MUST select Internal. This project type only allows your personal Gmail address / any email address in your G Suite organization to be authorized. This is what you want and the only way that you will not need to go through Google's verification process. If you accidentally select External you will need to go through the verification process which will take a massive amount of time and effort on your part only to be _declined_ since you don't have a valid use case for an External project that allows anyone, with any Gmail / G Suite email address, to authorize your application to access their account. |
Click on the blue button to proceed.
OAuth2 consent page setup, top section
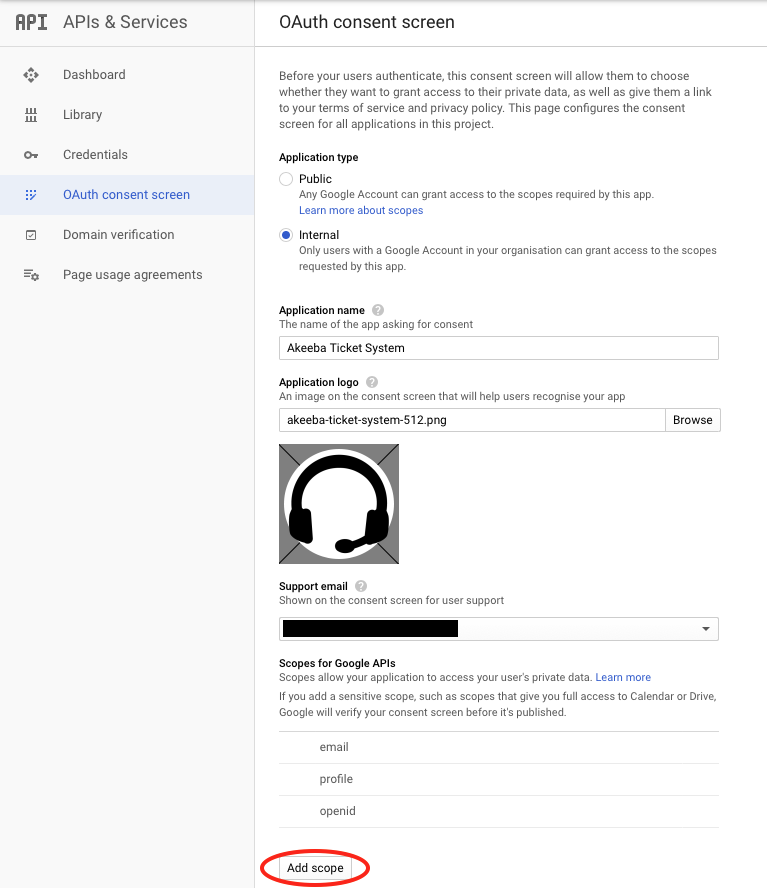
In the new page enter an Application Name. This will be displayed when authorizing Akeeba Ticket System to your Gmail account. We recommend entering something along the lines of “ATS on example.com” where example.com is the domain name of your site.
In the Application Logo select any square image over 128x128 pixels. You can use your logo, for example.
Then click on the Add scope button. This opens a popup dialog.
OAuth2 scope popup
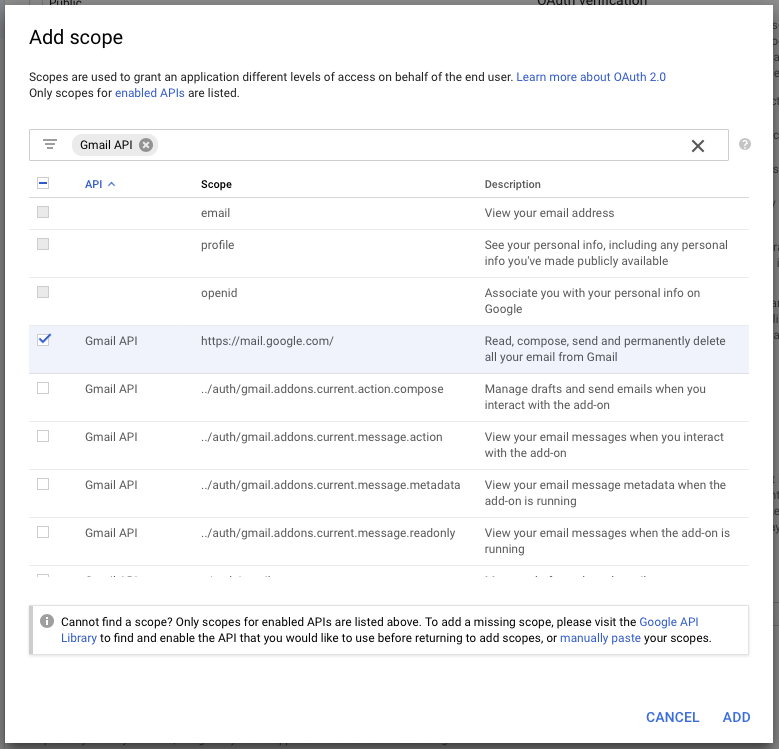
In the search box at the top enter Gmail
API to filter the results.
From the list below select the Gmail API entry with the Scope https://mail.google.com/
| Note |
|---|---|
|
Yes, this also applies if you are using G Suite. As far as Google is concerned, Gmail and G Suite email are one and the same. |
Click on the button.
OAuth2 consent page setup, bottom section
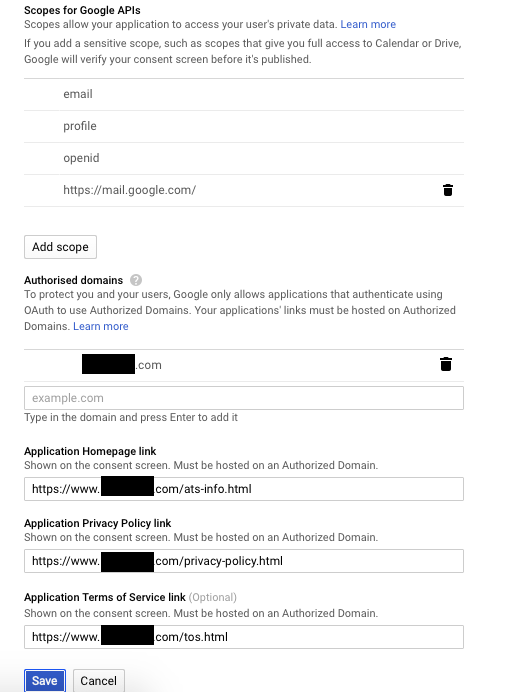
Under Authorized Domains enter your
site's domain name. It is VERY important
that the domain name you enter here matches EXACTLY the site you
are going to be using to link Akeeba Ticket System with your email
address. Do remember that www.example.com
and example.com are different
domains.
| Note |
|---|---|
|
If you have not yet linked the domain name to your Google Cloud Platform account you will be asked to do so. The easiest way is to be using Google Analytics on your site. |
In the Application Homepage Link enter
the URL to your site. It is VERY important
that the domain name in this URL matches EXACTLY one of the
Authorized Domains you set up above. Do remember that
www.example.com and example.com are
different domains.
In the Application Privacy Policy Link
enter a URL on your site. This can be a dummy page, as long as it
doesn't return a 404. It is VERY important
that the domain name in this URL matches EXACTLY one of the
Authorized Domains you set up above. Do remember that
www.example.com and example.com are
different domains.
You don't need to enter an Application Terms of Service Link.
Finally click on the button.
Get your API credentials
Navigating to the credentials page
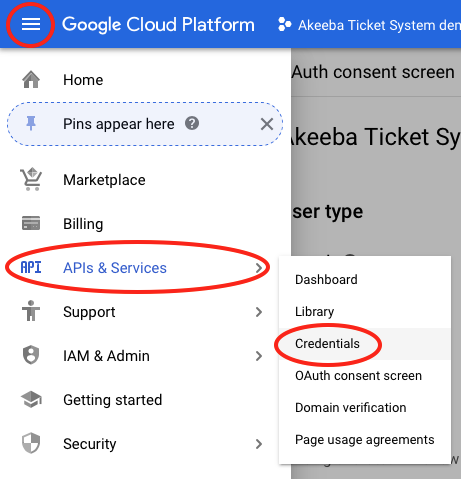
From the new page click on the hamburger menu icon, hover over APIs & Services and click on Credentials.
The credentials page
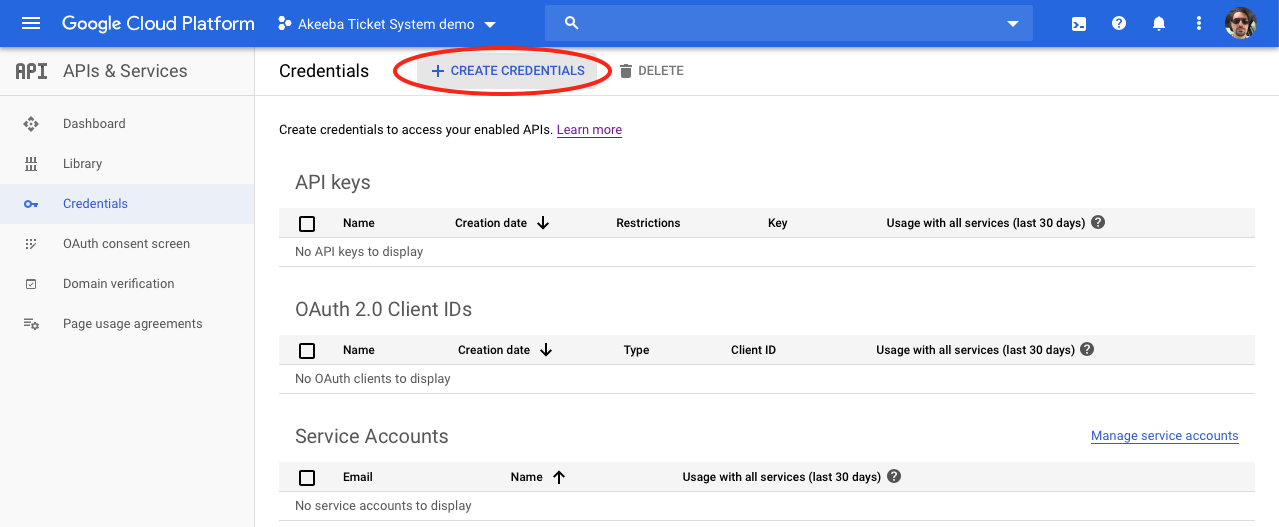
On the credentials page click on at the top of the page.
New credentials popup
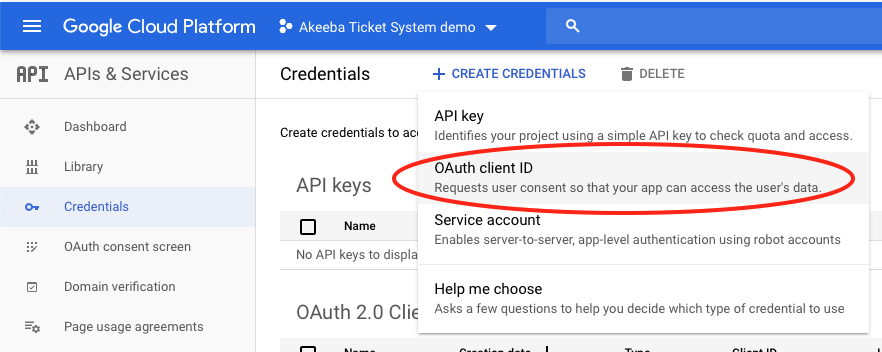
From the drop-down, select OAuth client ID.
New credentials setup page
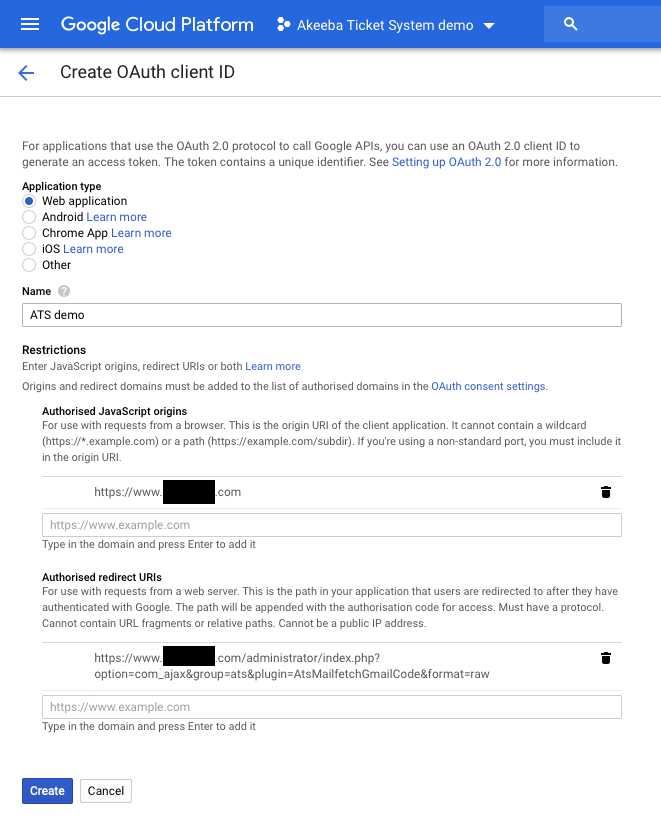
Select the Web Application under Application Type.
Enter any Name you want; this is only for your convenience.
Under Authorized JavaScript origins
enter your site's URL, e.g. https://www.example.com. It is VERY important that the domain name in this URL
matches EXACTLY one of the Authorized Domains you set up in the
OAuth consent page setup earlier. Do remember that
www.example.com and example.com are
different domains.
The Authorized Redirect URIs is the
most important part of this process. It needs to be your site URL
plus
/administrator/index.php?option=com_ajax&group=ats&plugin=AtsMailfetchGmailCode&format=raw
For example, if your site is
http://www.example.com/mysite you would need to
enter
http://www.example.com/mysite/administrator/index.php?option=com_ajax&group=ats&plugin=AtsMailfetchGmailCode&format=raw
| Warning |
|---|---|
|
If you get this URL wrong you will NOT be able to connect Akeeba Ticket System to your email address. You will get an error 400 from Google. If that happens to you, you will need to come back to this page and fix the Redirect URI. |
Click on .
The API credentials popup
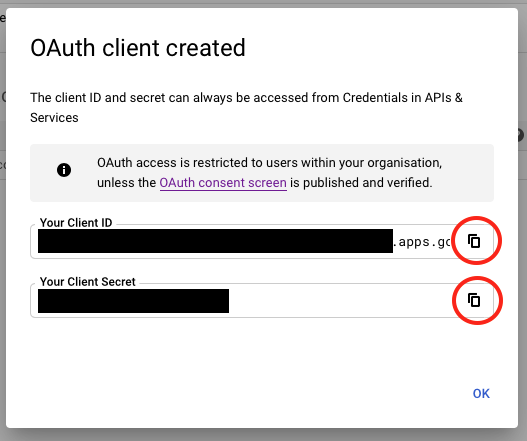
You will now see a popup with your API credentials. Before doing anything else copy these credentials to a safe place. You need to copy BOTH the Client ID AND Client Secret. Use the copy buttons next to each one to copy them to your clipboard, do NOT try to highlight them (you cannot highlight the entire Client ID).
Use your API credentials in Akeeba Ticket System
Go to your site's administrator backend.
Click on , from the top menu.
Find and click on the Akeeba Ticket System - Fetch Email plugin.
Editing the Akeeba Ticket System - Fetch Email plugin
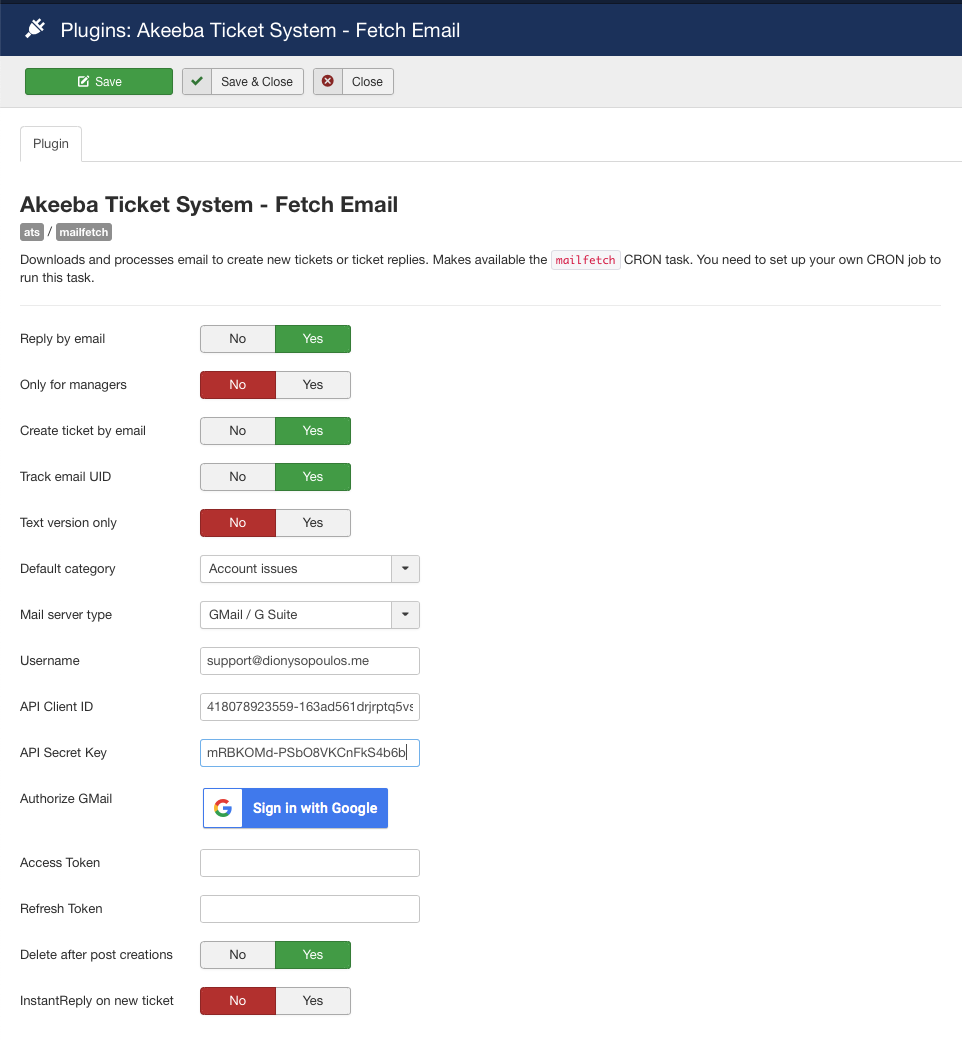
On the screen, under Mail server
type please choose GMail / G
Suite
Under Username enter your email address.
| Important |
|---|---|
|
The email address you enter here MUST be the same one you will be authorizing in the next couple of steps. Otherwise ATS will be unable to retrieve any email. |
In the API Client ID field paste the Client ID you copied from Google Cloud Console in the steps further above.
In the API Secret Key field paste the Secret Key you copied from Google Cloud Console in the steps further above.
Next to Authorize GMail there is a button. Click on it. A popup opens.
Gmail popup, select an account
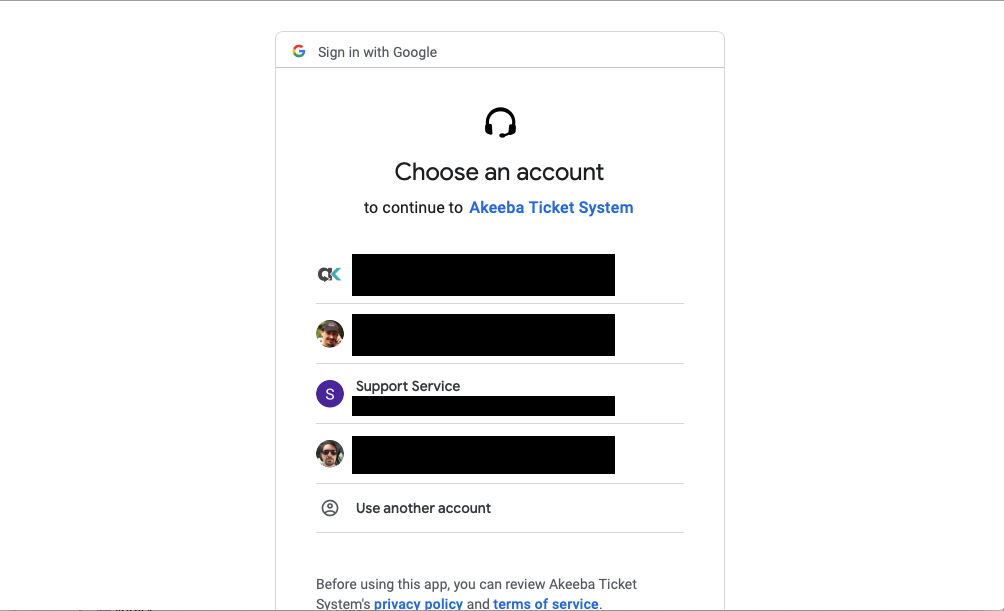
Select the email account you want to link to Akeeba Ticket System. It must match exactly the email address you typed in the Username field in the plugin configuration page.
Gmail popup, final authorization
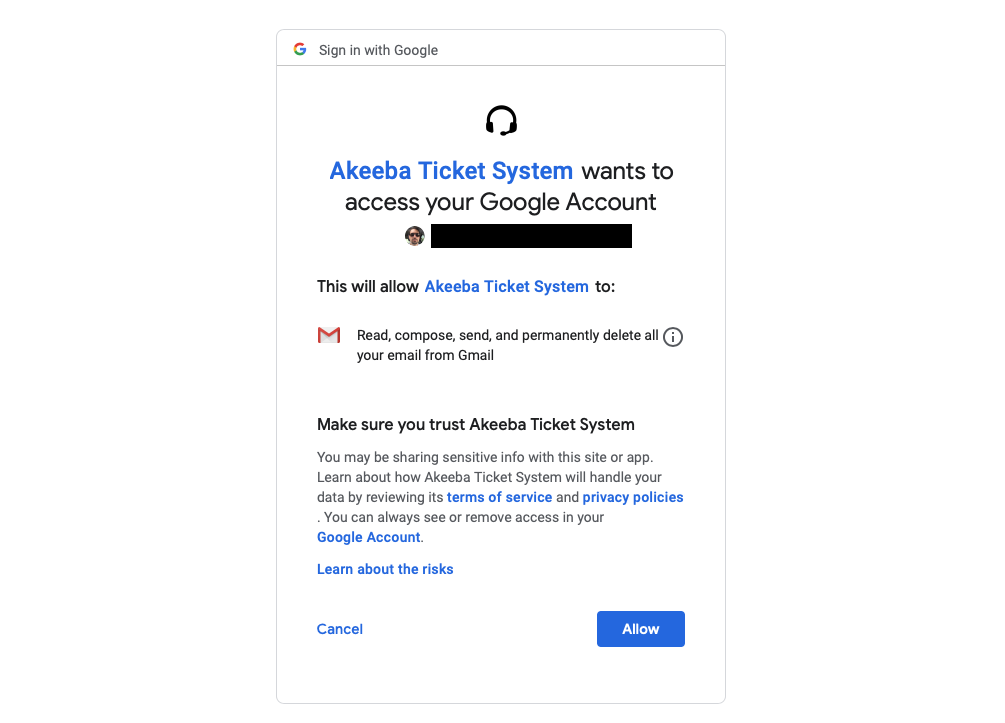
Click on to complete the link.
The popup will redirect back to your site and you will see a "One moment please" message momentarily. The popup will automatically close and the Access Token and Refresh Token fields will be filled in.
Now click on in the toolbar. You are done.
| Important |
|---|---|
|
If you have multiple sites DO NOT copy the Access Token and Refresh Token between them. It will NOT work. |
Possible error on the popup: You are not authorized to view this resource
Have you entered the Client ID and Secret Key before clicking the Login with Google button?
Are the Client ID and Secret Key correct, created for a web application OAuth2 flow as described above and they really, really, REALLY belong to the API application you created on Google Cloud Platform? Before dismissing this question as too basic – these are examples of mistakes made writing this documentation.
Has the user you are currently logged in with adequate Joomla privileges to edit the plugin options?
If you answered yes to all of the above then probably your Joomla session is broken. Log out from Joomla, log back in and try again.
Possible error on the popup: Google error 400
Error 400 on the popup
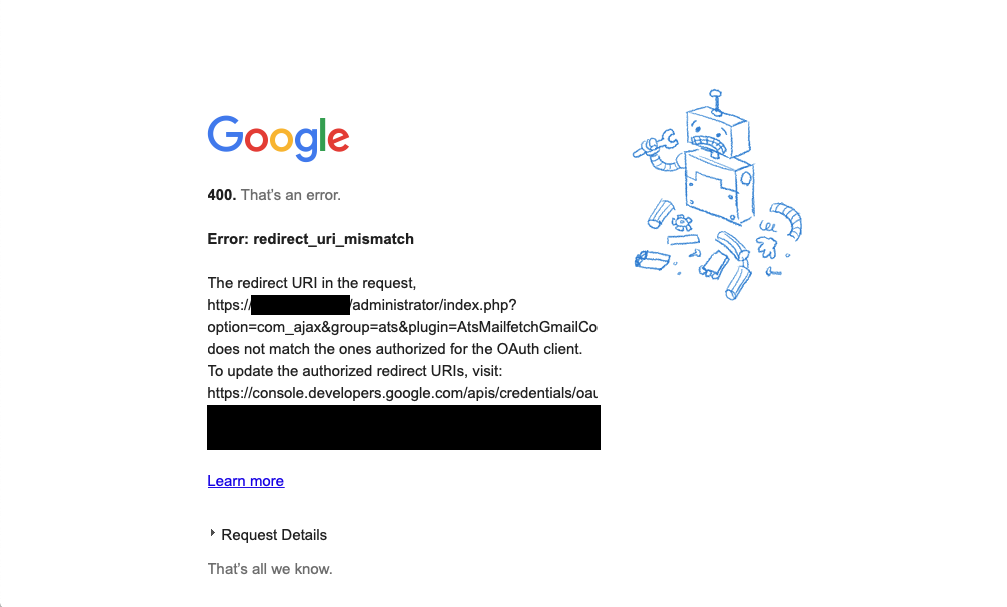
If you receive an error 400 _from Google_ when the popup first opens the problem is that you have not entered the correct Authorized Redirect URIs as explained under “Get your API credentials”.
Please correct the redirect URL and try again.
Possible error on the popup: 403, 404 or Joomla error page
You might get an error 403 or 404 or a Joomla error page in the popup after you confirm that you want to link your email address to your application.
The problem is that your server is rejecting Google's
redirection URL because it contains the URL parameter
scope=https://mail.google.com/. As you can see,
Google includes a full, unencoded URL which might trigger the
server's protection.
If you are using our Admin Tools software and its .htaccess Maker, NginX Conf Maker or Web.config Maker feature please go to Components, Admin Tools, click on the .htaccess Maker, NginX Conf Maker or Web.config Maker button (depending on what you are using on your site) and set Protect against common file injection attacks to No. Then click on Save and Create .htaccess. Now you can retry linking your mail account to Akeeba Ticket System. After you're done you can set that option back to Yes if you want.
If you are not using Admin Tools or that did not help please contact your host. They might have to make a server configuration change, e.g. disable an Apache ModSecurity2 server protection rule.
- 1.1. Why did you remove the old Gmail integration? It seemed to work fine.
- 1.2. Other applications don't require me to go through that process to login to Gmail / G Suite. They just show a consent page. Why didn't you implement something like this?
- 1.3. I am not a G Suite admin (e.g. I am a site integrator working on behalf of my client). Can I set up Akeeba Ticket System to use the G Suite account?
- 1.4. I do not have access to my client's Gmail account. Can I set up Akeeba Ticket System to use their Gmail account?
- 1.5. I believe there is an easier way to connect to Gmail / G Suite email
- 1.6. How about the security, privacy and GDPR compliance of this integration?
- 1.7. Can I forward my Gmail / G Suite emails to a different account and access that account over IMAP / POP3 instead?
| |
1.1. | Why did you remove the old Gmail integration? It seemed to work fine. |
Yes, it did work fine. However, Google decided to phase out the IMAP password authentication for Gmail and G Suite mail. This means that starting June 2020 it no longer works fine – it doesn't work at all. Implementing XOAUTH2 is a requirement imposed by Google, not Akeeba Ltd. If you are unhappy with that please let them know; we have done so already. | |
1.2. | Other applications don't require me to go through that process to login to Gmail / G Suite. They just show a consent page. Why didn't you implement something like this? |
This is exactly the approach we initially pursued. However, Google wouldn't allow us to do it. As explained earlier, Access and Refresh Tokens are issued to an API application registered with Google. There are two kinds of applications. An Internal application – like the one created with the process explained above – only allows getting tokens for an email account that is the same as the one creating the account (Gmail) or belongs to the same organisation (G Suite). This wouldn't work for our clients. This meant that we had to create the other kind of API application, an External one. The External application is able to request tokens for any Gmail or G Suite account. However, External applications need to be verified by Google. Normally, External applications are used for desktop applications, mobile apps or hosted web services. Akeeba Ticket System is none of the above. It's a self-hosted web application meant to be installed on your sites. The tokens are meant to be stored on our clients' sites, not our server. The emails are retrieved directly by our clients' sites, not through our server. However, Google requires us to host an application on our domain to retrieve the Access Token and, when it expires, exchange the Refresh Token with a new Access Token. The only solution to that is something similar to what desktop / mobile apps like Thunderbird or Microsoft Outlook for Android do – or like what we are already doing in Akeeba Backup to integrate with Google Drive: a "mediator" application. That's a barebones application hosted on our site which handles the OAuth2 consent flow, retrieves the Access and refresh Tokens and conveys them to your site, without storing them on our server. This guarantees your privacy. We wrote and tested that code and submitted our External API application to Google for verification. Unfortunately, Google decided to decline the verification of our Extenal API application on the grounds that the site processing the email is not the same as the domain name registered with the application. Therefore they are rejecting the use case of a self-hosted ticket system using an easy method for authenticating to Gmail / G Suite. Google gave us only one alternative: have an unverified application which could be whitelisted by G Suite administrators manually. This alternative is bad for two reasons. First and foremost, it makes it impossible for Gmail clients (with an @gmail.com email address) to use Akeeba Ticket System; that's the majority of our clients interested in connecting Akeeba Ticket System with a mail account hosted by Google. Second, the manual whitelisting process is just as complicated as creating your own Internal API application. This left us with two options. One, we would have to stop supporting Gmail / G Suite in Akeeba Ticket System. Two, we would have to make you create your own Internal API applications with Google since they do not require going through the verification process. We chose the latter as the lesser of two evils. We are fully aware that this process is complicated and hostile to the users. We did raise that point with Google, repeatedly, throughout the onerous verification process. Unfortunately, Google does not want to consider software like Akeeba Ticket System as valid consumers of email. In other words, email accounts hosted by Google come with artificial limitations imposed by Google. They are not real email accounts that can be used for any purpose their owners see fit. They are crippled by anti-features which are controlled by a commercial entity's opaque and arbitrary decision making process. We strongly recommend not using a Google-controlled, crippled email account whenever possible. If your organisation / client is tied to G Suite then you will have to go through the complicated process of creating an Internal API application. Unfortunately, we can't be of much help because Google doesn't want third parties providing support for its products either. Worse, yet, because of the nature of an Internal API application we cannot perform that process for you, not for free or even for a fee; it would require administrator access to your Gmail / G Suite account that you cannot reasonably provide and we cannot possibly accept to be given for reasons that have to do with GDPR and similar privacy legislation. | |
1.3. | I am not a G Suite admin (e.g. I am a site integrator working on behalf of my client). Can I set up Akeeba Ticket System to use the G Suite account? |
No, you can't. That's a limitation due to Google's decision not to authorize our External project as described above. | |
1.4. | I do not have access to my client's Gmail account. Can I set up Akeeba Ticket System to use their Gmail account? |
No, you can't. That's a limitation due to Google's decision not to authorize our External project as described above. | |
1.5. | I believe there is an easier way to connect to Gmail / G Suite email |
Yes, you are right, there is. Unfortunately, Google denied verification for it. See the long explanation above. | |
1.6. | How about the security, privacy and GDPR compliance of this integration? |
Your OAuth2 API application information (client ID and secret key) and your access and refresh tokens are **only** stored on your own site, as plugin parameters. They are NOT shared with Akeeba Ltd or any other third party, nor do they ever leave your site. This means that you have perfect privacy of your support tickets. Regarding security, your information is as secure as your Joomla! site itself. If your site gets hacked you should unlink your email address from your API application, disable the OAuth2 API credentials of your API application and create new ones, then relink ATS to your email account. A more secure alternative is forwarding your emails to a non-Gmail, non-G Suite email account that's accessible over regular IMAP with password authentication. In case of compromise you can simply change the password of that account and be done with it. As for GDRP, CCPA and similar privacy legislation – please ask your lawyer. We cannot give a legal opinion. Our non-legal advice is that you should disclose that the emails sent to a particular email address are automatically processed by software running on your site for the purpose of creating new support tickets or replies to existing ones. If that has other privacy implications, e.g. third parties employed by / affiliated with your site have access to the ticket system, that should be disclosed as well. Again, it's best to ask a qualified lawyer. | |
1.7. | Can I forward my Gmail / G Suite emails to a different account and access that account over IMAP / POP3 instead? |
Yes, of course you can. Google has documented the automatic mail forwarding process already. Once you set up your automatic forwarding to a regular email account, e.g. one provided by your hosting company, you can connect ATS to that email account over IMAP / POP3. | |
| Note |
|---|---|
|
This plugin is NOT availabe in Akeeba Ticket System Core. |
Displayed in the Joomla! Plugin Manager as Akeeba Ticket System - New post notification emails.
This is a very important plugin. It is responsible for sending emails whenever a new ticket is created or a reply is sent to an existing ticket. Unless you have a very serious reason not to, we strongly recommend keeping this plugin published at all times.
| Note |
|---|---|
|
This plugin is NOT availabe in Akeeba Ticket System Core. |
Displayed in the Joomla! Plugin Manager as Akeeba Ticket System - Remove Obsolete Attachments
This plugin allows you to automatically delete attachments a
certain amount of time after they are sent. It makes the
removeattachments CRON command available when
set up to do so.
This plugin replaces the obsolete
ats-remove-attachments CLI script.
The options for this plugin are:
- Only closed
-
When enabled only attachments which are old enough and belong to already closed tickets will be removed. Otherwise all attachments, even from open tickets, will be removed if they are old enough.
- Maximum attachment age (days)
-
Attachments older than this many days will be deleted by the
ats-remove-attachments.phpCRON script
| Note |
|---|---|
|
This plugin is NOT availabe in Akeeba Ticket System Core. |
Displayed in the Joomla! Plugin Manager as Akeeba Ticket System - Social buttons.
This plugin allows visitors of your site to "like" and share your public tickets on various social networks including Facebook, Google+, Twitter and Pinterest. This is a handy feature to allow your users to easily share the public tickets with obvious SEO value.
| Note |
|---|---|
|
This plugin is NOT availabe in Akeeba Ticket System Core. |
Displayed in the Joomla! Plugin Manager as Akeeba Ticket System - Joomla! user groups integration
This plugin displays to your support staff the user groups each user belongs to. This information is printed under the username displayed along each ticket post.